Automator handover guide
This document is for a new maintainer taking over the Automator system. It covers what the system is, how it is built, how to install it from scratch, how to configure the network, and how to diagnose problems. No prior knowledge of the system is assumed.
For day-to-day user instructions, see HowToUseAutomator.md.
1. What this system is
Automator is a Raspberry Pi-controlled robotic imaging platform for QR-labelled Petri dishes at The Sainsbury Laboratory, Norwich. It combines a motion gantry, two cameras, a vacuum plate-handling mechanism, and a web-based controller into a single instrument.
The system has four main software/hardware layers:
- The Raspberry Pi runs the web server, the cameras, the imaging schedule, and the state machine. It is the central brain.
- The MKS Robin Nano V3.1 is a motion controller board that drives the stepper motors for the X, Y, and Z axes. It receives G-code commands from the Pi.
- Klipper is the firmware system linking the Pi and the MKS board. The Pi runs the Klipper host; the MKS board runs the Klipper MCU firmware.
- Moonraker is an API server on the Pi that exposes Klipper's functions over HTTP. The Automator controller calls Moonraker to send motion commands.
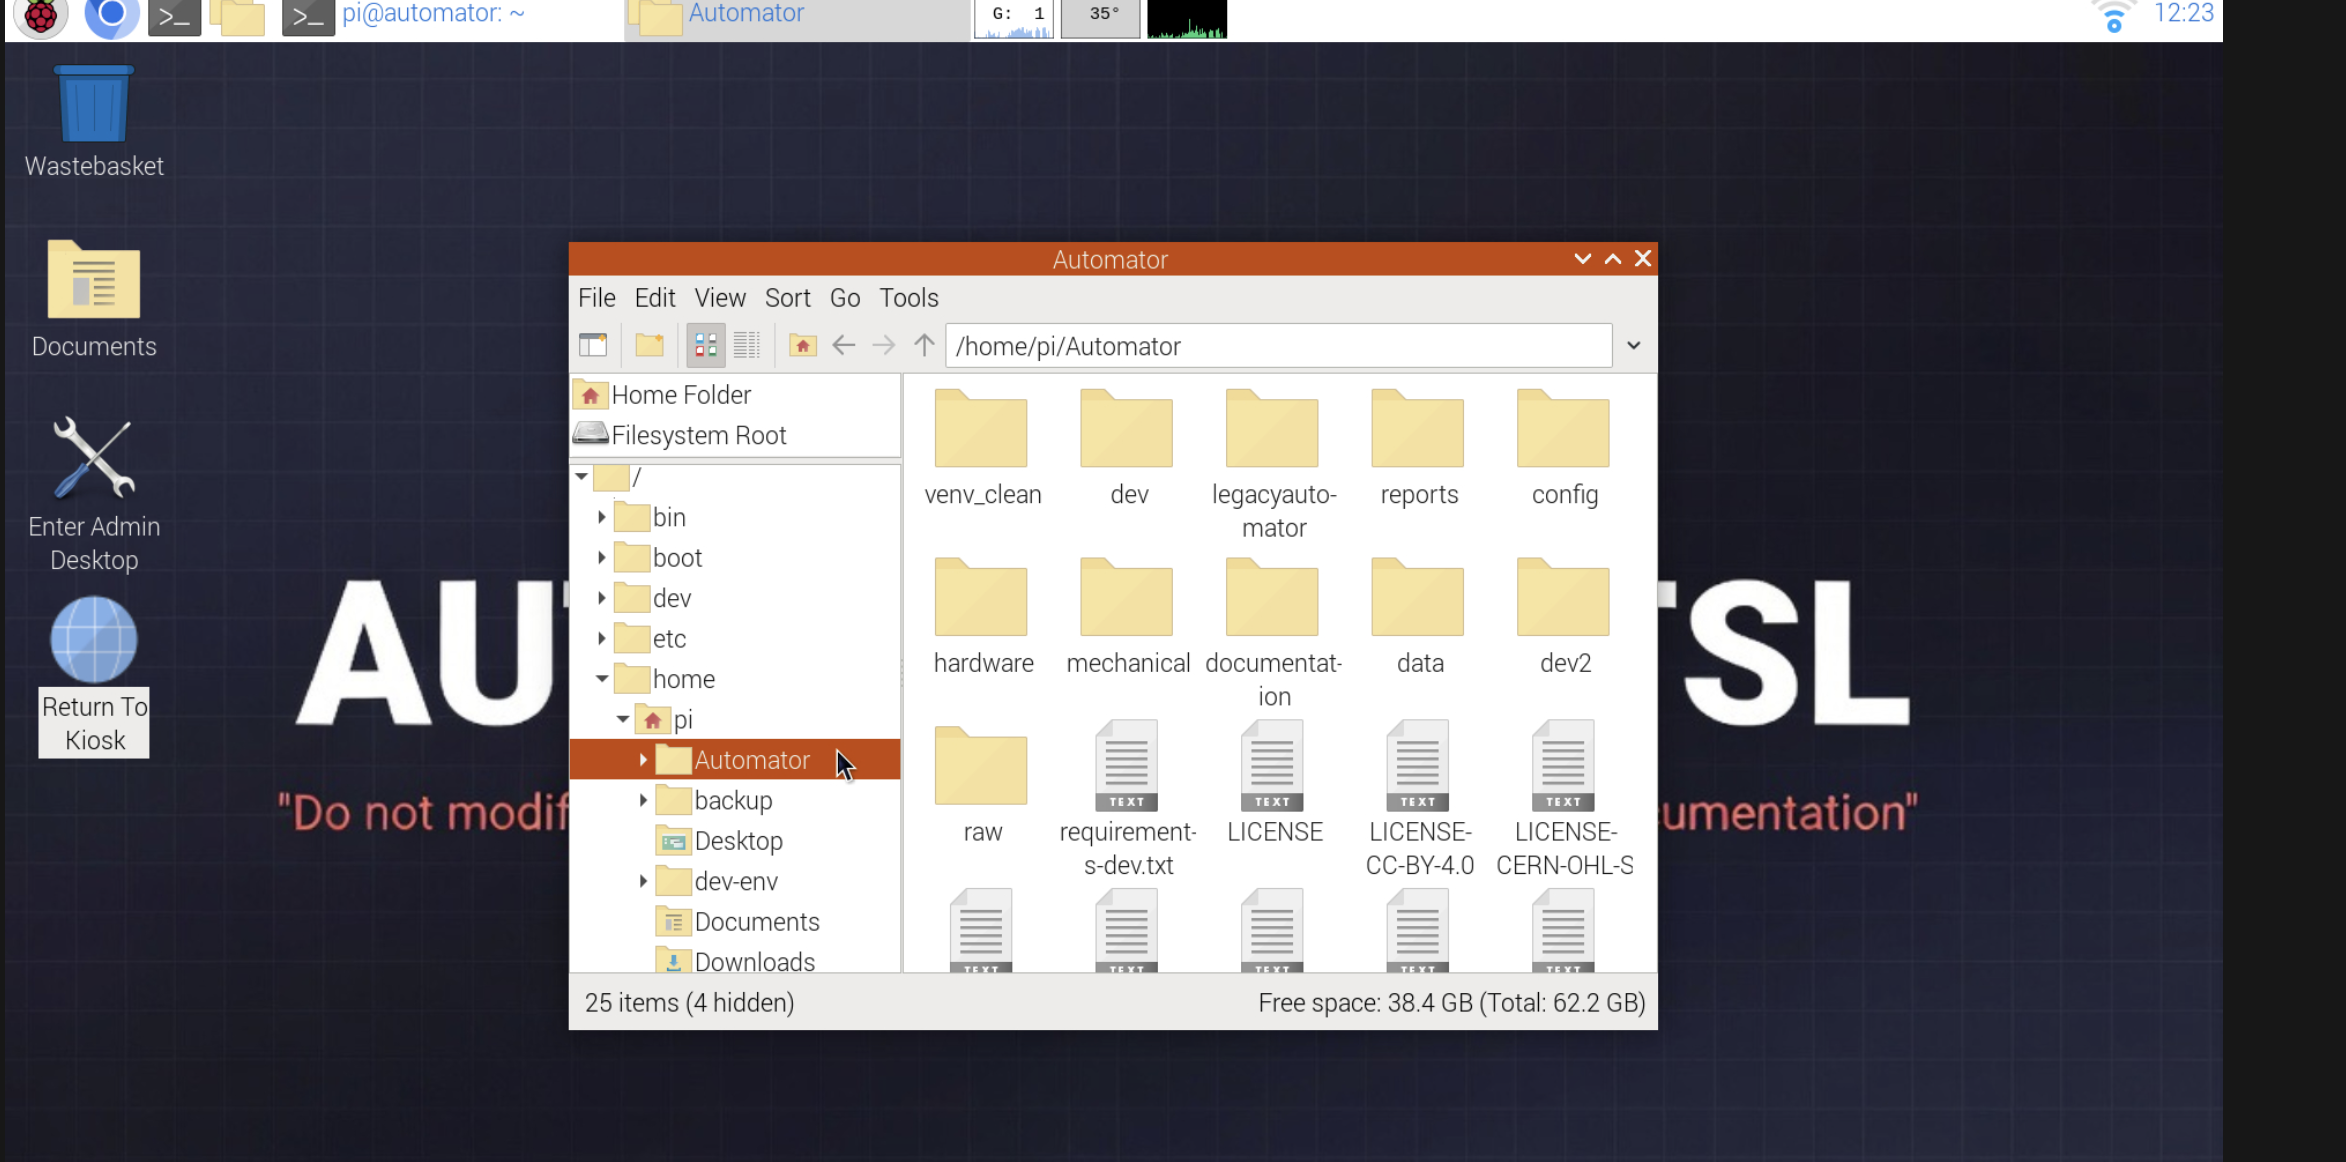
All code is stored at /home/pi/Automator/ on the Raspberry Pi. Within that directory, the main runtime files are in dev2/, images are written to data/, and runtime state files live in raw/.
2. Component guide
This section explains what each major component is, for a maintainer who is new to this hardware.
2.1 Raspberry Pi 4B
A Raspberry Pi is a small single-board computer about the size of a credit card. It was designed by the Raspberry Pi Foundation and runs a full Linux operating system. The 4B model used here has a Broadcom BCM2711 processor, 8 GB of RAM, and 64 GB of storage on a microSD card.
In Automator, the Pi does several things at once:
- Runs the Flask web server (the UI you see in a browser, on port 8080)
- Controls the high-resolution Pi camera via the CSI ribbon cable
- Controls the USB camera used for QR code scanning
- Communicates with the MKS board over USB serial (via Klipper/Moonraker)
- Manages GPIO pins for the door sensor, LED relay, and button listener
- Stores all images locally to
data/
The Pi uses two separate power supplies: a dedicated 5 V adapter for the Pi itself, and a separate 12 V supply for the rest of the electronics.
Normal operators access Automator in one of two ways, and should use only one at a time to avoid latency:
- Kiosk display — if a monitor, keyboard, and mouse are connected to the Pi, the system boots directly into a full-screen Chromium kiosk at
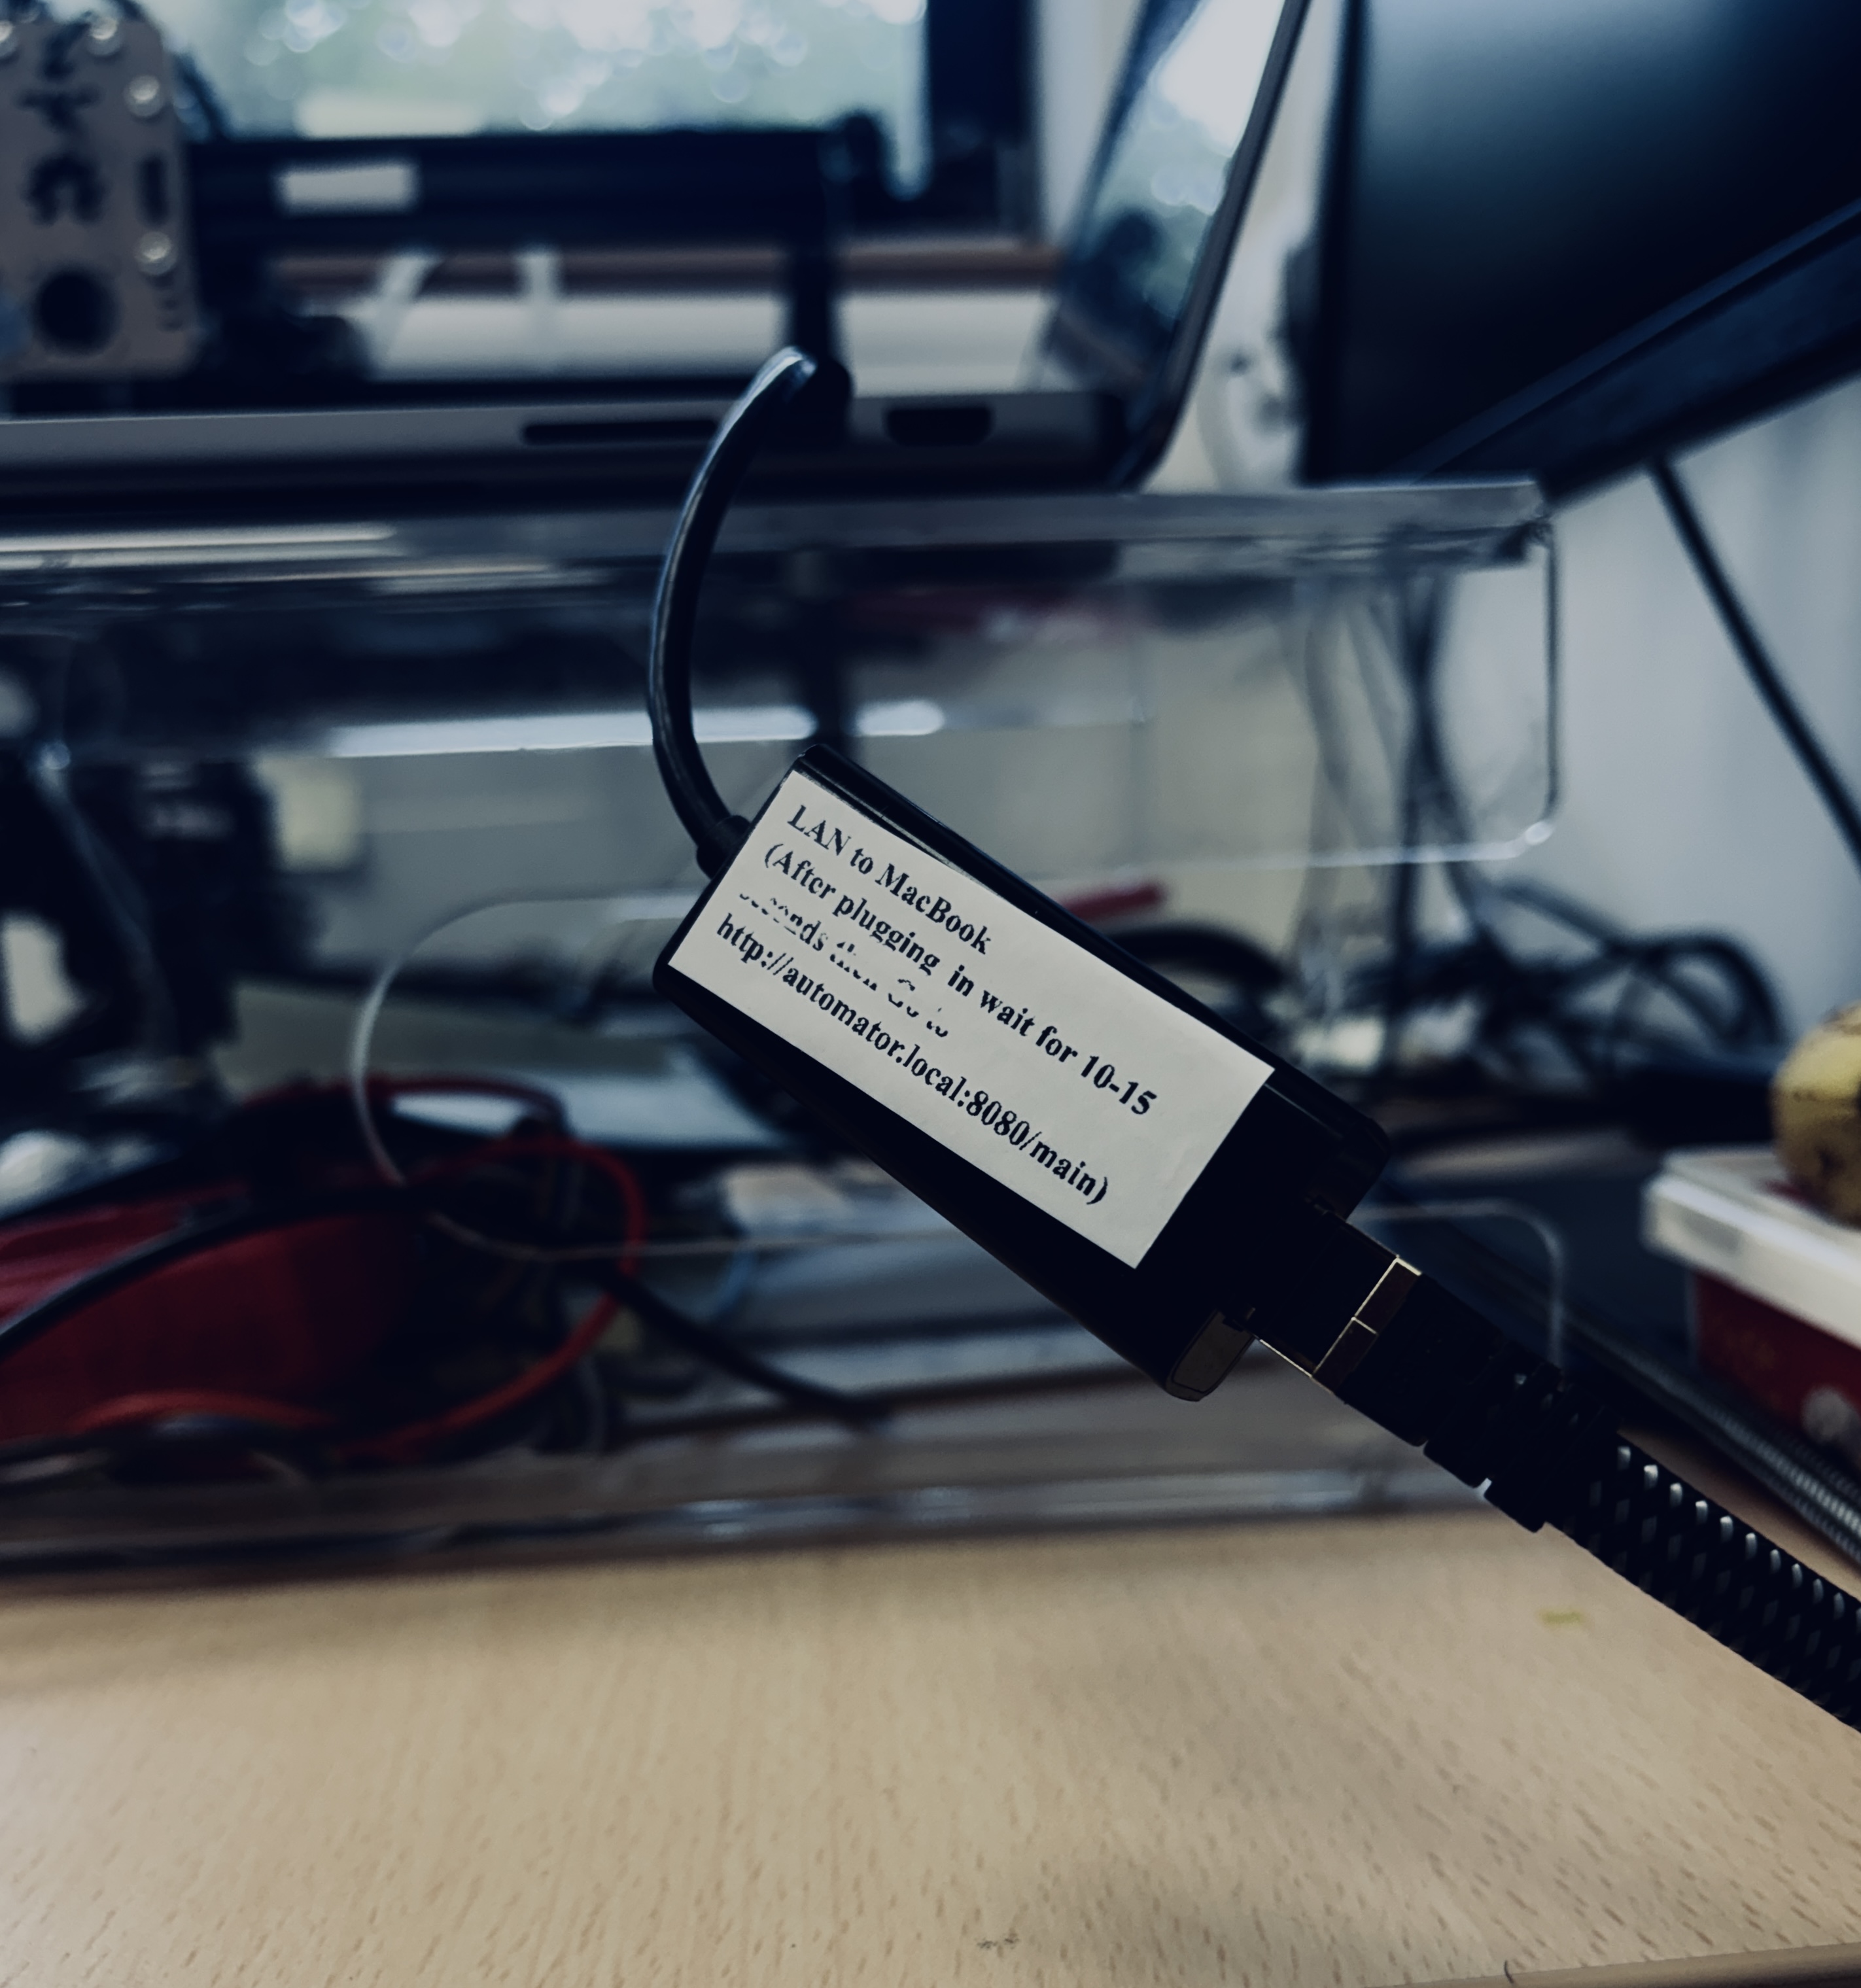
http://127.0.0.1:8080/. No MacBook or Ethernet cable is required. - Direct MacBook Ethernet — connect a MacBook with a USB-C to Ethernet adapter (plugs into the MacBook's USB-C port). The adapter must be set to Using DHCP (the default); the Pi assigns a
192.168.50.xaddress automatically via DHCP when in direct mode. Access viahttp://192.168.50.2:8080/.
Access from other network computers is not supported.
Web UI login credentials
| Field | Value |
|---|---|
| Username | admin |
| Password | tsl |
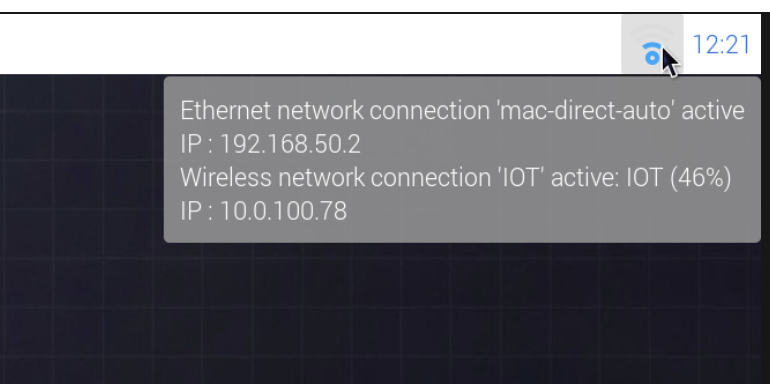
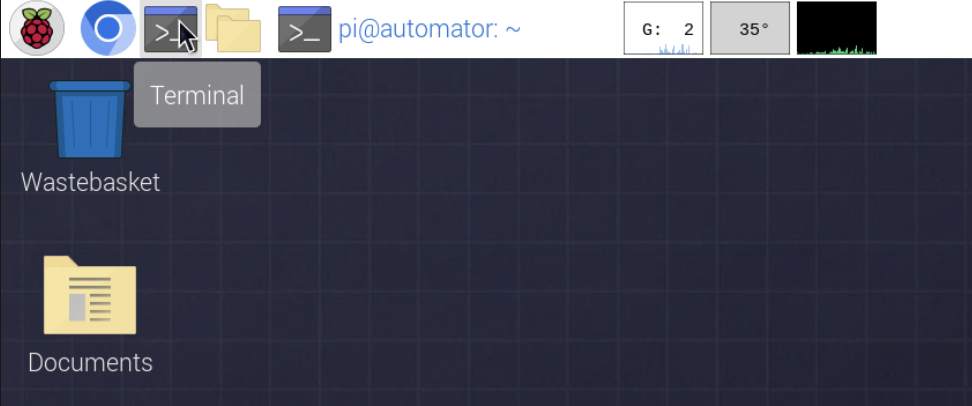
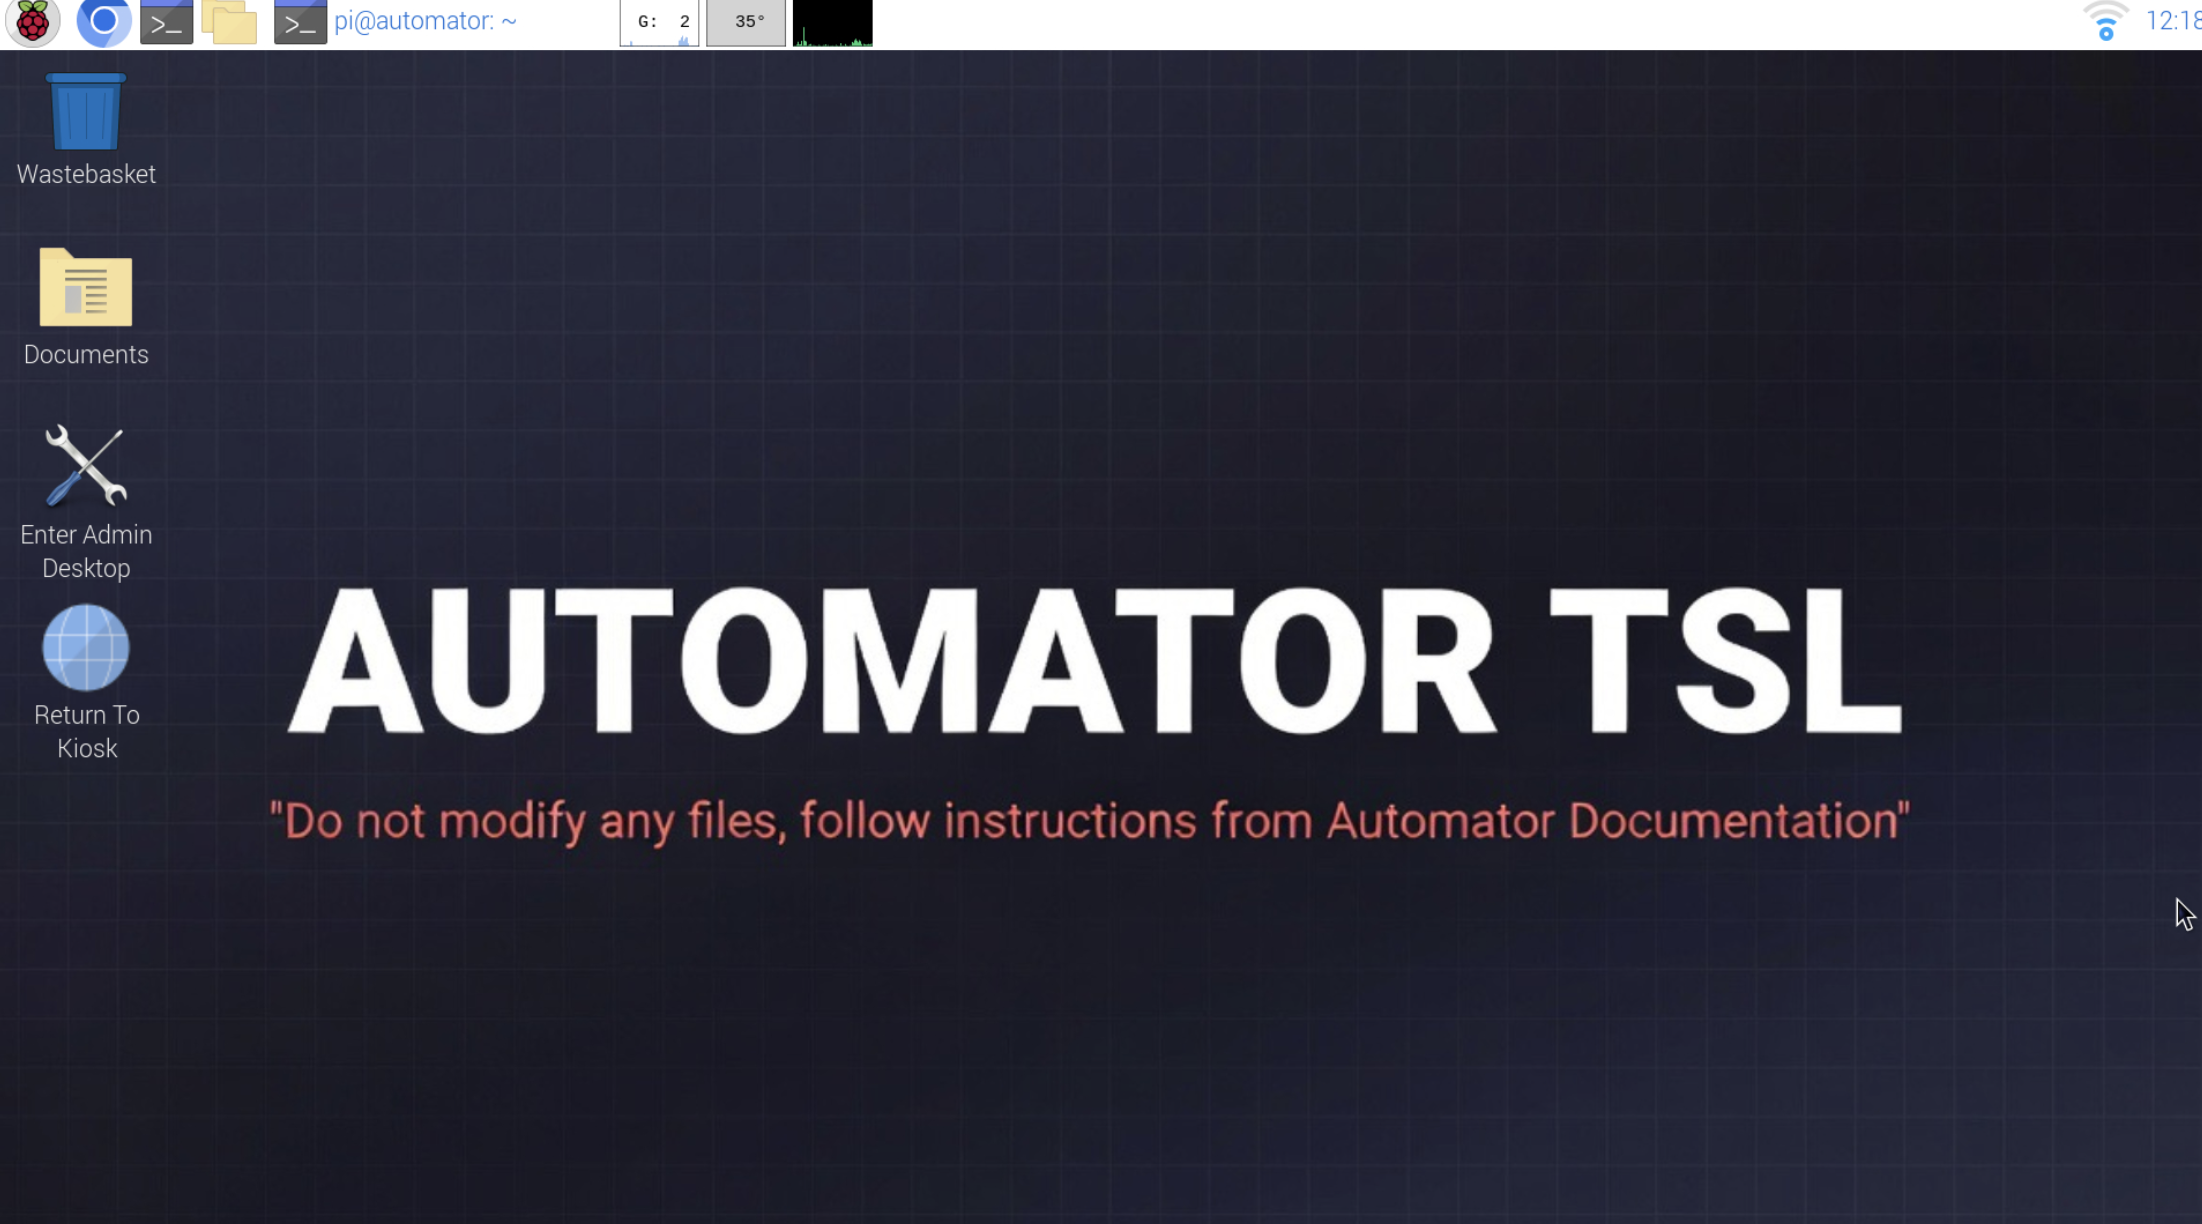
For technical/admin maintenance, the Pi boots into kiosk mode by default. Admins can exit kiosk by pressing Ctrl+Alt+A (closes Chromium, reveals the full Raspberry Pi desktop including the top panel and terminal access), and return to kiosk by pressing Windows+K. From the Pi desktop browser, admins can open http://127.0.0.1:8080/. See raspberry-pi-automator-kiosk-admin-desktop.md for the complete kiosk and admin desktop setup guide.
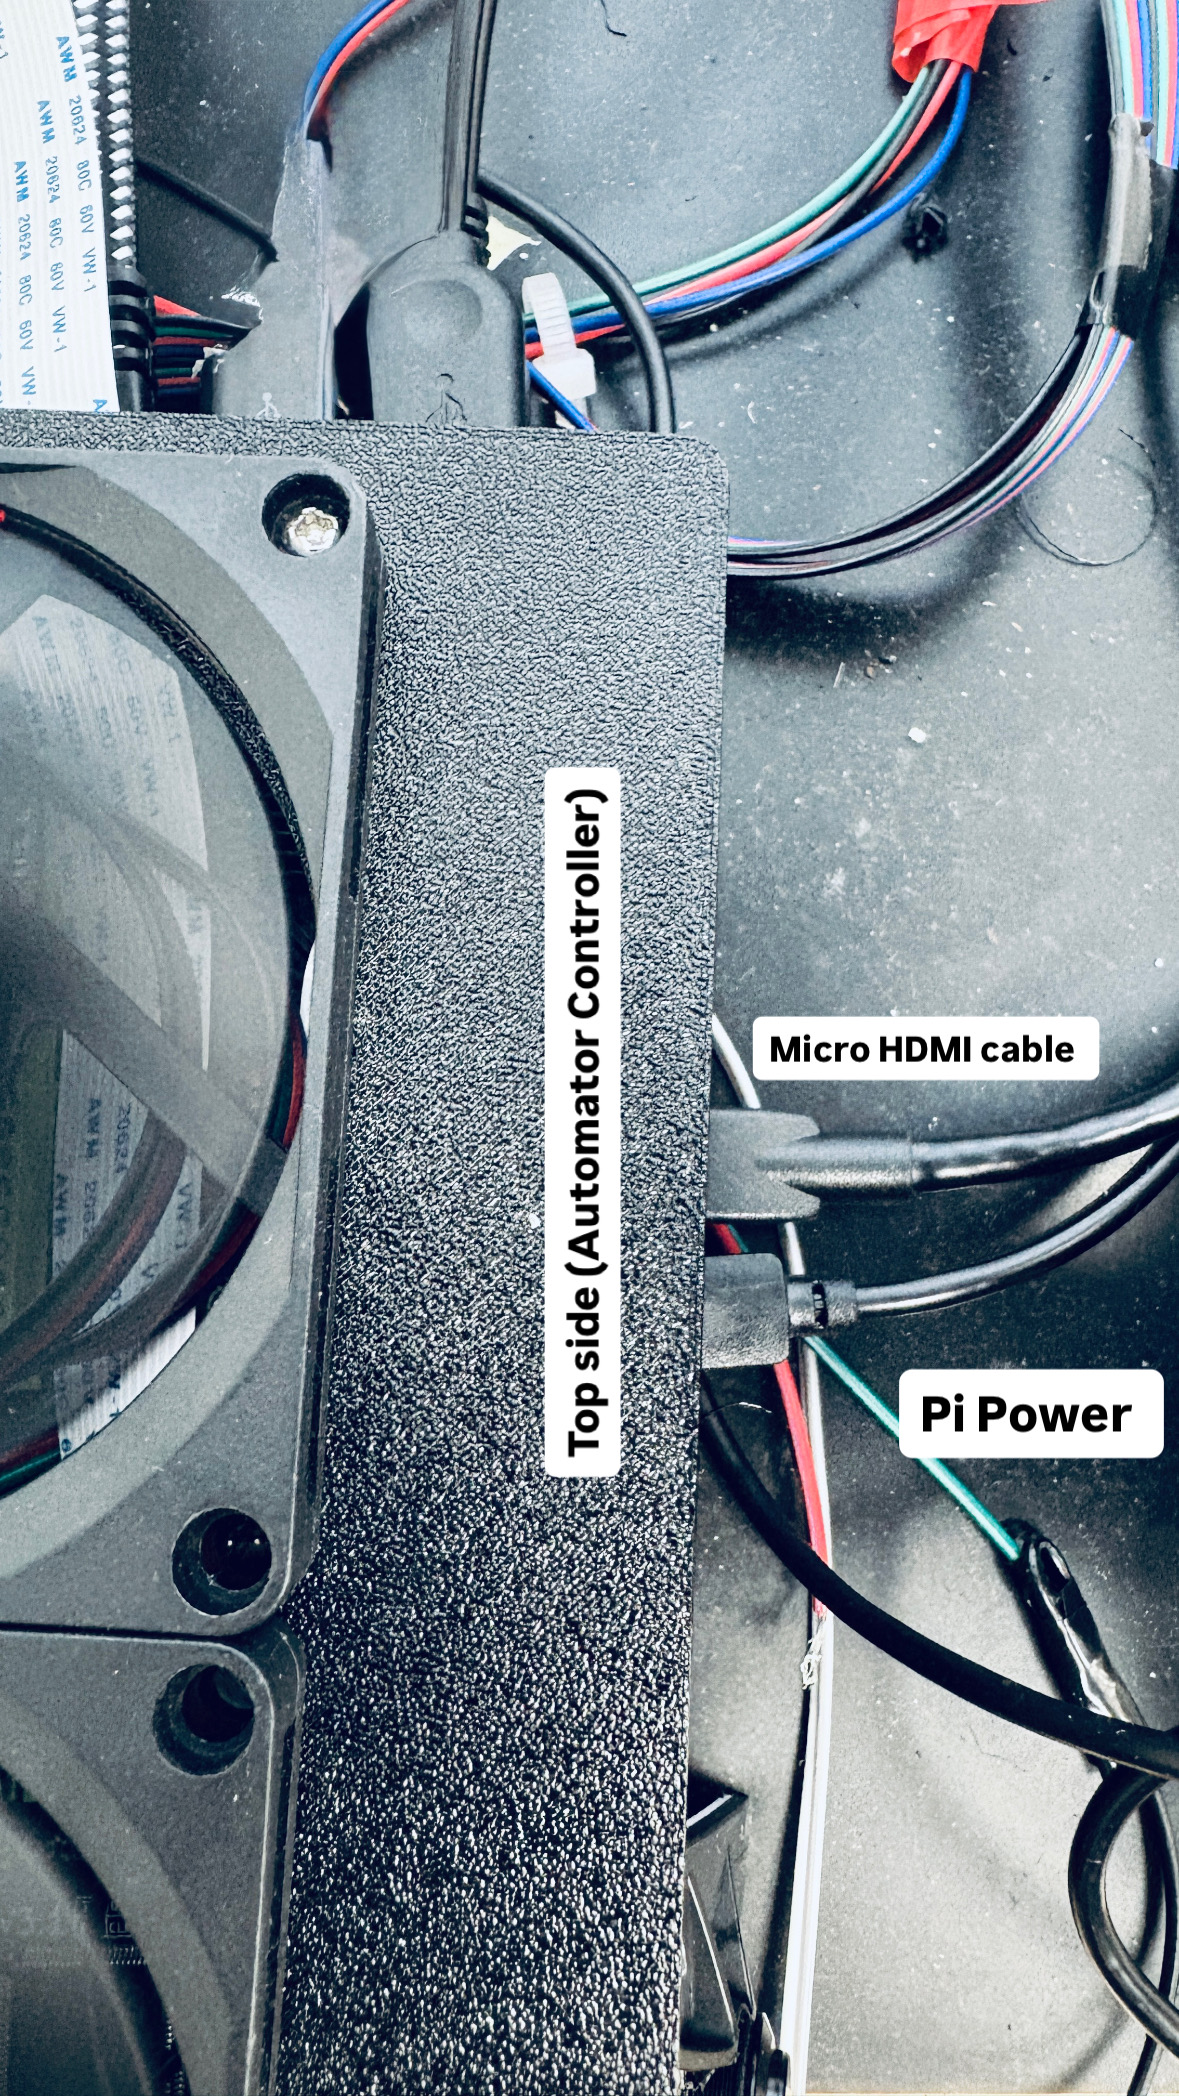
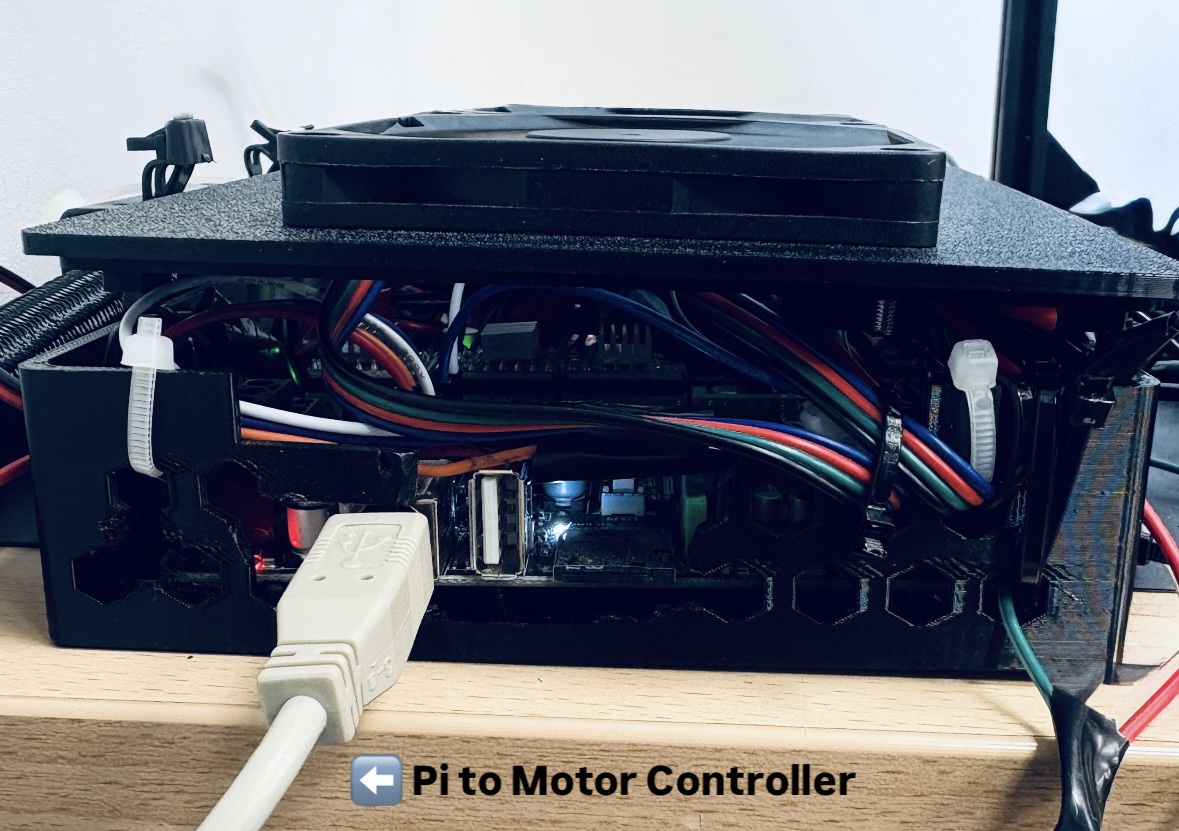
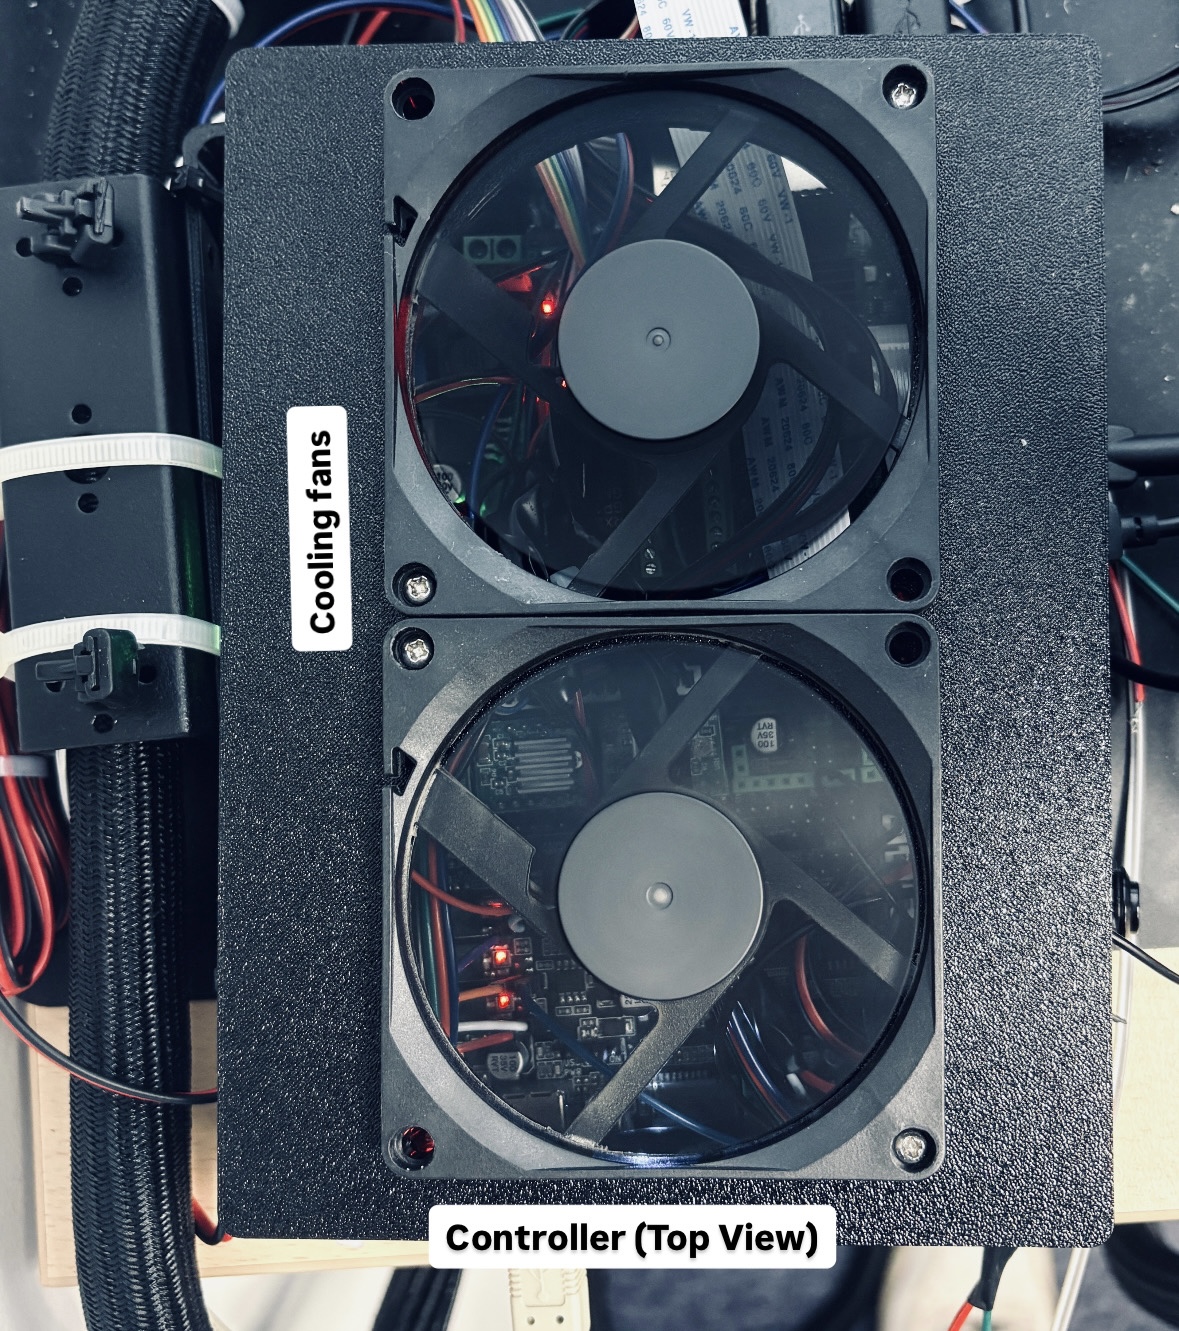
Reference: hardware/Hardware_Documentation.md and hardware/raspberry-pi-4-datasheet.pdf
2.2 MKS Robin Nano V3.1
The MKS Robin Nano V3.1 is a motion controller board originally designed for 3D printers. It contains an STM32F407 microcontroller and provides four stepper motor driver slots, servo PWM outputs, and relay control outputs. In Automator it drives the X, Y, and Z axes of the camera gantry, plus the suction cup servo and the vacuum relay.
The board communicates with the Raspberry Pi via USB serial. It does not make any decisions on its own — it simply executes step pulses and pin toggles as instructed by the Klipper host running on the Pi.
When first received, the board has 3D printer firmware on it. To work with Automator, it must be re-flashed with Klipper's MCU firmware. This is covered in section 4.4.
Reference: hardware/Hardware_Documentation.md and the MKS hardware repository at https://github.com/makerbase-mks/MKS-Robin-Nano-V3.X
2.3 Klipper
Klipper is an open-source 3D printer firmware that splits motion processing between a host computer (the Pi) and a microcontroller (the MKS board). Traditional 3D printer firmware does all the motion planning on the microcontroller, which limits how complex it can get. Klipper moves all the complex work — G-code parsing, motion planning, and acceleration calculations — to the Pi, leaving the microcontroller to do only precise step-pulse timing.
This design means you configure everything through a text file (printer.cfg) on the Pi rather than recompiling firmware. Changes to motor speeds, pin assignments, or macros take effect after a simple restart.
Klipper runs as a systemd service called klipper. Its configuration file for Automator is at ~/printer_data/config/printer.cfg. The source of truth for this file is config/printer.cfg in the repository.
Reference: https://www.klipper3d.org/
2.4 Moonraker
Moonraker is a web API server that runs alongside Klipper on the Pi. It listens on port 7125 and provides HTTP endpoints that external software can call to send G-code, query machine state, and manage macros.
The Automator controller (dev2/maincontroller.py) uses Moonraker's API rather than talking to Klipper directly. This means the controller can send a motion command like G1 X100 Y50 by making an HTTP POST to Moonraker, without needing a direct serial connection to the MKS board.
Moonraker runs as a systemd service called moonraker. Its configuration is at ~/printer_data/config/moonraker.conf.
Reference: https://moonraker.readthedocs.io/
3. Hardware overview
The hardware documentation is at /home/pi/Automator/hardware/Hardware_Documentation.md. What follows is a summary for context.
3.0 Physical location
The Automator is installed inside TSL PGC07 (BINDER growth chamber) in the Growth Room on the TSL Building Ground Floor, at the end nearest the window.
Do not move the setup and do not pull any cables — the cable routing is calibrated to the installation position.
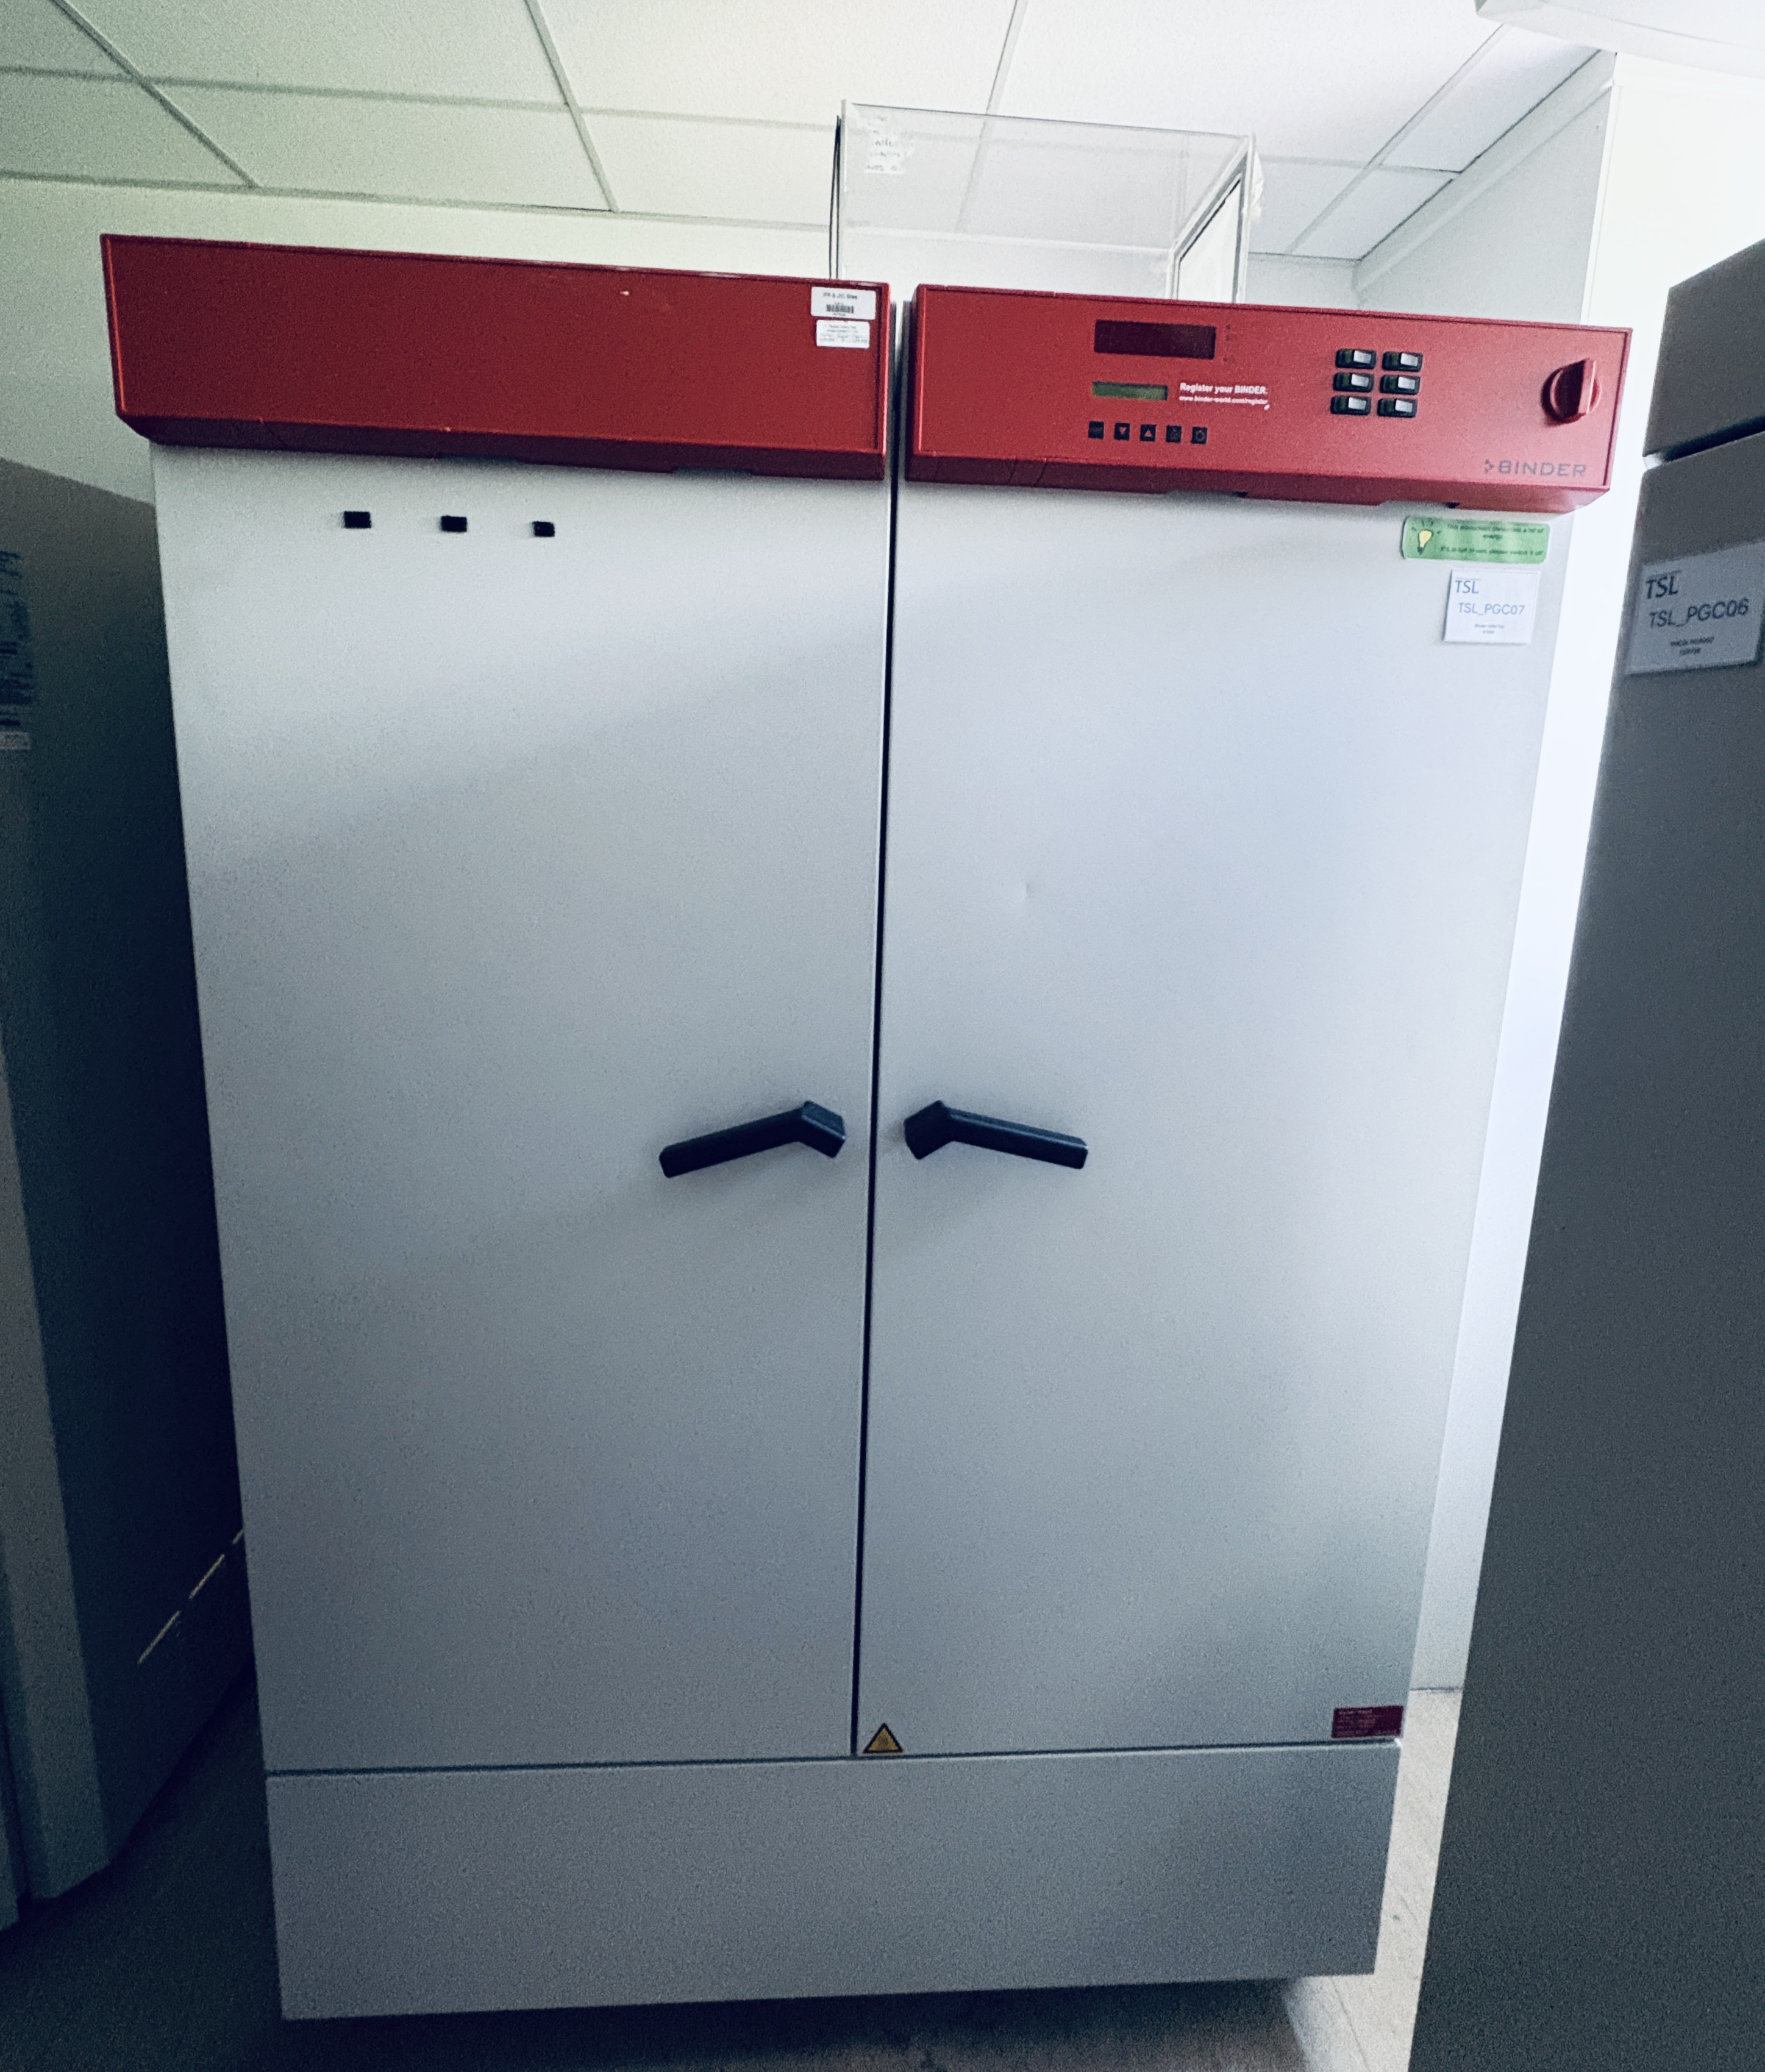
TSL PGC07 — the growth chamber housing the Automator
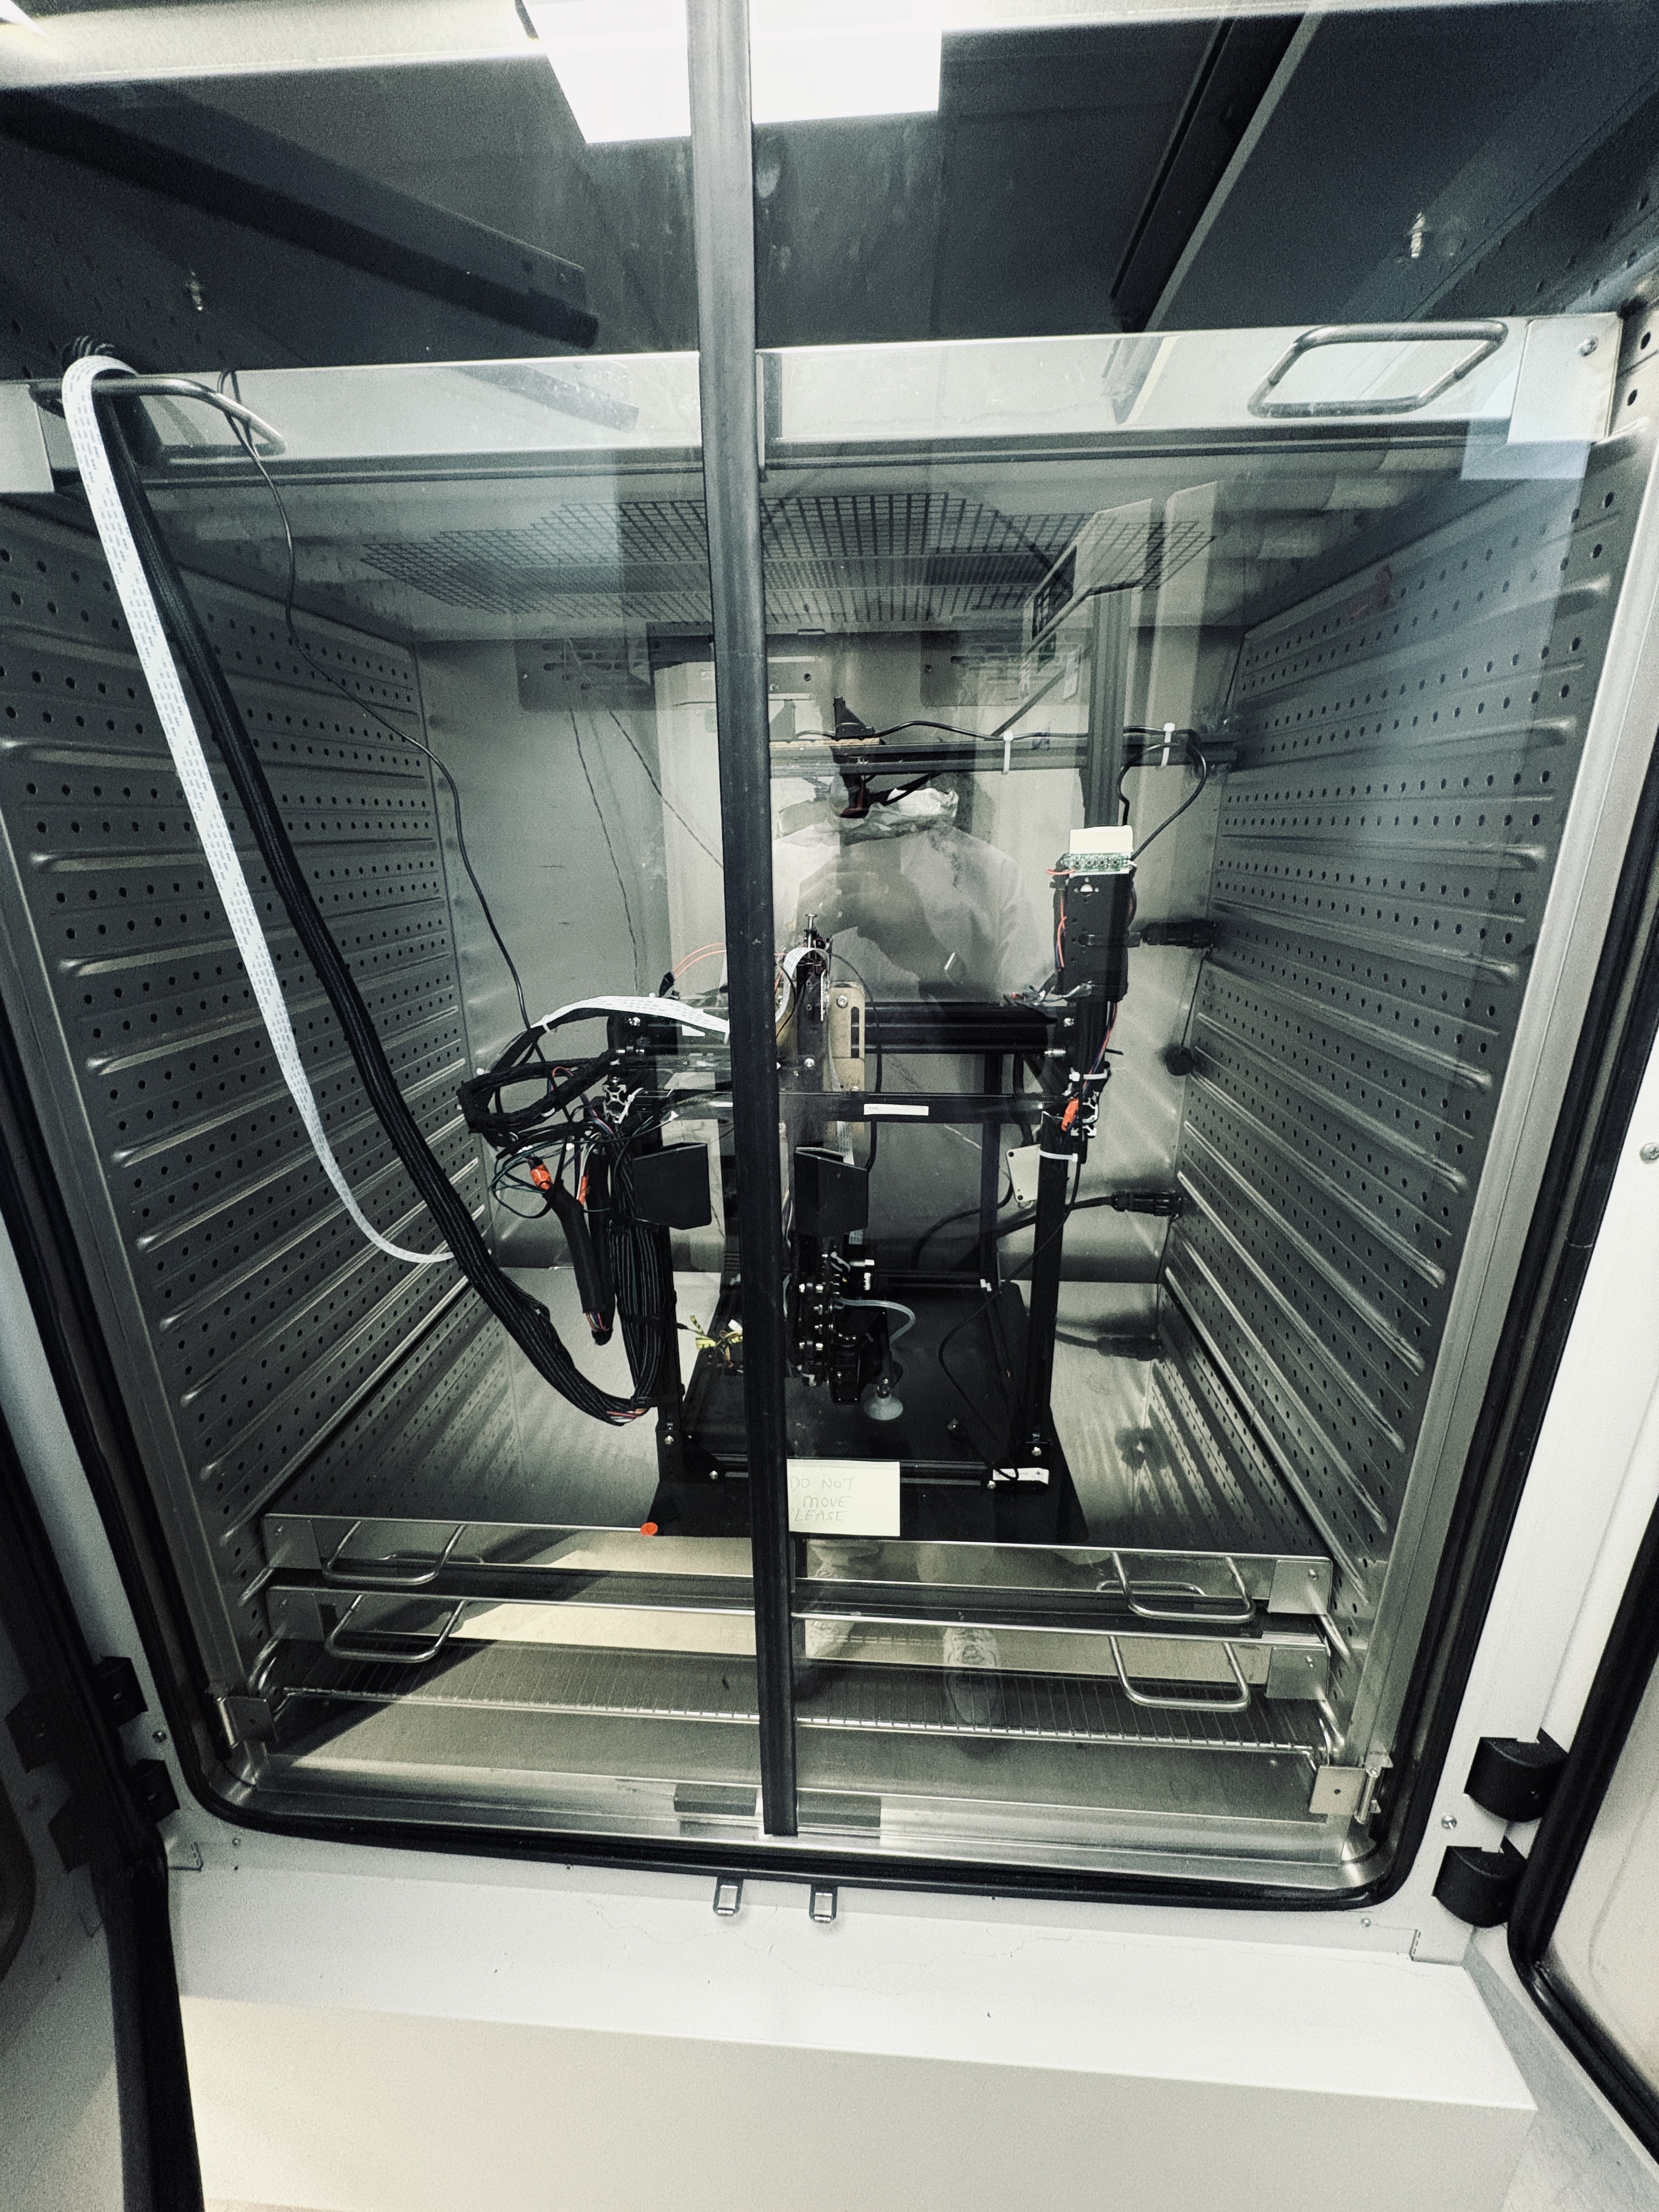
Automator inside TSL PGC07 with the door open
3.1 Power architecture
Mains AC feeds two DC supplies, both downstream of a single latching AC-side emergency stop:
- 12 V supply → MKS Robin Nano V3.1, stepper motors, a 12 V–to–5 V buck converter
- 5 V supply (dedicated adapter) → Raspberry Pi only
The buck converter powers the servo, proximity sensor, vacuum pump, solenoid valve, fans, relay module, and LED strip.
Activating the hardware emergency stop cuts AC to both supplies immediately.
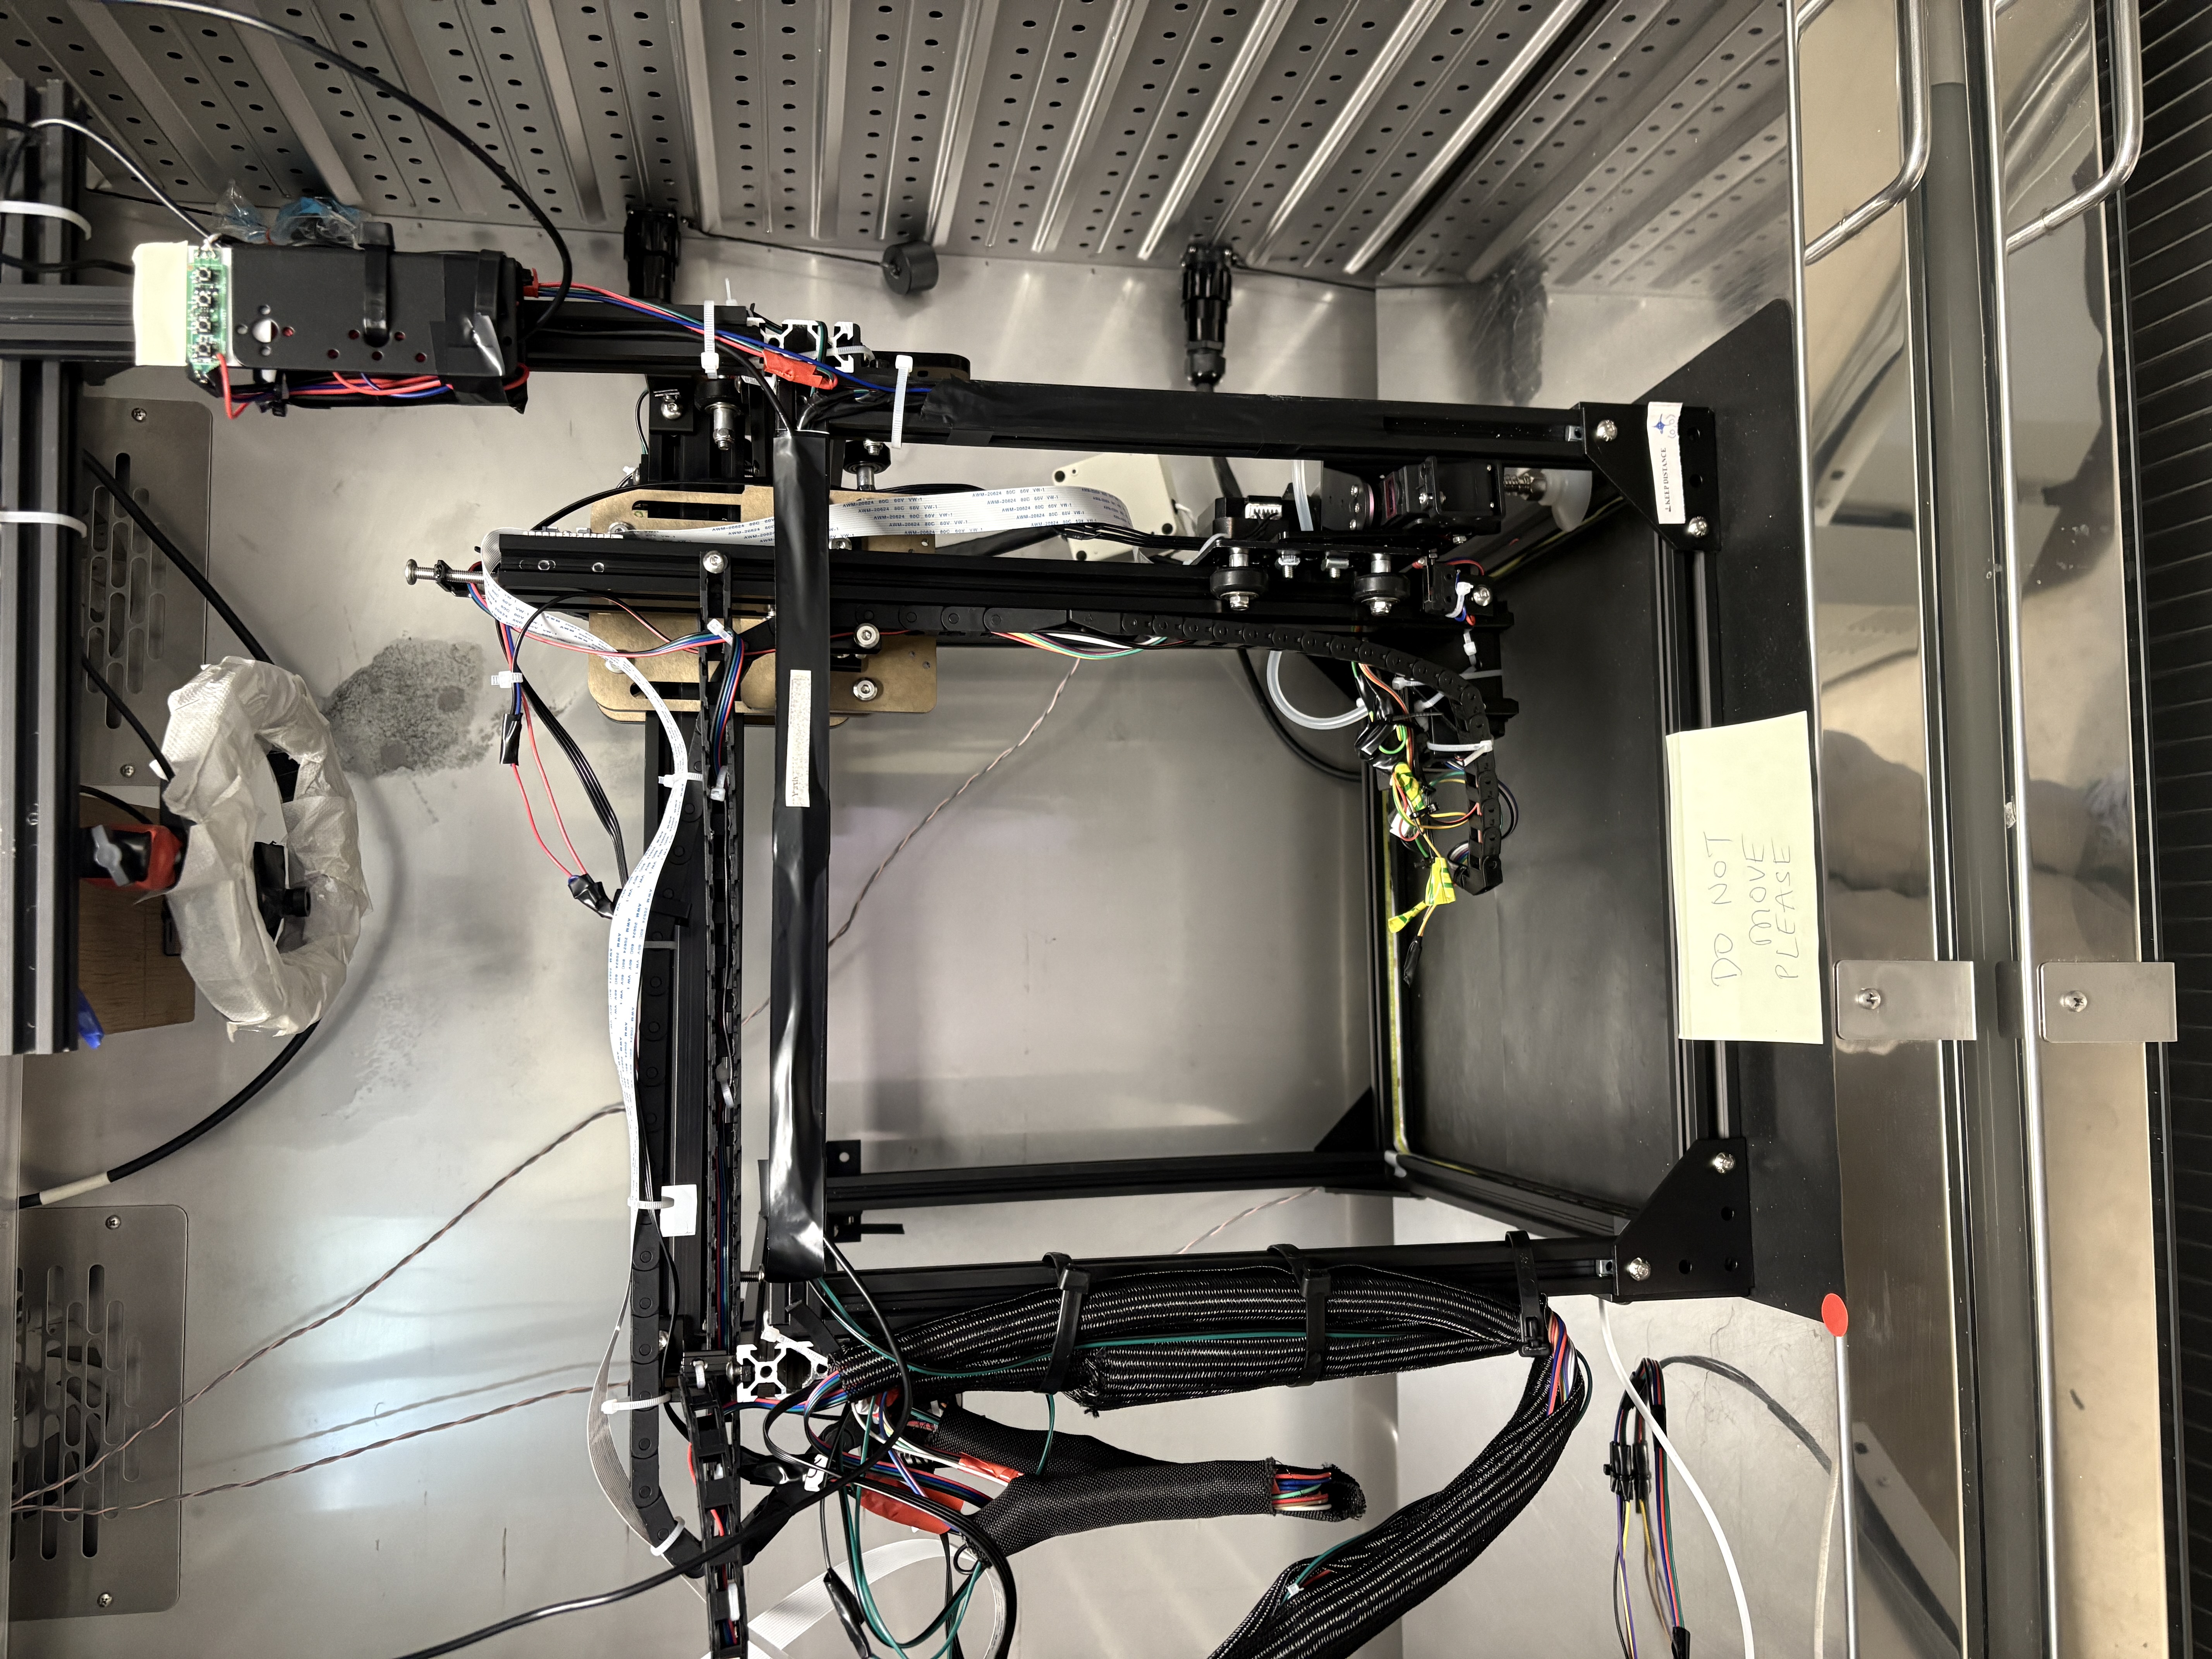
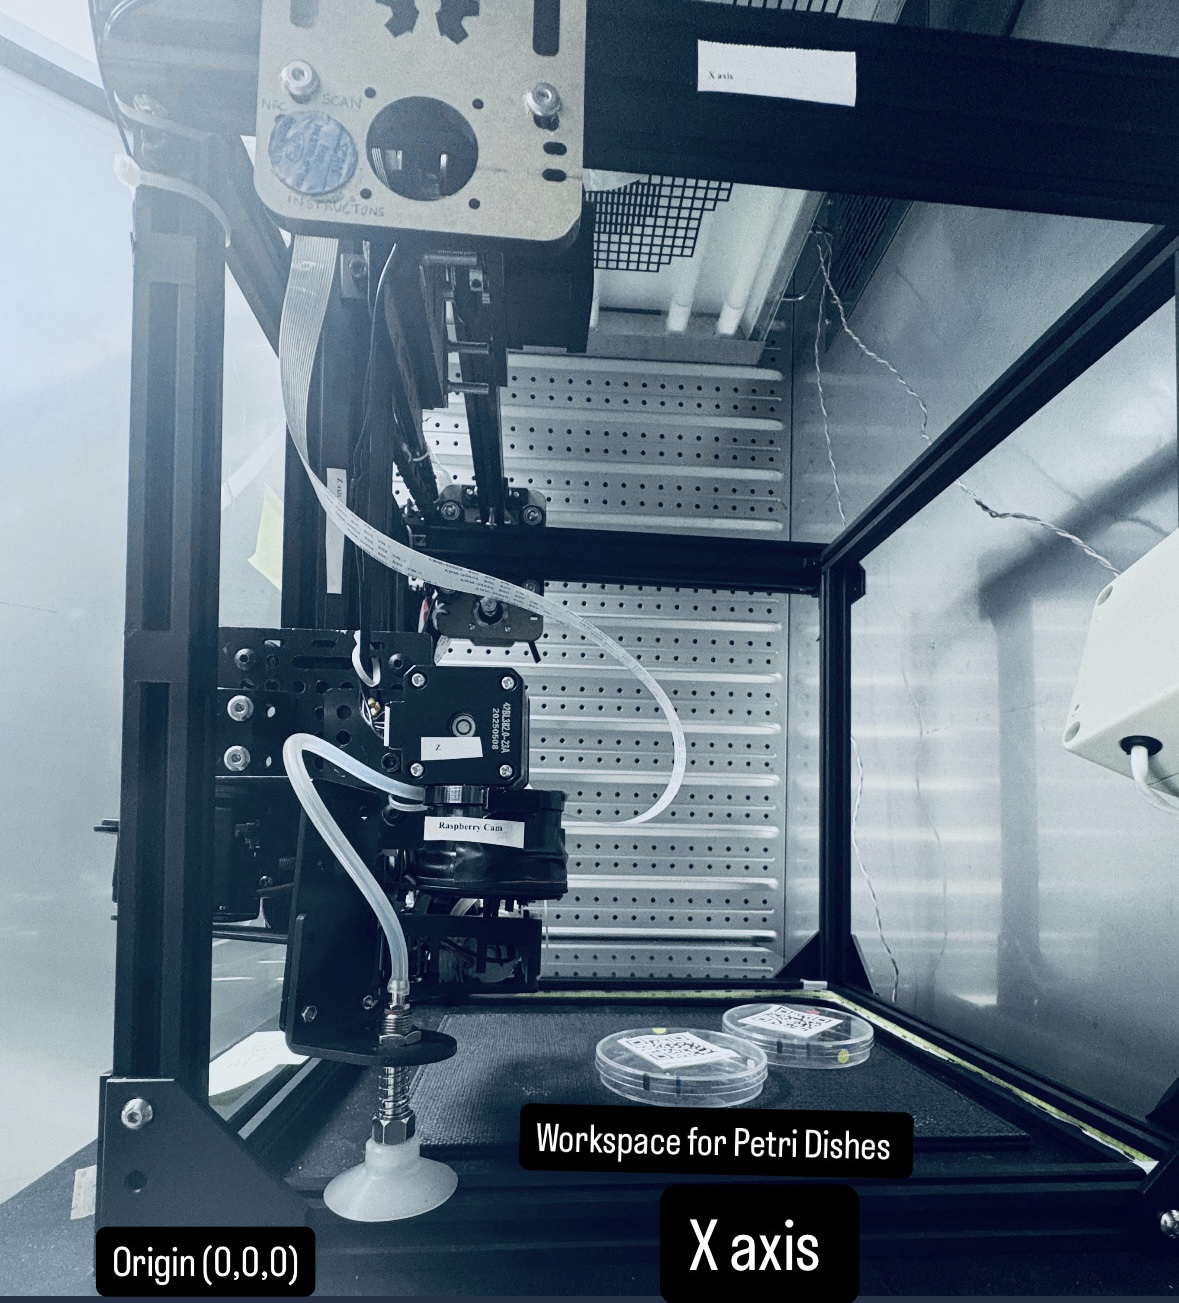
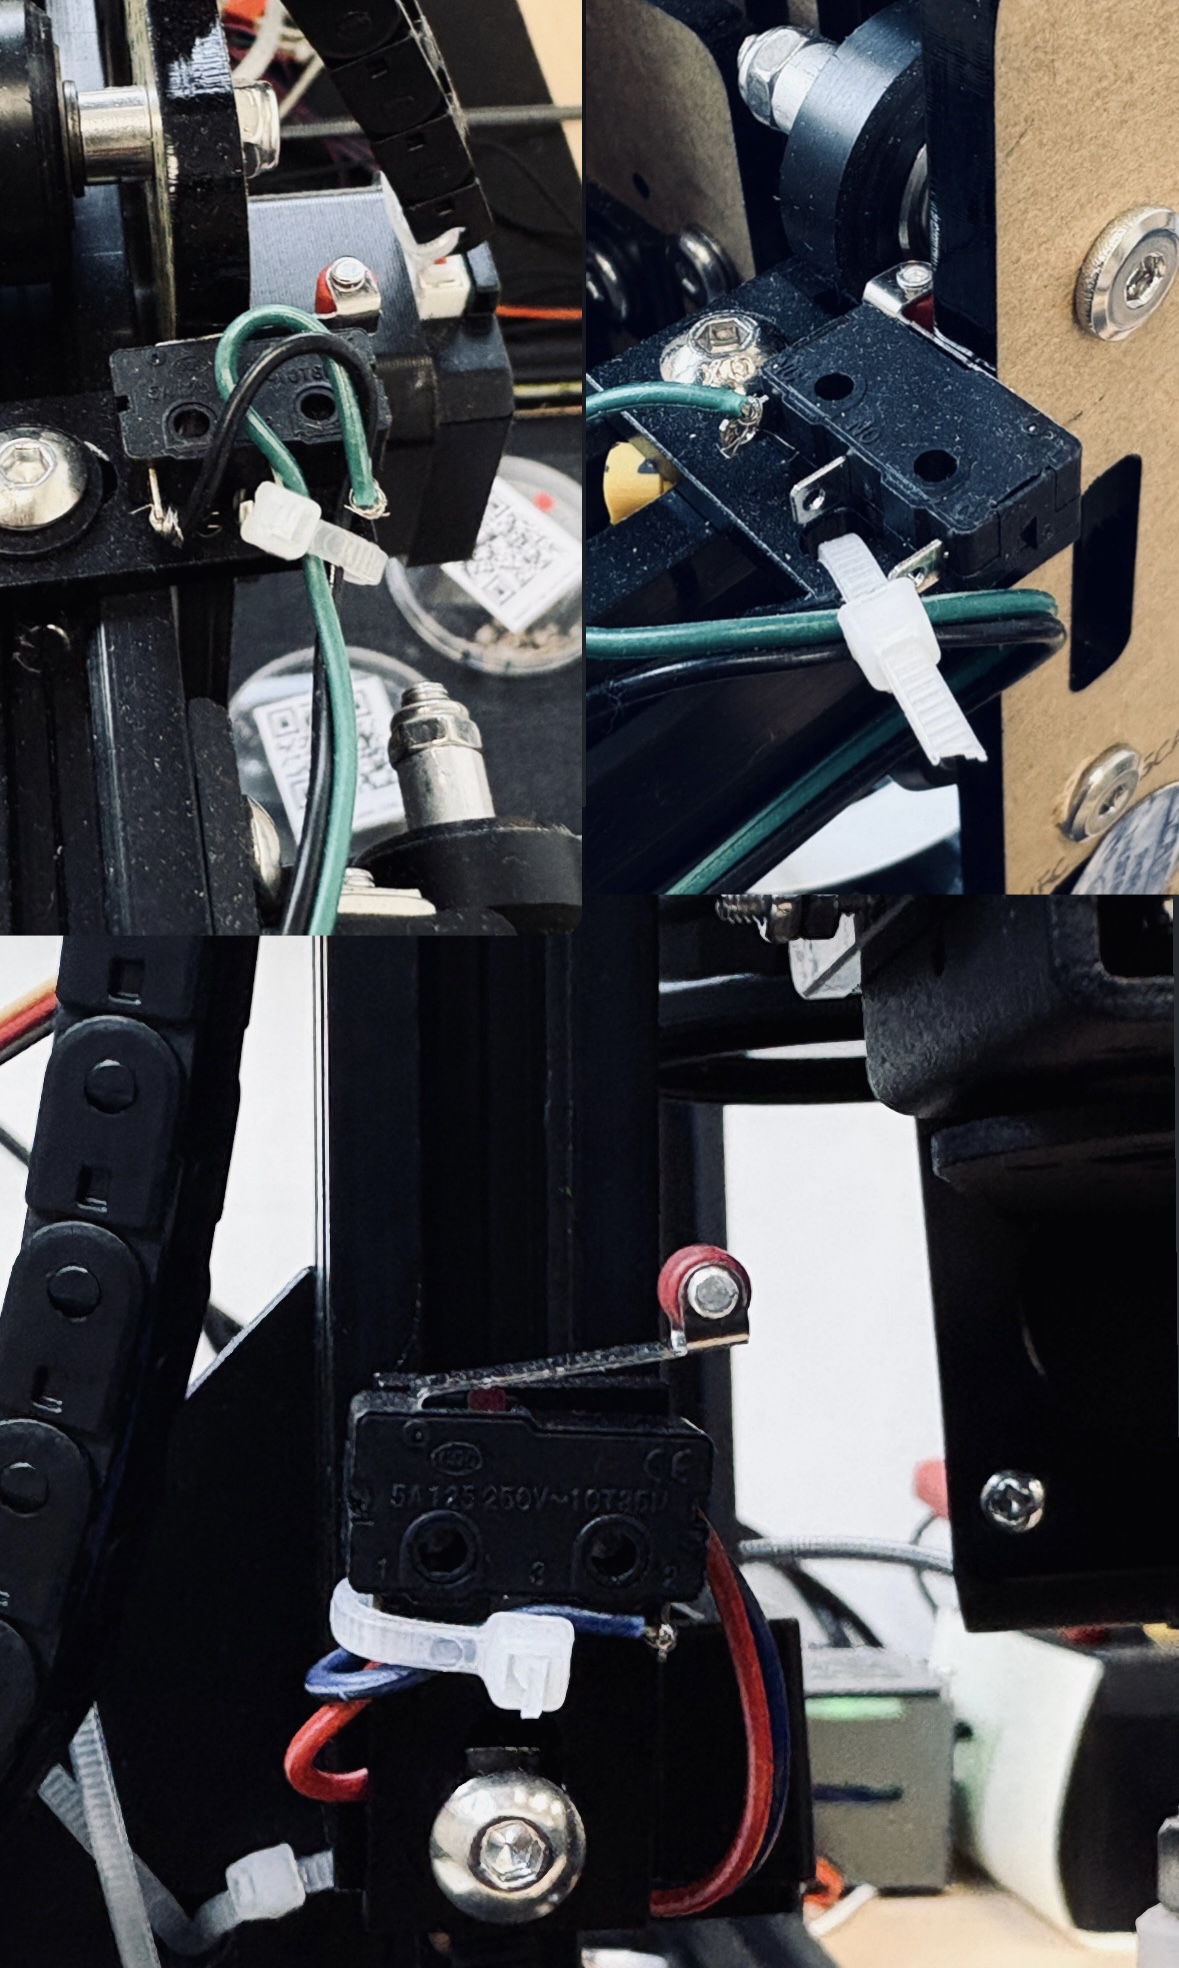
3.2 Motion system
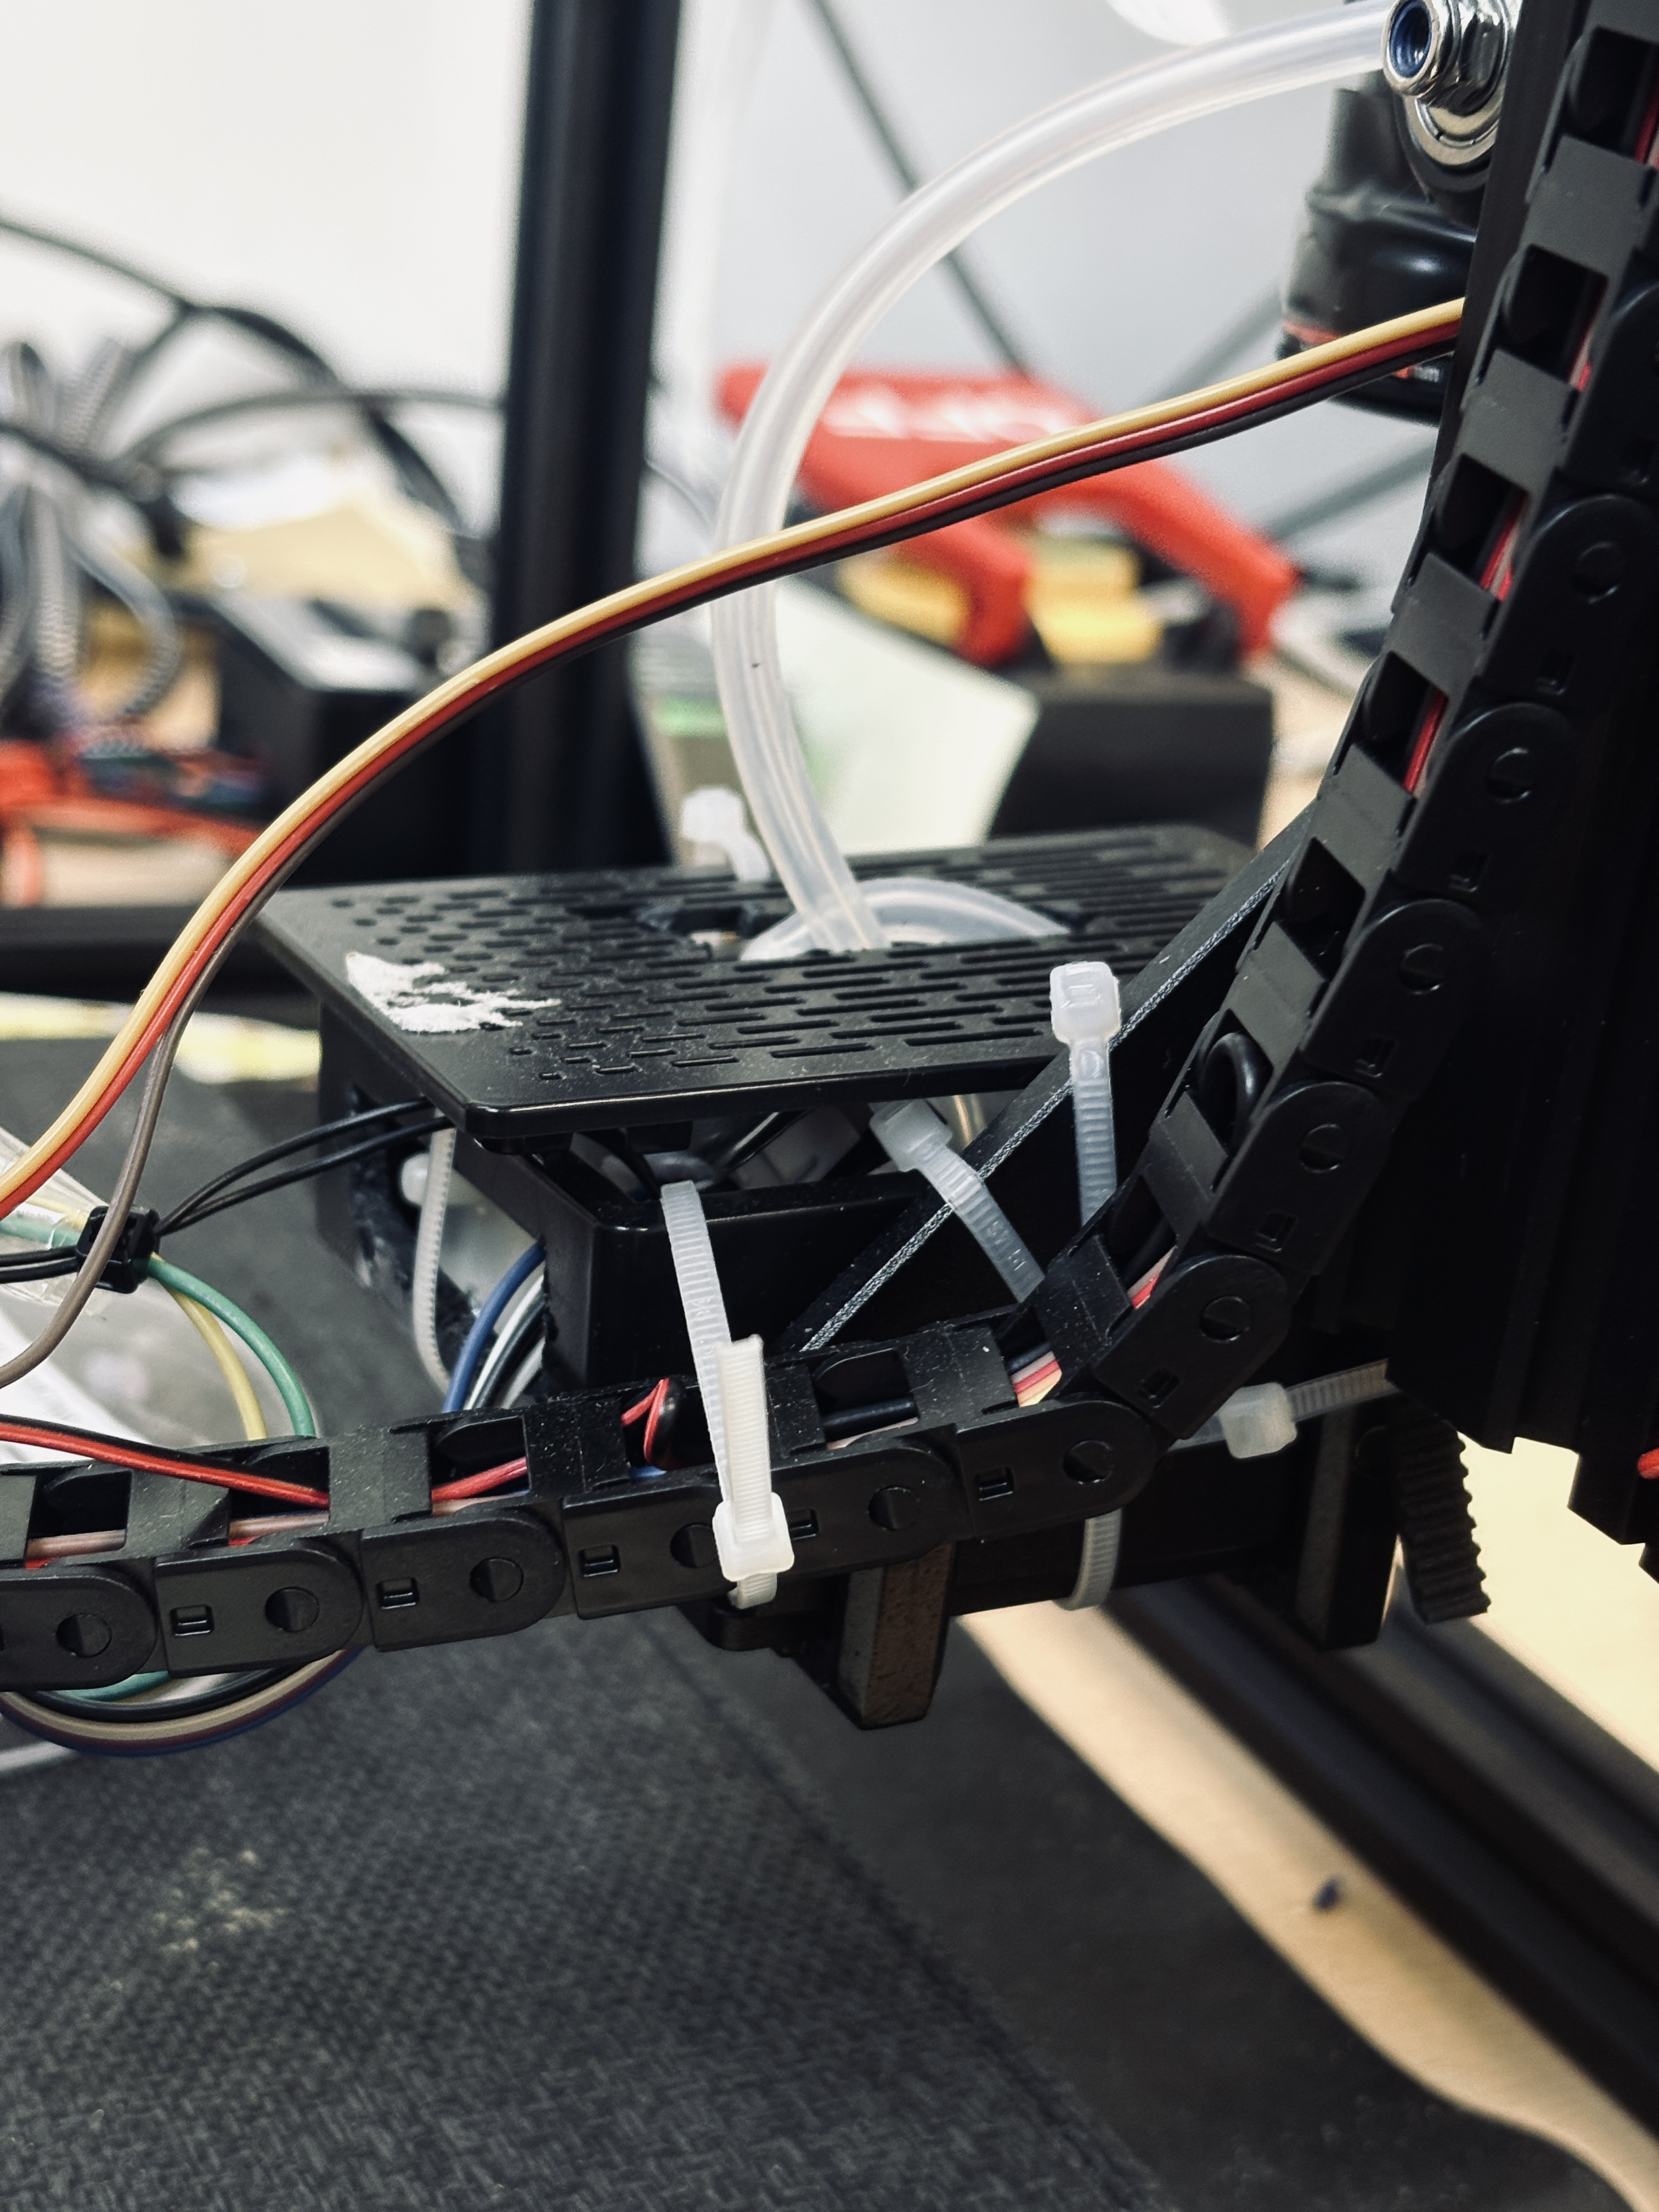
Three stepper motors drive the X, Y, and Z axes of the camera gantry. All three are NEMA17 and run from the MKS board on 12 V. End-stops are normally open and ground-triggered on all three axes.
3.3 Plate handling
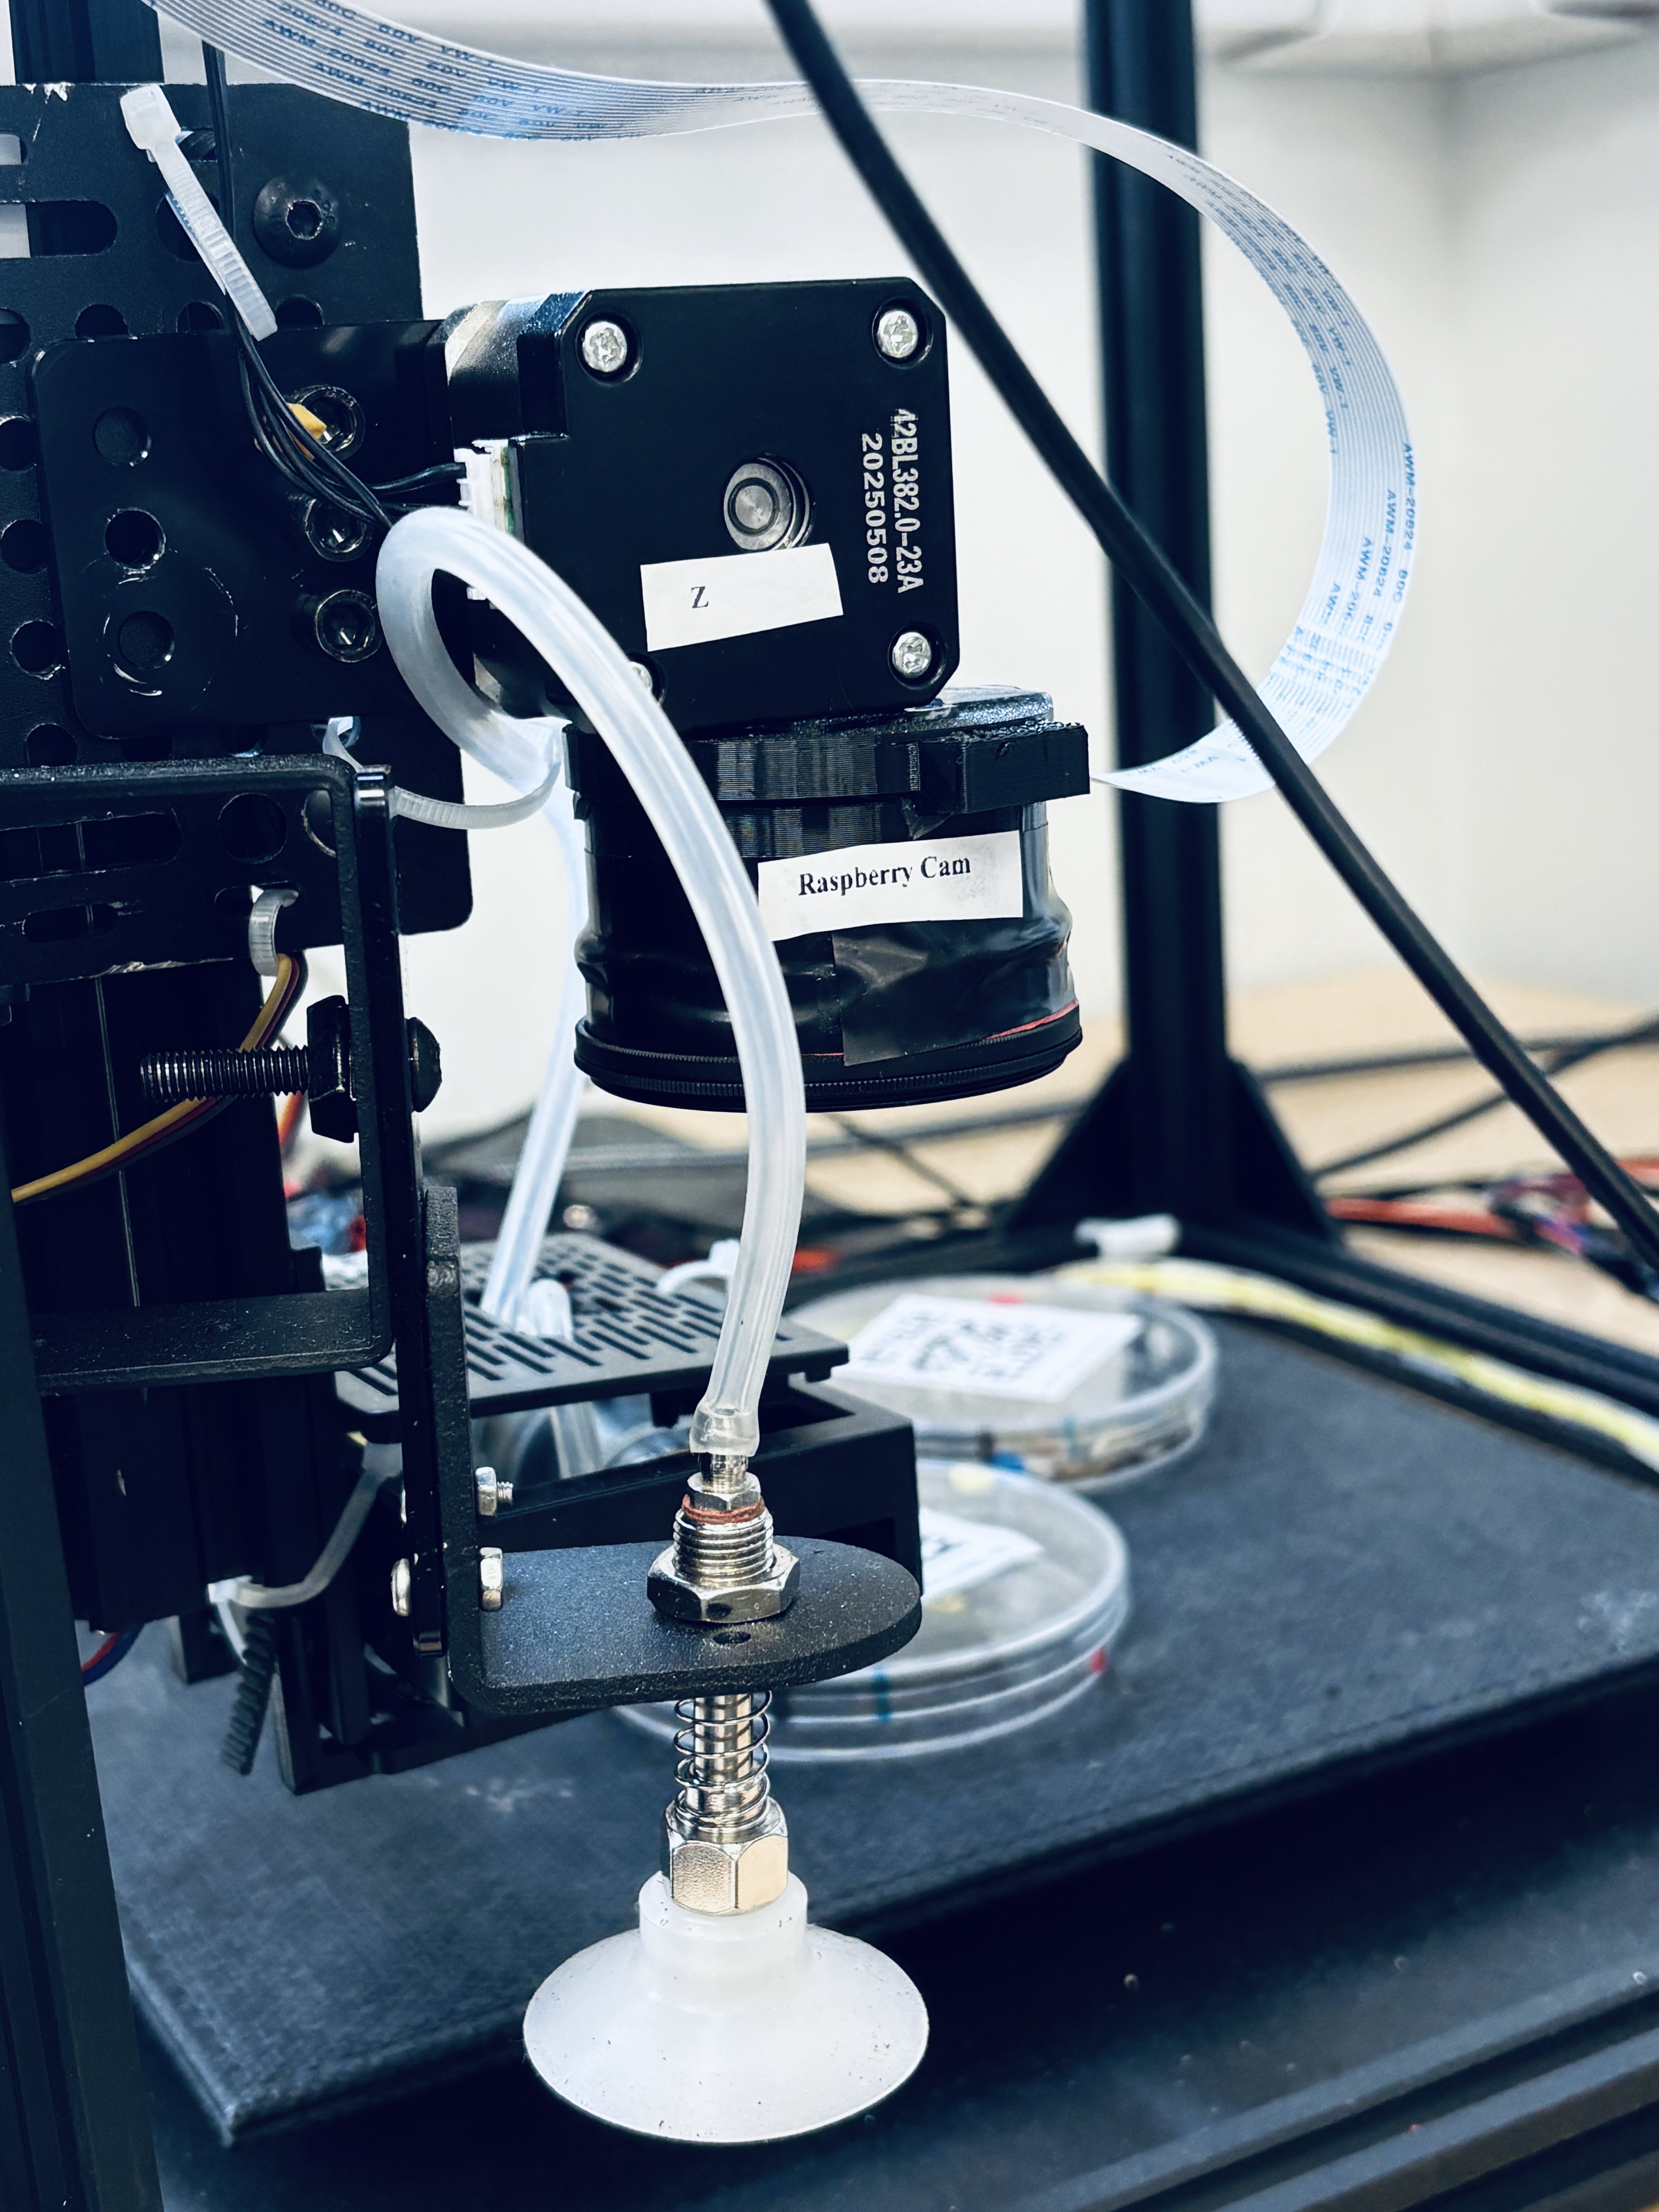
The suction cup grips the plate lid during imaging. The chain is: vacuum pump generates negative pressure → air solenoid valve routes it → suction cup holds the lid. A servo then rotates the lid 90° away from the dish base to expose the colony surface.
The vacuum pump and solenoid are controlled via relay outputs from the MKS board. The servo is on a hardware PWM output.
3.4 Cameras
Two cameras are in use:
- Raspberry Pi Camera Module 3 — high-resolution still images of colonies, connected via CSI ribbon cable. Used only during the imaging step.
- USB camera — wide-angle view of the workspace, used to detect plate positions and read QR codes. Connected via USB.
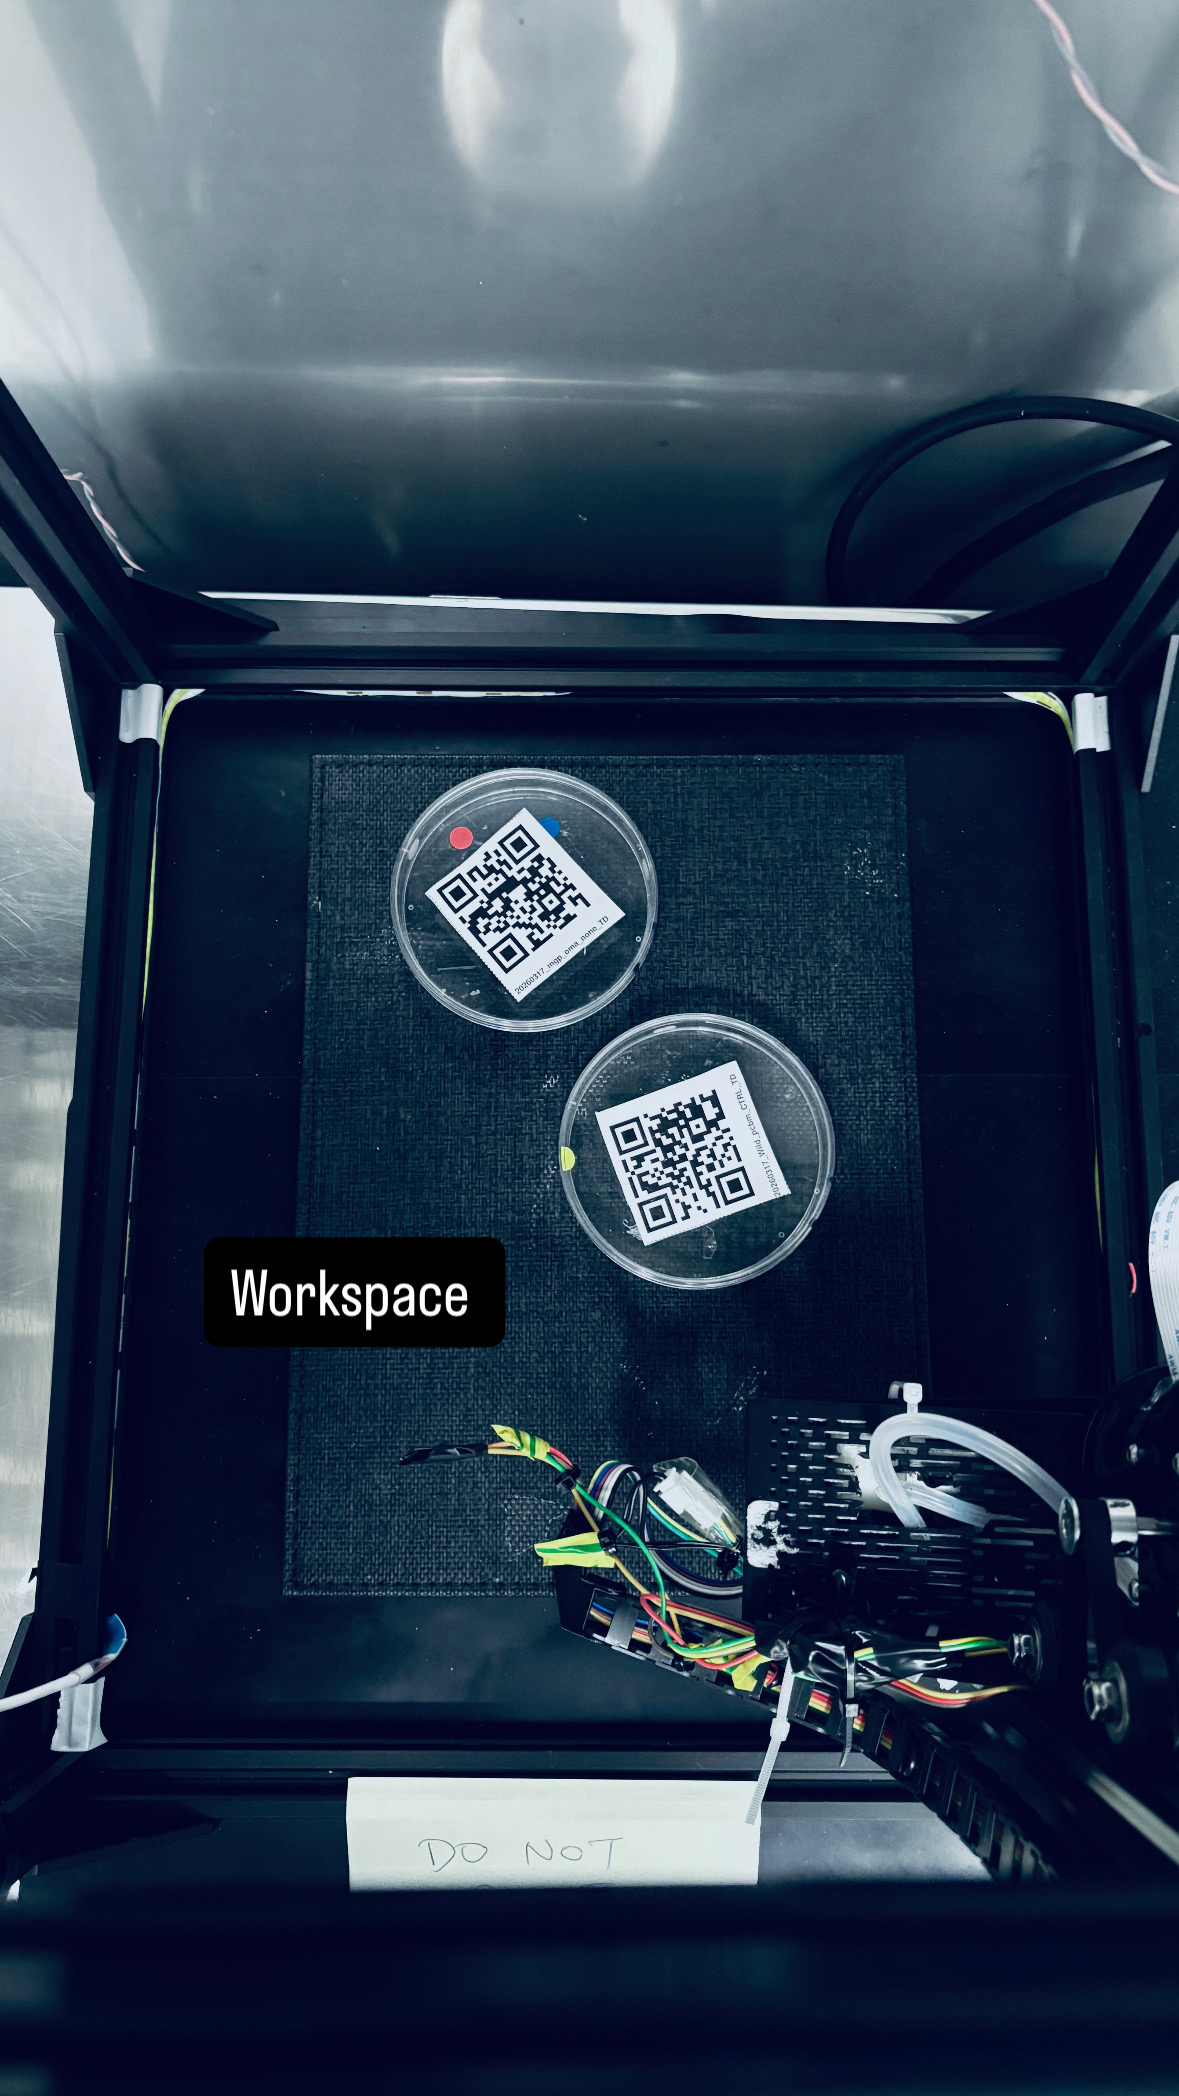
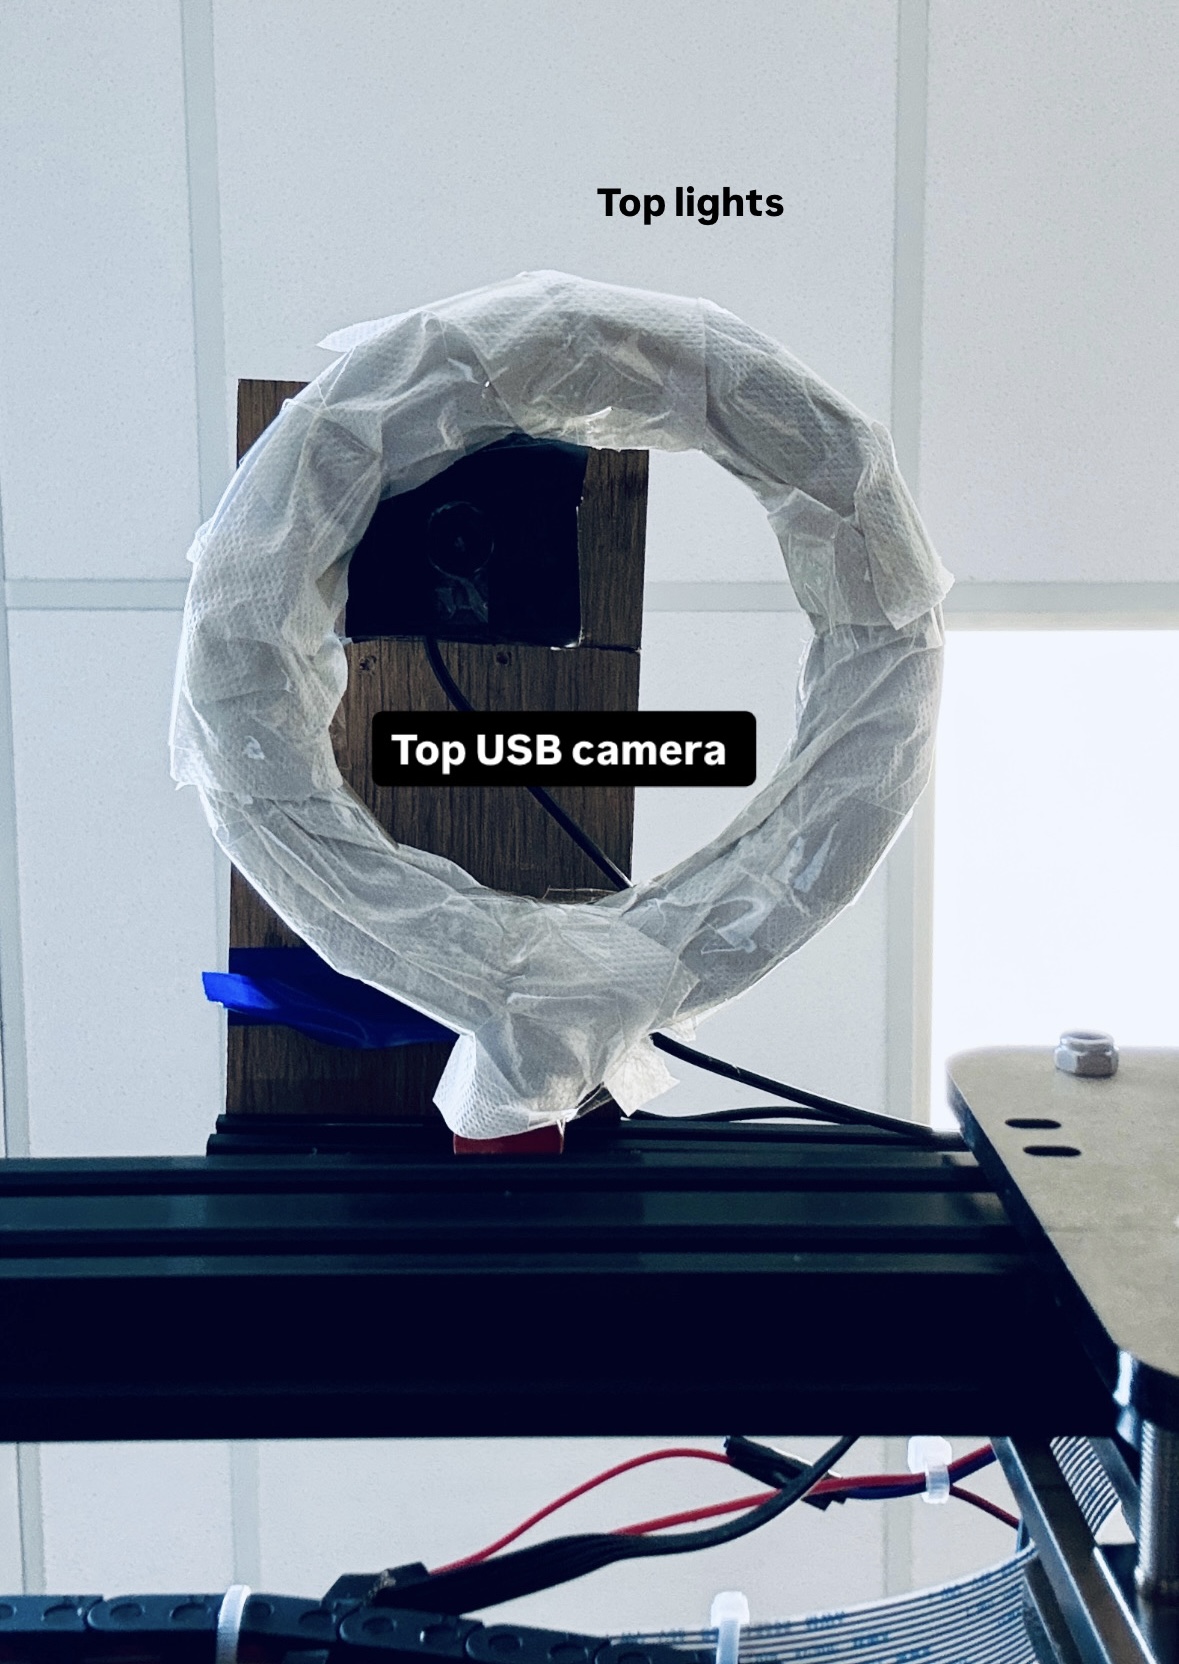
Plate detection pipeline
The USB camera scan uses two detection stages:
-
YOLO stage (
bestnew.onnx, confidence ≥ 0.75): Detects plate bounding boxes. For each box, the system attempts to read the QR code. Plates with a readable QR are resolved immediately. Plates detected by YOLO but with an unreadable QR are placed in the unresolved detections list. -
Geometric fallback stage (
detect_geometric_plate_candidatesinmainusbcamera.py): For plates missed entirely by YOLO, an OpenCV pipeline (Canny edges → contour extraction →fitEllipse) identifies ellipse candidates that match the expected circularity, aspect ratio, and size of a 90–100 mm round Petri dish/plate. Candidates must be confirmed across multiple consecutive scan frames before being reported. Confirmed fallback plates also appear in the unresolved detections list.
Both types of unresolved detection expose Identify and Dismiss controls in the web UI. Identifying a plate associates it with a manually entered QR payload and assigns it a persistent SQLite-backed plate ID.
3.5 Safety hardware
- AC-side latching emergency stop switch — physically cuts all power when pressed
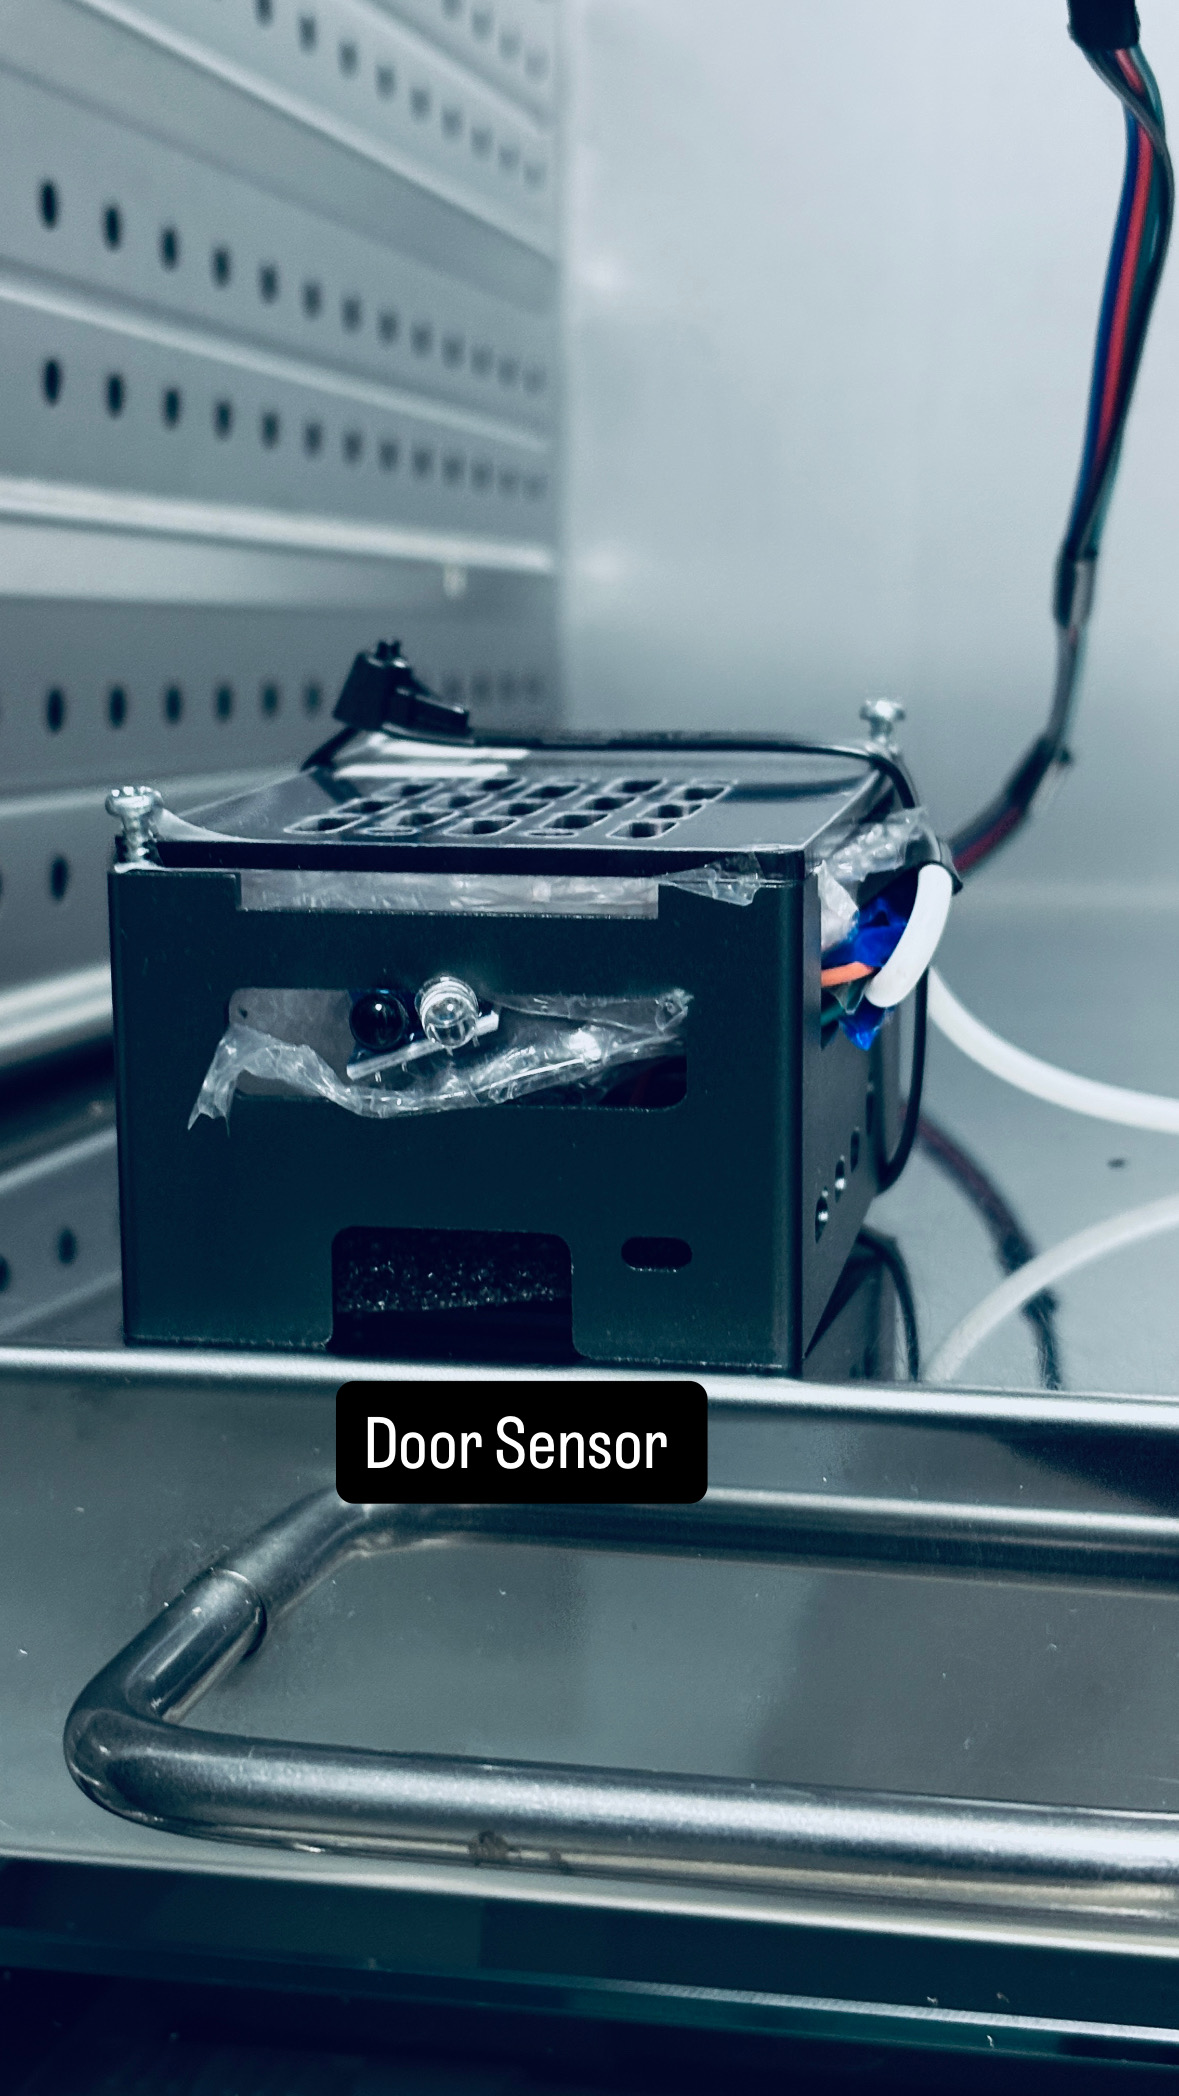
- Door interlock — proximity sensor on GPIO 26. Opening the door triggers a controlled halt.
- Axis end-stops — hard limits on X, Y, and Z
4. Full installation
This section walks through setting up a fresh Automator system from a blank Raspberry Pi. Follow the steps in order.
4.1 Hardware and OS prerequisites
Minimum hardware:
- Raspberry Pi 4B (8 GB RAM)
- microSD card, 32 GB or larger
- 5 V / 3 A power supply for the Pi
- MKS Robin Nano V3.1 controller board
- Network access (Wi-Fi and/or Ethernet)
Flashing the OS
Download and install Raspberry Pi Imager from https://www.raspberrypi.com/software/. Insert the microSD card into your computer.
In Raspberry Pi Imager:
- Select: Raspberry Pi OS (64-bit)
- Select the target microSD card
- Open Advanced Options:
- Enable SSH
- Set username to
piand a password - Configure Wi-Fi if needed
- Set locale and timezone
- Write the image and eject the card
Insert the card into the Pi and power it on.
4.2 First boot and base packages
Connect via SSH:
Update the system:
Set the deployed hostname to automator and ensure local name resolution works:
The hosts file should include:
Install and enable Avahi/mDNS so automator.local resolves from local machines:
sudo apt install -y avahi-daemon
sudo systemctl enable --now avahi-daemon
systemctl status avahi-daemon --no-pager
After reboot, install required system packages:
sudo apt update
sudo apt install -y \
  python3 python3-venv python3-dev \
  libcamera-dev libcamera-apps v4l-utils \
  libjpeg-dev libpng-dev libatlas-base-dev \
  rsync exfatprogs ntfs-3g util-linux
The libcamera packages support the Pi Camera Module 3 via Picamera2. The storage utilities (rsync, exfatprogs, etc.) are needed for the USB image export system.
4.3 Clone the repository
All code expects to live at /home/pi/Automator/. Do not change this path without also updating the hard-coded paths throughout dev2/maincontroller.py and all service files.
4.4 Klipper and Moonraker installation
What this step does: Klipper splits motion planning between the Pi and the MKS board. This step installs the host side (on the Pi) and the API layer (Moonraker).
Clone and install Klipper:
This installs the Klipper host service, Moonraker, and a web interface (Mainsail or Fluidd). The web interface is not used by Automator day-to-day, but it is useful for diagnosing Klipper directly.
Reference: https://www.klipper3d.org/Installation.html
4.5 Building Klipper firmware for the MKS Robin Nano V3.1
The MKS board needs Klipper's MCU firmware flashed onto it. This firmware is compiled on the Pi and then transferred to the board via SD card.
Pre-built firmware available: A compiled firmware binary for this exact setup is already included in the repository at
config/firmware mks/firmware.bin. If you are re-flashing the same board configuration, you can use this file directly — rename it torobin_nano.bin, copy to a FAT32 SD card, and follow the flashing steps below. Only rebuild from source if the Klipper version or board configuration has changed.
Why this step is needed: The board ships with 3D printer firmware. Klipper replaces it entirely with firmware designed to receive step commands from the Pi's host process.
Build the firmware:
In the menuconfig interface, set:
| Setting | Value |
|---|---|
| MCU Architecture | STM32 |
| Processor model | STM32F407 |
| Bootloader offset | 32 KiB |
| Clock reference | 8 MHz crystal |
| Communication interface | USB (PA11/PA12) |
Save and exit, then compile:
The compiled firmware is at out/klipper.bin.
Flashing the firmware to the board
- Rename
out/klipper.bintorobin_nano.bin - Copy
robin_nano.binto a FAT32-formatted SD card - Insert the SD card into the MKS Robin Nano's card slot
- Power the board on
- Wait approximately 10 seconds
Successful flashing renames the file on the SD card to FIRMWARE.CUR. Power cycle the board after flashing.
Reference: https://github.com/makerbase-mks/MKS-Robin-Nano-V3.X
4.6 Connecting the MKS board to the Raspberry Pi
Connect the MKS board to the Pi via USB. Identify the serial device:
You should see something like:
This path goes into printer.cfg as the serial: value under [mcu].
4.7 Klipper printer configuration
The authoritative printer.cfg for Automator is in the repository at config/printer.cfg. Copy it to Klipper's config directory:
This file defines all pin assignments, stepper motor parameters, servo positions, and custom G-code macros that the Automator controller relies on. Do not modify it without testing the effects, since the controller calls specific macros by name (RELEASE, HOLD/SUCK_HOLD, arm_rotate, vacuum_pump, solenoid_valve).
Restart Klipper after copying:
Verify Moonraker is listening:
Moonraker CORS should contain only local/trusted Automator origins. Keep entries like:
Restart Moonraker after editing:
4.8 Network configuration
The Raspberry Pi has two network interfaces:
| Interface | Role | Profile name |
|---|---|---|
wlan0 |
IOT Wi-Fi (primary internet) | IOT (active) |
eth0 |
Direct MacBook access only | mac-direct-auto |
Internet traffic uses Wi-Fi as the primary path. eth0 is used exclusively for direct MacBook Ethernet connections. Do not connect the Ethernet cable to the institute or instrument network.
Set Wi-Fi as primary internet (low metric):
Verify internet traffic uses Wi-Fi:
Expected: via 10.0.112.1 dev wlan0
QR sheet PDF download
The Automator controller no longer sends QR sheets directly to a CUPS printer. The /qr/print_sheet route generates the A4 QR PDF in memory and returns it to the browser as a download.
For normal users, QR sheet PDF download is done from the directly connected MacBook workflow at http://192.168.50.2:8080/. Admins can also download from the Pi desktop browser at http://127.0.0.1:8080/. The user opens the downloaded PDF on their own computer and prints it using an available printer.
NTP time synchronisation
The system uses the NBI site-approved NTP server. Public NTP pools are not used, per IT policy.
Create the configuration file:
Paste:
Apply and verify:
Correct time synchronisation matters for image timestamping, run logs, and experiment traceability.
4.9 Automatic Mac direct Ethernet access
This setup lets a MacBook connect directly to the Raspberry Pi by Ethernet cable. A script at /usr/local/sbin/eth0-auto-switch.sh activates the mac-direct-auto profile (192.168.50.2/24) and starts a small DHCP server (automator-direct-dhcp.service, using dnsmasq) that assigns the MacBook a 192.168.50.x address automatically. The MacBook user does not need to configure anything manually — the USB-C Ethernet adapter just needs to be on Using DHCP, which is the macOS default. Wi-Fi on wlan0 is not affected.
All files for this system are at the OS level. Nothing is in the Automator repository at /home/pi/Automator/.
The script is triggered three ways:
- At boot by a systemd service (
eth0-auto-switch.service) - On every Ethernet event by a NetworkManager dispatcher hook at
/etc/NetworkManager/dispatcher.d/90-eth0-auto-switch - Every 15 seconds by a systemd timer (
eth0-auto-switch.timer), to self-correct after missed cable events
The 192.168.50.0/24 private subnet with DHCP is used because macOS link-local (169.254.x.x) addressing was unreliable — macOS sometimes routed those packets over Wi-Fi instead of Ethernet.
Confirmed profile UUIDs
| Purpose | Profile name | UUID | Interface |
|---|---|---|---|
| Direct MacBook (auto) | mac-direct-auto |
65c3e7b6-303b-421a-9590-e41b9f1ce6b2 |
eth0 |
| IOT Wi-Fi | IOT |
e51d7392-116a-4dc6-8333-39fd9c718dbf |
wlan0 |
Step 1: Verify current state
Expected when directly connected to a MacBook:
Step 2: Disable the old manual profile
The old mac-direct profile must not autoconnect.
Verify:
nmcli con show 1039be5f-55ea-481a-aa92-bccda19095d1 | grep -E 'connection.id|connection.autoconnect'
Expected:
Step 3: Create the mac-direct-auto profile
Create the profile if it does not already exist:
sudo nmcli con add type ethernet ifname eth0 con-name mac-direct-auto \
  ipv4.method manual \
  ipv4.addresses 192.168.50.2/24 \
  ipv4.gateway "" \
  ipv4.never-default yes \
  ipv6.method ignore \
  connection.autoconnect yes \
  connection.autoconnect-priority -50
If it already exists, enforce the correct settings:
sudo nmcli con modify mac-direct-auto \
  ipv4.method manual \
  ipv4.addresses 192.168.50.2/24 \
  ipv4.gateway "" \
  ipv4.routes "" \
  ipv4.never-default yes \
  ipv6.method ignore \
  connection.autoconnect yes \
  connection.autoconnect-priority -50
Verify:
nmcli con show mac-direct-auto | grep -E 'connection.id|connection.interface-name|connection.autoconnect|connection.autoconnect-priority|ipv4.method|ipv4.addresses|ipv4.gateway|ipv4.never-default|ipv6.method'
Expected:
connection.id:                     mac-direct-auto
connection.interface-name:         eth0
connection.autoconnect:            yes
connection.autoconnect-priority:   -50
ipv4.method:                       manual
ipv4.addresses:                    192.168.50.2/24
ipv4.gateway:                      --
ipv4.never-default:                yes
ipv6.method:                       ignore
Step 4: Install arping
arping sends ARP packets at the Ethernet layer. A standard ping (ICMP) follows the routing table, which may not reflect what is physically connected. ARP checks physical presence at the link layer.
Verify:
Expected: /usr/sbin/arping
Step 5: Create the auto-switch script
Paste:
#!/usr/bin/env bash
set -u

LOCK_FILE="/run/eth0-auto-switch.lock"
ETH_DEV="eth0"

INSTITUTE_PROFILE_UUID="c3612a53-4d0a-4587-b00c-6f6eaaef9f04"
INSTITUTE_PROFILE_NAME="Instrument connection"
INSTITUTE_GATEWAY="10.0.8.1"

DIRECT_PROFILE="mac-direct-auto"
DIRECT_IP="192.168.50.2"
DIRECT_PREFIX="24"
DIRECT_DHCP_SERVICE="automator-direct-dhcp.service"

LOG_TAG="eth0-auto-switch"

log() {
  logger -t "$LOG_TAG" "$*"
  echo "$*"
}

start_direct_dhcp() {
  log "Starting direct MacBook DHCP service: $DIRECT_DHCP_SERVICE"
  systemctl start "$DIRECT_DHCP_SERVICE" >/dev/null 2>&1 || true
}

stop_direct_dhcp() {
  log "Stopping direct MacBook DHCP service: $DIRECT_DHCP_SERVICE"
  systemctl stop "$DIRECT_DHCP_SERVICE" >/dev/null 2>&1 || true
}

# Prevent overlapping runs from dispatcher/service/timer.
exec 9>"$LOCK_FILE"
if ! flock -n 9; then
  log "Another eth0-auto-switch instance is already running; exiting"
  exit 0
fi

if ! ip link show "$ETH_DEV" >/dev/null 2>&1; then
  log "$ETH_DEV does not exist; exiting"
  exit 0
fi

CARRIER_FILE="/sys/class/net/${ETH_DEV}/carrier"

if [ ! -f "$CARRIER_FILE" ]; then
  log "No carrier file for $ETH_DEV; exiting"
  exit 0
fi

if [ "$(cat "$CARRIER_FILE")" != "1" ]; then
  log "$ETH_DEV has no Ethernet carrier; stopping direct DHCP and exiting"
  stop_direct_dhcp
  exit 0
fi

CURRENT_CON="$(nmcli -t -f NAME,DEVICE con show --active | awk -F: -v dev="$ETH_DEV" '$2==dev{print $1; exit}')"
CURRENT_UUID="$(nmcli -t -f UUID,DEVICE con show --active | awk -F: -v dev="$ETH_DEV" '$2==dev{print $1; exit}')"

log "$ETH_DEV has carrier; current active eth0 profile: ${CURRENT_CON:-none}"
log "Checking whether Institute gateway $INSTITUTE_GATEWAY is reachable on $ETH_DEV"

# Do not bring up Instrument connection before this test.
# This checks whether the real Institute LAN gateway exists on the physical Ethernet link.
if arping -I "$ETH_DEV" -c 3 -w 3 "$INSTITUTE_GATEWAY" >/dev/null 2>&1; then
  log "Institute gateway $INSTITUTE_GATEWAY is reachable; Institute LAN is physically connected"

  # Safety: never run the direct MacBook DHCP server on the Institute LAN.
  stop_direct_dhcp

  if [ "$CURRENT_UUID" = "$INSTITUTE_PROFILE_UUID" ] || [ "$CURRENT_CON" = "$INSTITUTE_PROFILE_NAME" ]; then
    log "Already on $INSTITUTE_PROFILE_NAME; no switch needed"
    exit 0
  fi

  log "Switching to $INSTITUTE_PROFILE_NAME"
  nmcli con up "$INSTITUTE_PROFILE_UUID" ifname "$ETH_DEV" >/dev/null 2>&1 || true

  sleep 3

  if ip -4 addr show "$ETH_DEV" | grep -q "inet 10.0.8.72/"; then
    log "$INSTITUTE_PROFILE_NAME active on 10.0.8.72/24"
  else
    log "WARNING: $INSTITUTE_PROFILE_NAME did not show 10.0.8.72/24 after switching"
    ip -4 addr show "$ETH_DEV" | logger -t "$LOG_TAG"
  fi

  exit 0
fi

log "Institute gateway $INSTITUTE_GATEWAY not reachable; assuming direct MacBook cable"

if [ "$CURRENT_CON" = "$DIRECT_PROFILE" ]; then
  if ip -4 addr show "$ETH_DEV" | grep -q "inet ${DIRECT_IP}/"; then
    log "Already on $DIRECT_PROFILE with ${DIRECT_IP}/${DIRECT_PREFIX}; ensuring DHCP service is running"
    start_direct_dhcp
    exit 0
  fi
fi

log "Switching to $DIRECT_PROFILE"

nmcli con up "$DIRECT_PROFILE" ifname "$ETH_DEV" >/dev/null 2>&1 || true

for i in $(seq 1 15); do
  if ip -4 addr show "$ETH_DEV" | grep -q "inet ${DIRECT_IP}/"; then
    log "Direct MacBook mode active on ${DIRECT_IP}/${DIRECT_PREFIX}"
    start_direct_dhcp
    exit 0
  fi
  sleep 1
done

log "WARNING: $DIRECT_PROFILE did not appear to assign ${DIRECT_IP}/${DIRECT_PREFIX} after waiting"
ip -4 addr show "$ETH_DEV" | logger -t "$LOG_TAG"

# If direct IP did not come up, do not run DHCP.
stop_direct_dhcp

exit 0
Make it executable:
Step 6: Test the script manually
Connect the Pi directly to a MacBook and run:
Expected output:
eth0 has carrier; current active eth0 profile: none
Checking whether Institute gateway 10.0.8.1 is reachable on eth0
Institute gateway 10.0.8.1 not reachable; assuming direct MacBook cable
Switching to mac-direct-auto
Direct MacBook mode active on 192.168.50.2/24
Verify:
Expected in direct mode:
If the web server only shows 127.0.0.1:8080, it is not reachable from outside the Pi. Check the Flask bind address in /home/pi/Automator/dev2/maincontroller.py.
Step 7: Create the boot-time systemd service
Paste:
[Unit]
Description=Auto switch eth0 between Institute LAN and direct MacBook mode
After=NetworkManager.service
Wants=NetworkManager.service

[Service]
Type=oneshot
ExecStart=/usr/local/sbin/eth0-auto-switch.sh
RemainAfterExit=no

[Install]
WantedBy=multi-user.target
Enable:
Test the service:
Expected for a successful oneshot:
If an old failed state remains:
Step 8: Create the NetworkManager dispatcher hook
The dispatcher fires the script on Ethernet up or connectivity-change events, catching most cable insertions immediately.
Paste:
#!/usr/bin/env bash

IFACE="$1"
STATUS="$2"

if [ "$IFACE" != "eth0" ]; then
  exit 0
fi

case "$STATUS" in
  up|connectivity-change)
    /usr/local/sbin/eth0-auto-switch.sh &
    ;;
esac

exit 0
Make it executable and restart NetworkManager:
sudo chmod +x /etc/NetworkManager/dispatcher.d/90-eth0-auto-switch
sudo systemctl restart NetworkManager
Repeated log messages of Another eth0-auto-switch instance is already running; exiting are acceptable — the flock lock prevents concurrent runs. Continuous profile switching is not acceptable.
Step 9: Create the systemd timer
Cable changes do not always produce a dispatcher event. The timer re-checks every 15 seconds and self-corrects.
Paste:
[Unit]
Description=Run eth0 auto switch periodically

[Timer]
OnBootSec=20
OnUnitActiveSec=15
AccuracySec=5
Unit=eth0-auto-switch.service

[Install]
WantedBy=timers.target
Enable and start:
Verify:
systemctl status eth0-auto-switch.timer --no-pager
systemctl list-timers --all | grep eth0-auto-switch
Expected:
After a cable change, the Pi should self-correct within 15–20 seconds.
Final validation
With the Pi directly connected to a MacBook, run:
Expected:
Expected log pattern:
Institute gateway 10.0.8.1 not reachable; assuming direct MacBook cable
Direct MacBook mode active on 192.168.50.2/24
MacBook-side setup and admin testing
Normal users set the MacBook Ethernet adapter through macOS Settings (see HowToUseAutomator.md). For admin testing in a terminal:
Find the active Ethernet interface:
It may be named en5, en6, en7, en8, or similar.
Set the MacBook address manually (replace en8 with the correct interface name):
Add a host route via Ethernet:
sudo route -n delete -host 192.168.50.2 2>/dev/null
sudo route -n add -host 192.168.50.2 -interface en8
Verify the route goes over Ethernet, not Wi-Fi:
Expected: interface: en8. If it shows en0 (Wi-Fi), re-add the explicit host route.
Test connectivity:
A successful unauthenticated curl returns:
That confirms the web UI is reachable and prompting for authentication.
If stale 169.254.50.2 routes from the old design cause interference, remove them:
sudo route -n delete -host 169.254.50.2 2>/dev/null
sudo route -n delete -net 169.254.0.0/16 2>/dev/null
Recovery commands
Force direct MacBook mode:
Temporarily disable the dispatcher (stops auto-switching for testing):
Re-enable the dispatcher:
Disable and re-enable the timer:
sudo systemctl disable --now eth0-auto-switch.timer
sudo systemctl enable --now eth0-auto-switch.timer
Check logs:
Live view:
Clear an old failed service state:
Wi-Fi is not affected by any of these operations. The IOT connection on wlan0 remains active throughout.
4.10 USB image export system
This system automatically copies the Automator image/data folder from the Pi's local storage to a USB pen drive when one is plugged in. It uses udev to detect the USB drive, and a systemd service to run the copy.
For operators, the workflow is intentionally simple and headless: plug in a USB drive, wait 2-3 minutes, then remove the drive. Exported files are placed under USB drive/images/. If the expected files are not present on the USB drive, the local Pi copy should be treated as the authoritative source.
The setup creates three files. All code for this system is at the system level, not in the Automator repository.
Install required packages (if not already done in step 4.2):
Create the export script
Paste the following:
#!/usr/bin/env bash
set -Eeuo pipefail

readonly SOURCE_DIR="/home/pi/Automator/data"
readonly MOUNT_POINT="/mnt/image-export-usb"
readonly LOCK_FILE="/run/export-images-to-usb.lock"
readonly EXPORT_SUBDIR="images"

log() { echo "export-images-to-usb[$$]: $*"; }
fail() { log "ERROR: $*"; exit 1; }

DEVICE_NAME="${1:-}"
[[ -z "$DEVICE_NAME" ]] && fail "No device name supplied."
[[ ! "$DEVICE_NAME" =~ ^[A-Za-z0-9._+-]+$ ]] && fail "Invalid device name: $DEVICE_NAME"

readonly DEVICE="/dev/$DEVICE_NAME"
exec 9>"$LOCK_FILE"
flock -n 9 || { log "Another export is already running."; exit 0; }

[[ ! -d "$SOURCE_DIR" ]] && fail "Source directory does not exist: $SOURCE_DIR"
[[ ! -b "$DEVICE" ]] && fail "Device is not a block device: $DEVICE"

DEVTYPE="$(lsblk -no TYPE "$DEVICE" 2>/dev/null | head -n1 | tr -d '[:space:]' || true)"
[[ "$DEVTYPE" != "part" ]] && fail "Device is not a partition: $DEVICE type=$DEVTYPE"

PKNAME="$(lsblk -no PKNAME "$DEVICE" 2>/dev/null | head -n1 | tr -d '[:space:]' || true)"
[[ -z "$PKNAME" ]] && fail "Could not determine parent block device for $DEVICE"

PARENT_DEVICE="/dev/$PKNAME"
TRAN="$(lsblk -dn -o TRAN "$PARENT_DEVICE" 2>/dev/null | head -n1 | tr -d '[:space:]' || true)"
[[ "$TRAN" != "usb" ]] && fail "Parent device is not USB: $PARENT_DEVICE transport=$TRAN"

FSTYPE="$(blkid -o value -s TYPE "$DEVICE" 2>/dev/null || true)"
LABEL="$(blkid -o value -s LABEL "$DEVICE" 2>/dev/null || true)"
[[ -z "$FSTYPE" ]] && fail "Could not detect filesystem on $DEVICE"

case "$LABEL" in
  bootfs|rootfs) log "Skipping system partition: $DEVICE label=$LABEL"; exit 0 ;;
esac

case "$FSTYPE" in
  vfat|exfat|ext4|ntfs) log "Filesystem: $FSTYPE label=${LABEL:-none}" ;;
  *) fail "Unsupported filesystem: $FSTYPE" ;;
esac

mkdir -p "$MOUNT_POINT"
MOUNTED_BY_SCRIPT=0
EXPORT_OK=0

write_status_file() {
  local sf="$1" st="$2"
  mountpoint -q "$MOUNT_POINT" && {
    { echo "$st"; echo "Device: $DEVICE"; echo "Filesystem: $FSTYPE";
      echo "Timestamp UTC: $(date -u '+%Y-%m-%dT%H:%M:%SZ')"; echo "Hostname: $(hostname)";
    } > "$MOUNT_POINT/$sf" || true
  }
}

cleanup() {
  local ec=$?; set +e
  if [[ "$MOUNTED_BY_SCRIPT" -eq 1 ]] && mountpoint -q "$MOUNT_POINT"; then
    [[ "$EXPORT_OK" -eq 1 ]] \
      && write_status_file "EXPORT_DONE.txt" "Export completed successfully." \
      || write_status_file "EXPORT_FAILED.txt" "Export failed or was interrupted."
    log "Syncing and unmounting..."; sync; umount "$MOUNT_POINT"
    command -v udisksctl >/dev/null 2>&1 \
      && udisksctl power-off -b "$PARENT_DEVICE" >/dev/null 2>&1 || true
  fi
  exit "$ec"
}
trap cleanup EXIT INT TERM

EXISTING_MOUNTS="$(findmnt -rn -S "$DEVICE" -o TARGET 2>/dev/null || true)"
if [[ -n "$EXISTING_MOUNTS" ]]; then
  while IFS= read -r em; do
    [[ -z "$em" ]] && continue
    umount "$em" || fail "Could not unmount existing mount: $em"
  done <<< "$EXISTING_MOUNTS"
fi

mountpoint -q "$MOUNT_POINT" && fail "Mount point already in use: $MOUNT_POINT"

log "Mounting $DEVICE at $MOUNT_POINT..."
case "$FSTYPE" in
  ext4)  mount -t ext4  -o rw,noexec,nodev,nosuid "$DEVICE" "$MOUNT_POINT" ;;
  vfat)  mount -t vfat  -o rw,noexec,nodev,nosuid,uid=0,gid=0,umask=022,flush "$DEVICE" "$MOUNT_POINT" ;;
  exfat) mount -t exfat -o rw,noexec,nodev,nosuid,uid=0,gid=0,umask=022 "$DEVICE" "$MOUNT_POINT" ;;
  ntfs)  mount -t ntfs3 -o rw,noexec,nodev,nosuid,uid=0,gid=0,umask=022 "$DEVICE" "$MOUNT_POINT" \
           2>/dev/null || ntfs-3g -o rw,noexec,nodev,nosuid,uid=0,gid=0,umask=022 "$DEVICE" "$MOUNT_POINT" \
           || fail "NTFS: neither ntfs3 nor ntfs-3g available." ;;
esac
MOUNTED_BY_SCRIPT=1
mkdir -p "$MOUNT_POINT/$EXPORT_SUBDIR"

log "Starting rsync from $SOURCE_DIR/ to $MOUNT_POINT/$EXPORT_SUBDIR/"
if rsync -rt --ignore-existing --no-owner --no-group --no-perms --omit-dir-times \
    -- "$SOURCE_DIR"/ "$MOUNT_POINT/$EXPORT_SUBDIR"/; then
  EXPORT_OK=1; log "rsync completed."
else
  EXPORT_OK=0; log "ERROR: rsync failed."; exit 1
fi
exit 0
Set permissions:
sudo chmod 0755 /usr/local/sbin/export-images-to-usb.sh
sudo chown root:root /usr/local/sbin/export-images-to-usb.sh
Create the systemd service
Paste:
[Unit]
Description=Export Automator capture images to USB partition %I
After=systemd-udevd.service local-fs.target
Wants=systemd-udevd.service

[Service]
Type=oneshot
ExecStart=/usr/local/sbin/export-images-to-usb.sh %I
TimeoutStartSec=30min
User=root
Group=root
StandardOutput=journal
StandardError=journal
NoNewPrivileges=true
PrivateTmp=true

[Install]
WantedBy=multi-user.target
Reload systemd:
Create the udev rule
Paste:
ACTION=="add", SUBSYSTEM=="block", ENV{DEVTYPE}=="partition", ENV{ID_BUS}=="usb", ENV{ID_FS_USAGE}=="filesystem", ENV{UDISKS_IGNORE}="1"

ACTION=="add", SUBSYSTEM=="block", ENV{DEVTYPE}=="partition", ENV{ID_BUS}=="usb", ENV{ID_FS_USAGE}=="filesystem", ENV{ID_FS_LABEL}=="bootfs", GOTO="export_images_usb_end"
ACTION=="add", SUBSYSTEM=="block", ENV{DEVTYPE}=="partition", ENV{ID_BUS}=="usb", ENV{ID_FS_USAGE}=="filesystem", ENV{ID_FS_LABEL}=="rootfs", GOTO="export_images_usb_end"

ACTION=="add", SUBSYSTEM=="block", ENV{DEVTYPE}=="partition", ENV{ID_BUS}=="usb", ENV{ID_FS_USAGE}=="filesystem", TAG+="systemd", ENV{SYSTEMD_WANTS}+="export-images-to-usb@%k.service"

LABEL="export_images_usb_end"
Reload udev:
Testing
Plug in a USB drive and check its partition name:
Start the service manually (replace sda1 with the actual partition name):
Check logs:
Successful output ends with Unmounted /mnt/image-export-usb successfully.
Note: The udev rule uses ENV{UDISKS_IGNORE}="1" to stop the Raspberry Pi desktop automounter from mounting the USB drive while the export service is running. If the desktop still automounts it, unmount manually with sudo umount /media/pi/<label>.
4.11 Python virtual environment
From the repository root:
python3 -m venv venv_clean
source venv_clean/bin/activate
python -m pip install --upgrade pip
pip install -r requirements.txt
The requirements.txt includes Flask, SocketIO, OpenCV, ONNX runtime, Picamera2, GPIO libraries, and QR decoding libraries.
For development tools:
4.12 Secrets and environment variables
The controller requires these environment variables at startup. If AUTOMATOR_ADMIN_PASSWORD is not set, maincontroller.py raises a RuntimeError and the service will not start.
export AUTOMATOR_ADMIN_PASSWORD='choose-a-strong-password'
export AUTOMATOR_SESSION_SECRET='long-random-secret-string'
Run-completion emails are sent automatically from no-reply-tslautomator@nbi.ac.uk via smtp.nbi.ac.uk (port 25, no auth). No email credentials are required in the environment or the systemd service file.
Note: Unauthenticated SMTP on port 25 is acceptable here because
smtp.nbi.ac.ukis an internal institute relay that accepts submissions only from within the NBI network. The Automator Pi is always on the IOT network segment behind the institute firewall, so this relay is never reachable from the public internet.
4.13 systemd services
Two services manage the Automator runtime.
automator-controller.service — runs the main controller
Create /etc/systemd/system/automator-controller.service:
[Unit]
Description=Automator Controller
After=network.target

[Service]
Type=simple
User=pi
WorkingDirectory=/home/pi/Automator/dev2
Environment=AUTOMATOR_ADMIN_PASSWORD=<password>
Environment=AUTOMATOR_SESSION_SECRET=<secret>

ExecStart=/home/pi/Automator/venv_clean/bin/python /home/pi/Automator/dev2/maincontroller.py
Restart=no
StandardOutput=journal
StandardError=journal

[Install]
WantedBy=multi-user.target
Restart=no is intentional. The controller should not restart automatically after an operator stops it for safety review or maintenance.
automator-buttons.service — listens for GPIO button presses
Create /etc/systemd/system/automator-buttons.service:
[Unit]
Description=Automator GPIO Button Listener
After=network.target moonraker.service klipper.service
Requires=moonraker.service klipper.service

[Service]
Type=simple
User=pi
WorkingDirectory=/home/pi/Automator/dev2
Environment=AUTOMATOR_ADMIN_PASSWORD=<password>
ExecStartPre=/bin/sleep 5
ExecStart=/home/pi/Automator/venv_clean/bin/python /home/pi/Automator/dev2/button_listener.py
Restart=always
RestartSec=2
StandardOutput=journal
StandardError=journal

[Install]
WantedBy=multi-user.target
Restart=always is correct here. The button listener should recover if it crashes.
Activate both services:
sudo systemctl daemon-reload
sudo systemctl enable automator-controller.service
sudo systemctl enable automator-buttons.service
sudo systemctl start automator-controller.service
sudo systemctl start automator-buttons.service
4.14 PolicyKit rule
Moonraker and the button listener need permission to manage systemd units and issue reboots. Create the PolicyKit rule:
Paste:
polkit.addRule(function(action, subject) {
    if (
        action.id == "org.freedesktop.systemd1.manage-units" ||
        action.id == "org.freedesktop.login1.power-off" ||
        action.id == "org.freedesktop.login1.power-off-multiple-sessions" ||
        action.id == "org.freedesktop.login1.reboot" ||
        action.id == "org.freedesktop.login1.reboot-multiple-sessions"
    ) {
        if (subject.user == "pi") {
            return polkit.Result.YES;
        }
    }
});
4.15 GPIO allocation
| GPIO | Physical pin | Function |
|---|---|---|
| 17 | 11 | START button input |
| 27 | 13 | STOP button input |
| 23 | 16 | LED relay output |
| 26 | 37 | Door sensor input |
| 4 | 7 | Relay pulse trigger output |
Internal pull-ups are used on all inputs. No external resistors are required.
4.16 Validate the installation
After completing all steps above, run through this checklist:
# Check all services are running
sudo systemctl status klipper moonraker automator-controller.service automator-buttons.service

# Check the API responds
curl -u admin:<password> http://localhost:8080/system/version
curl -u admin:<password> http://localhost:8080/system/state

# Check Moonraker
curl -s http://localhost:7125/printer/info

# Check routing
ip route
ip route get 8.8.8.8
Then run one complete imaging cycle with a single plate to confirm end-to-end operation.
4.17 Kiosk and admin desktop
The Raspberry Pi uses a Labwc/Wayland desktop session with Chromium running in kiosk mode on boot. General users see the Automator interface full-screen on the HDMI display without needing a MacBook or Ethernet cable. Admins can exit kiosk to the full Pi desktop and return to kiosk using keyboard shortcuts.
| Action | Shortcut |
|---|---|
| Exit kiosk → Pi desktop | Ctrl+Alt+A |
| Return to kiosk | Windows+K |
The kiosk uses two small scripts in ~/.local/bin/:
enter-admin-desktop.sh— kills Chromium, restores the Pi panelstart-kiosk.sh— starts Chromium in kiosk mode athttp://127.0.0.1:8080/
Keyboard shortcuts are bound via ~/.config/labwc/rc.xml. Kiosk auto-starts on boot via ~/.config/labwc/autostart. Desktop icons (~/Desktop/*.desktop) provide fallback access if shortcuts fail.
For the full step-by-step setup (including copy-paste setup block, troubleshooting, and safety rules), see raspberry-pi-automator-kiosk-admin-desktop.md.
5. Running the controller
Direct (testing only)
cd /home/pi/Automator/dev2
source /home/pi/Automator/venv_clean/bin/activate
export AUTOMATOR_ADMIN_PASSWORD='<password>'
export AUTOMATOR_SESSION_SECRET='<secret>'
python maincontroller.py
From the Raspberry Pi desktop browser, admins can use:
Normal users should use the directly connected MacBook route:
Via systemd (production)
sudo systemctl restart automator-controller.service
sudo systemctl status automator-controller.service
6. Code guide
All runtime Python files are at /home/pi/Automator/dev2/. Within that directory:
6.1 Core runtime
dev2/maincontroller.py — the main Flask + SocketIO application, port 8080.
Key responsibilities:
- Workspace QR detection via
/detect(optional?pulse=1pre-scan pulse) - Imaging configuration via
/config - Per-plate scheduling in
runtime(hours) mode - Imaging lifecycle: start, pause, resume, stop
- Pause-safe actuator handling: releases hold/vacuum and turns LEDs off on pause; restores them on resume
- Post-capture re-grip prevention: if a pause fires after the image is captured but before cleanup, the resume path skips the spurious re-grip (controlled by
_post_captureflag instage_state) - Per-plate first-grip extended vacuum dwell: each plate gets a longer settle (8 s vs 6 s) on its first grip per sequence; flags reset after each inter-cycle park so post-park first grips also get the extended dwell
- Door sensor debounce: door-open events are confirmed after a 3 s delay; transients shorter than 3 s (e.g. from servo PWM noise on GPIO 26) are silently discarded and do not trigger a pause
- Inter-cycle parking: if the gap before the next capture is greater than 5 minutes, the arm parks at home and wakes up automatically before the next due capture
- Local Basic Auth for
/and/main - QR generation via
/qr/generateand A4 QR PDF download via/qr/print_sheet - Local file browsing via
/files/and/files/<path> - State persistence to
/home/pi/Automator/raw/controller_state.json— survives unplanned reboots
dev2/maingcodesender.py — Klipper/Moonraker G-code communication.
Thread-safe send_gcode, motion helpers, vacuum and rotation control wrappers, position readback.
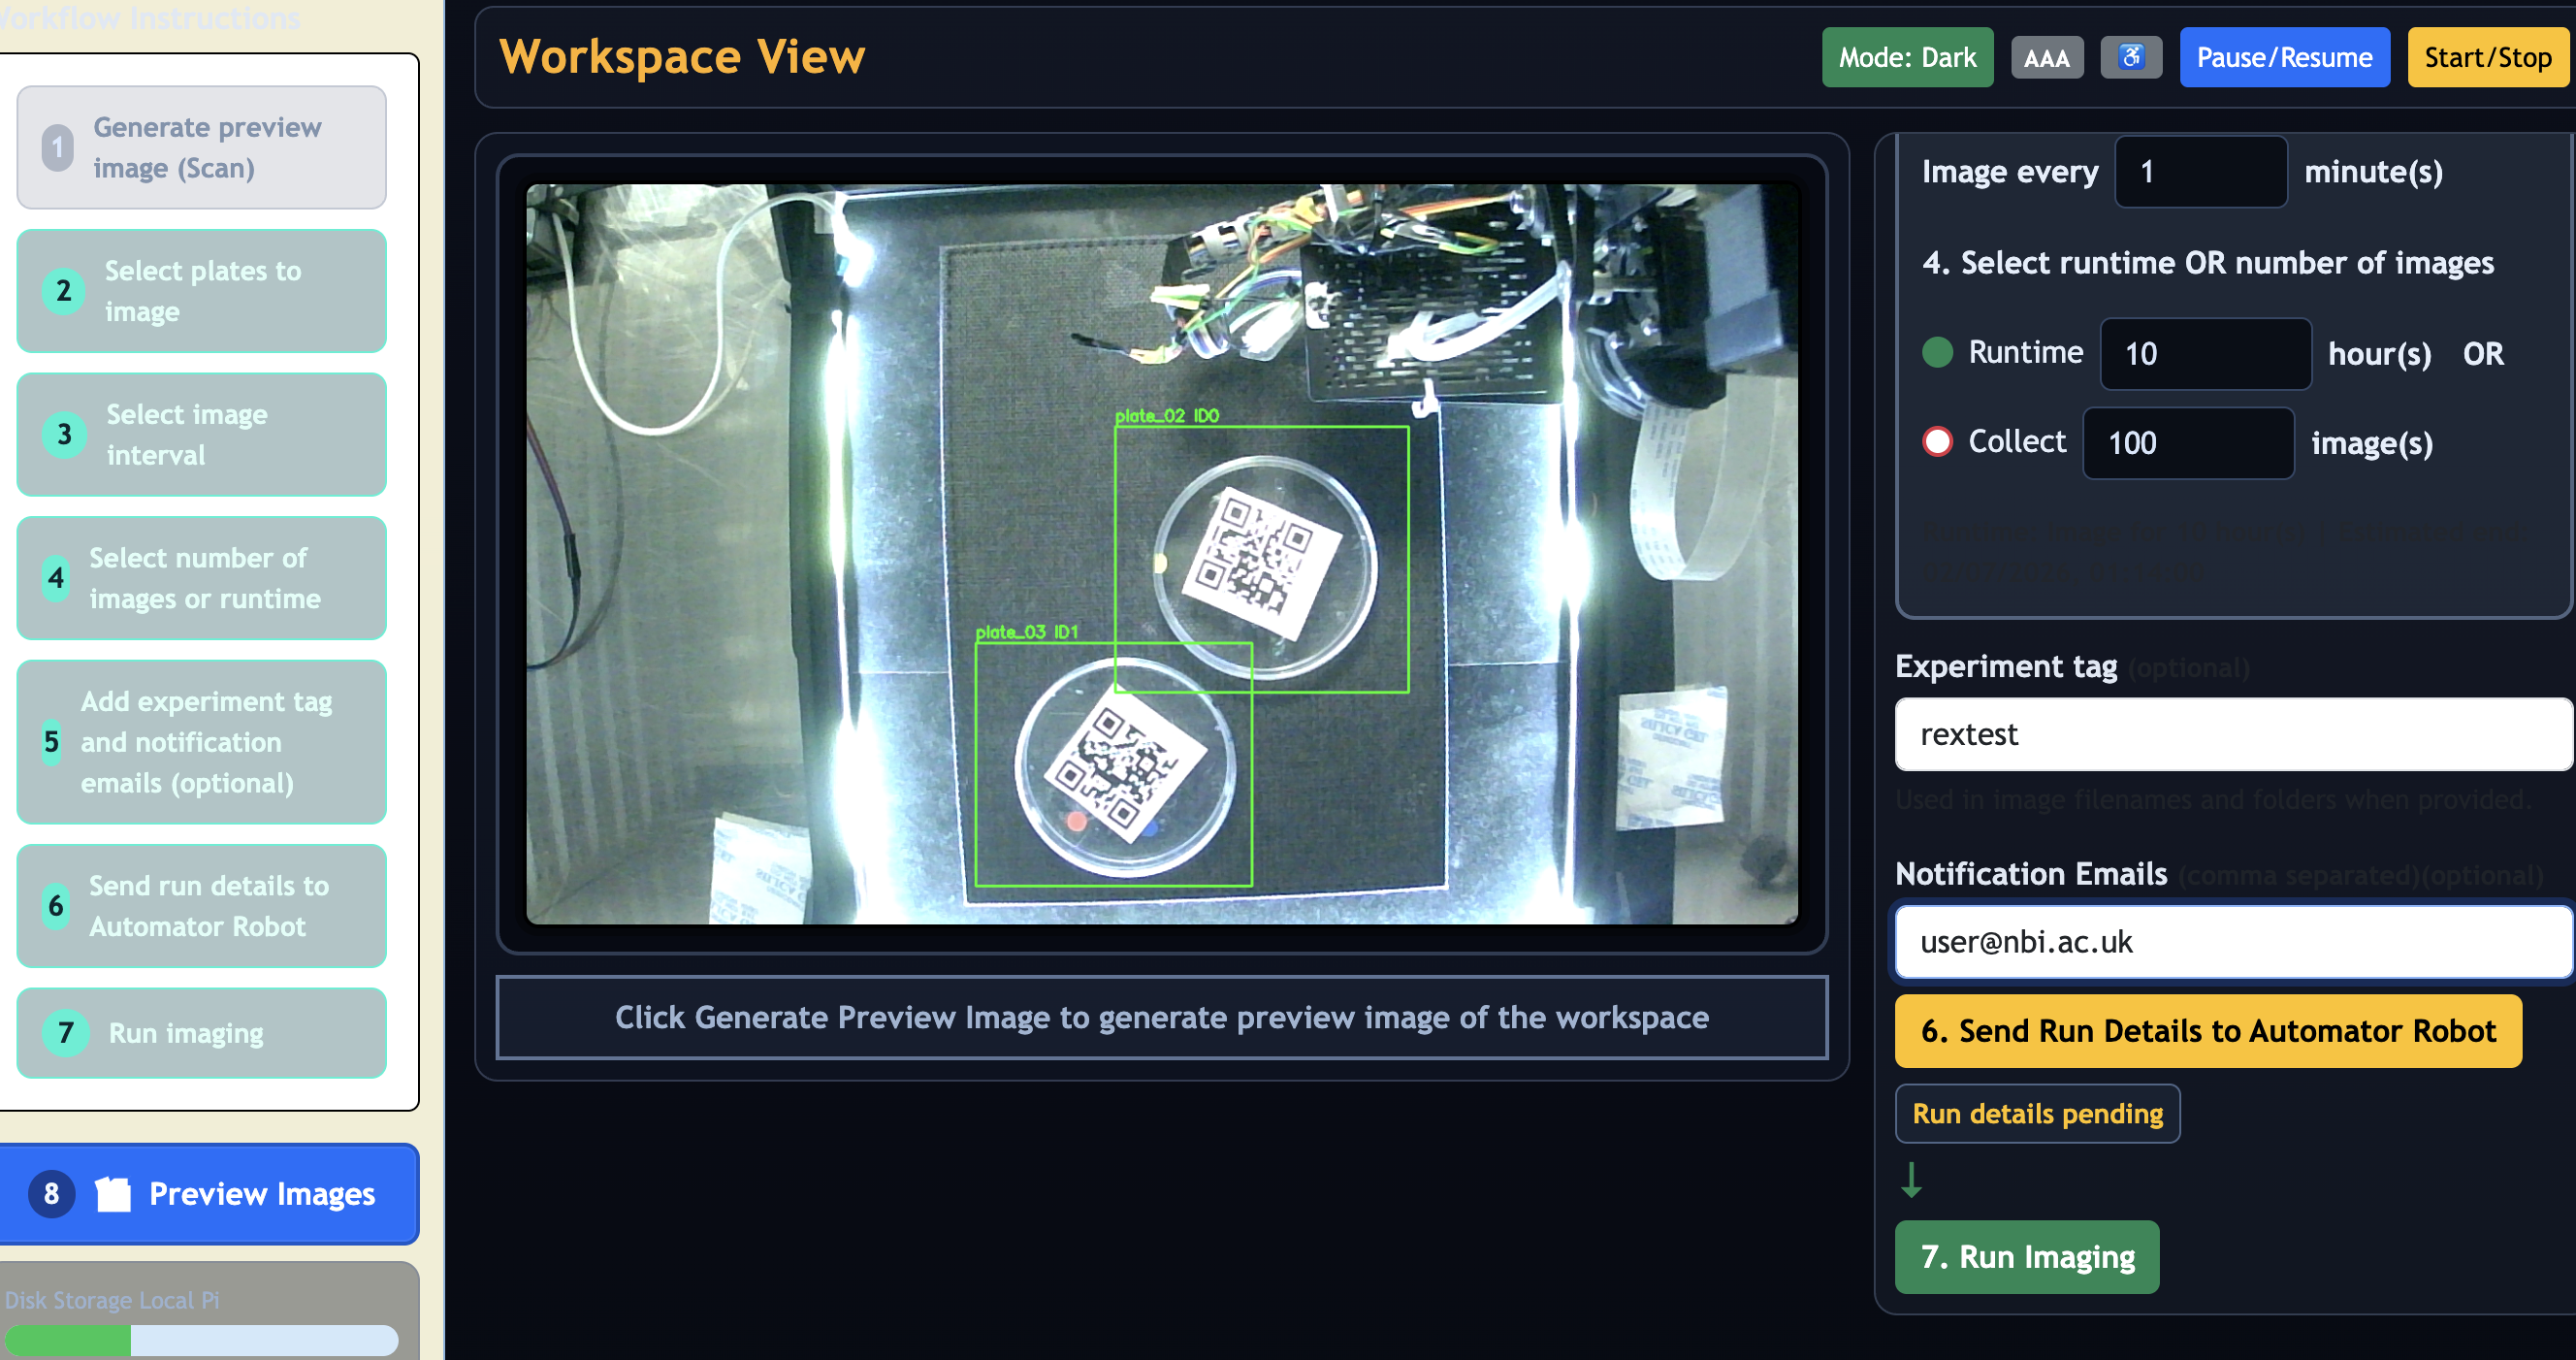
dev2/mainusbcamera.py — USB camera detection pipeline.
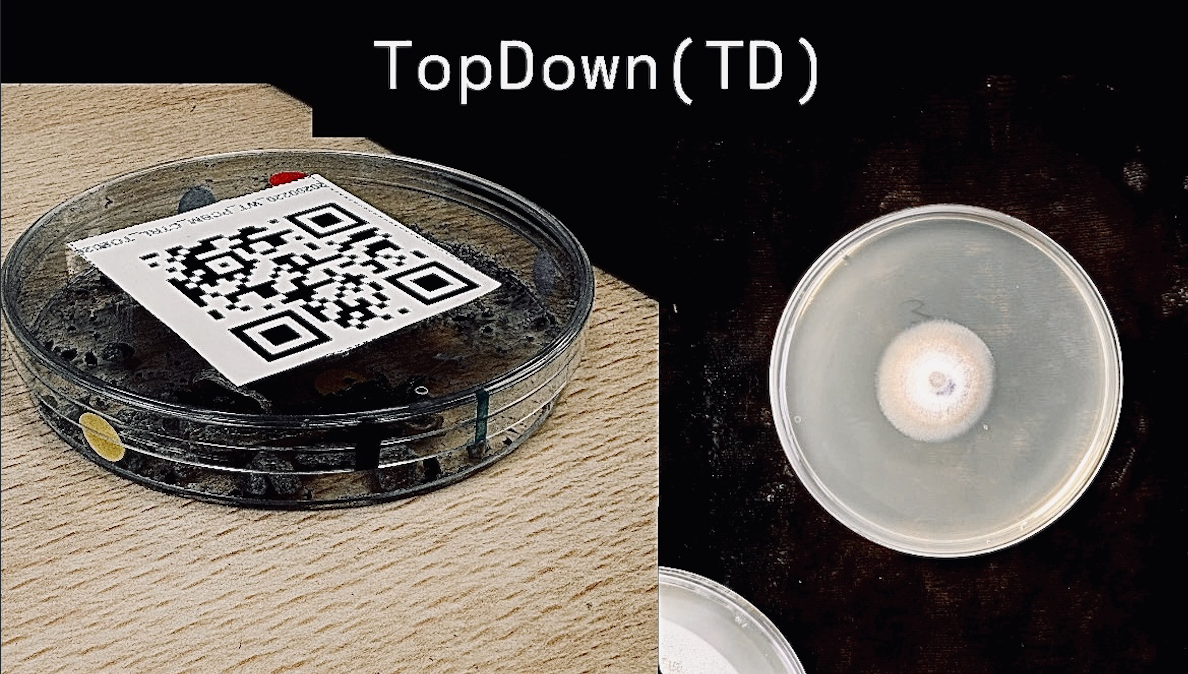
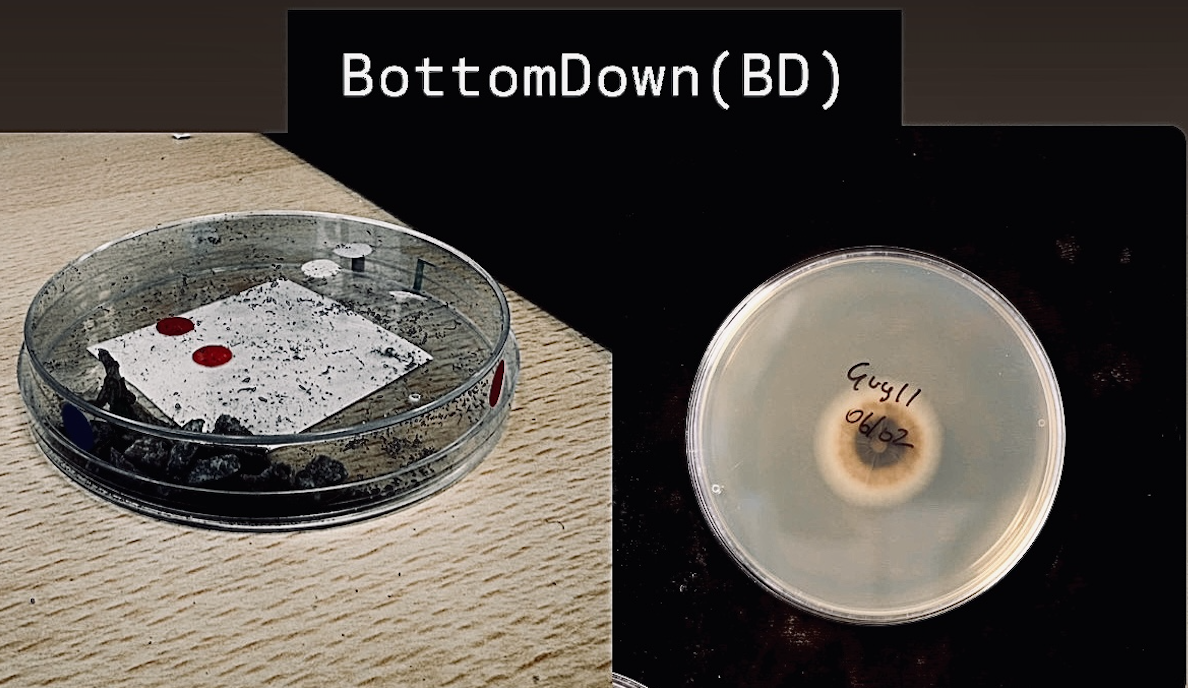
ONNX dish detection, QR decoding, homography mapping. Caches the USB camera index in data/usb_camera_index.json. The detection system handles two QR label orientations: top-down (TOP) and bottom-down (BOTTOM).
dev2/raspberry_camera.py — PiCamera2 still image capture.
6.2 Hardware and safety
dev2/doorsense.py — door sensor on GPIO 26 (open/closed state). Registers an atexit handler to release GPIO pin 26 on process exit.
dev2/led.py — LED relay on GPIO 23. Registers an atexit handler to drive the relay LOW and release GPIO pins 23 and 4 on process exit.
dev2/button_listener.py — hardware button logic.
- START (GPIO 17):
systemctl start automator-controller.service - STOP short press: pause/resume via API
6.3 Diagnostics (internal use only)
dev2/maindiagnostics.py — separate diagnostics web app for internal testing. Provides live MJPEG, machine state telemetry, and movement/vacuum/rotation test endpoints. Not used during production imaging.
dev2/main_mjpeg_server.py — standalone MJPEG streaming server on port 9000. Internal only.
dev2/calibration.py — interactive calibration scripts for homography and corner mapping.
dev2/qrtest.py — QR detection test utility.
6.4 UI assets
dev2/templates/index_qr.html — QR generator/setup UI for plate details and downloadable A4 QR PDF sheet. A standalone equivalent of this page is published separately as the qr-generator-Automator PyPI package for users who want to generate labels without connecting to the Automator; it is not part of this repo's requirements.txt and is not installed on the Pi.
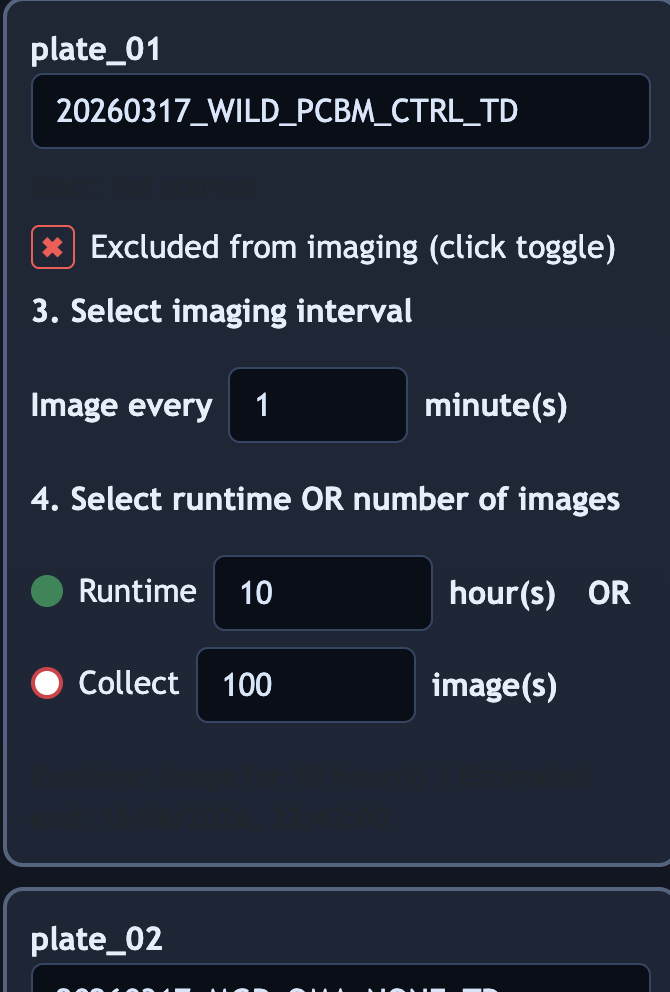
dev2/templates/index.html — main imaging workflow view; includes the optional Notification Emails field (below the experiment tag; institute addresses only: @nbi.ac.uk or @tsl.ac.uk). A Select All button beside the Per-Plate Configuration heading selects every detected plate in one click; individual plates can still be unticked using their per-card toggle. After clicking Send Run Details to Automator, an auto-dismissing popup confirms the estimated run finish time, total image count, and notification email recipient. Footer includes a Go back to QR page button (beside ● Kp ● Mk) that navigates to /; a confirm dialogue is shown if imaging_active is true when the button is clicked. Footer also includes a Troubleshooting button that opens a modal to restart Klipper or Moonraker via POST /system/restart-klipper and POST /system/restart-moonraker (both @require_auth; each runs sudo systemctl restart <service> on the Pi). If either Klipper or Moonraker goes offline, a non-blocking popup appears at the bottom-right of the page prompting the operator to use the Troubleshooting section; the popup auto-dismisses after 40 s and has a manual dismiss button.
dev2/static/ — logo, overlays, preview images.
6.5 Configuration and state files
| File | Purpose |
|---|---|
~/printer_data/config/printer.cfg |
Klipper pin/macro configuration |
/home/pi/Automator/raw/controller_state.json |
Run state, survives reboot |
/home/pi/Automator/raw/plates_db.json |
Plate detection database |
/home/pi/Automator/raw/controller.log |
Controller log |
/home/pi/Automator/data/ |
All captured images |
/home/pi/Automator/data/usb_camera_index.json |
USB camera device cache |
Do not delete controller_state.json during a run. The system reads it on startup to resume an interrupted session.
7. Admin troubleshooting
7.1 Service does not start
If the log shows RuntimeError: AUTOMATOR_ADMIN_PASSWORD is not set, the password is missing from the service environment. Edit the service file, add the environment variable, then sudo systemctl daemon-reload && sudo systemctl restart automator-controller.service.
7.2 Motion commands fail or no homing
sudo systemctl status klipper
curl -s http://localhost:7125/printer/info
journalctl -u klipper -n 50
If Klipper is not running or the printer info returns an error:
Users can also restart Klipper or Moonraker from the web UI Troubleshooting button (footer of /main) without terminal access.
- Restart Klipper:
sudo systemctl restart klipper - Verify the MKS board is connected:
ls /dev/serial/by-id/ - Verify
printer.cfgmacros and pin names match the hardware - Confirm the board was flashed correctly (see section 4.5)
7.3 USB camera not detected
If no camera appears, try a different USB port and restart the service. If the wrong camera index is cached, remove the stale cache file:
rm /home/pi/Automator/data/usb_camera_index.json
sudo systemctl restart automator-controller.service
7.4 Pi camera capture fails
If this fails, the Picamera2/libcamera stack is not installed correctly or the CSI ribbon cable is not seated. Check the ribbon cable orientation on both ends (the Pi CSI connector and the camera itself).
7.5 Buttons not working
systemctl status automator-buttons.service
journalctl -u automator-buttons.service -f
curl -u admin:<password> http://127.0.0.1:8080/system/state
If the button service logs auth errors, the AUTOMATOR_ADMIN_PASSWORD in automator-buttons.service does not match the one in automator-controller.service. They must be identical.
If the service shows GPIO busy errors, another process is holding the GPIO pins. Check for duplicate processes with ps aux | grep button_listener.
7.6 Controller restarts unexpectedly
The automator-controller.service unit must have Restart=no. If the controller restarts automatically after being stopped for safety review or maintenance, the unit file has been changed. Correct it and reload:
7.7 After relocation or path change
If the repository is moved from /home/pi/Automator/, update all hard-coded paths in:
dev2/maincontroller.py/etc/systemd/system/automator-controller.service/etc/systemd/system/automator-buttons.serviceconfig/printer.cfg(if paths are referenced there)
Then reload systemd.
7.8 Quick checks
# Controller status
curl -u admin:<password> http://127.0.0.1:8080/system/version
curl -u admin:<password> http://127.0.0.1:8080/system/state

# Logs
tail -n 200 /home/pi/Automator/raw/controller.log
journalctl -u automator-controller.service -n 200 --no-pager

# Disk space
curl -u admin:<password> http://127.0.0.1:8080/system/disk
df -h /home/pi/Automator/data

# JPG cleanup — timer status and last run log
systemctl is-active cleanup-jpgs.timer
journalctl -u cleanup-jpgs.service -n 20 --no-pager
python3 /home/pi/Automator/dev2/cleanup_jpgs.py   # dry run, no deletion

# Temperature
vcgencmd measure_temp
8. Maintenance schedule
Daily
- Visual inspection: no obstructions in the gantry path, no loose cables
- Check disk space (local) — imaging stops if local storage drops below 5%; confirm cleanup timer is active (
systemctl is-active cleanup-jpgs.timer); automated cleanup runs every 3 days viacleanup-jpgs.timer(see JPG_Cleanup_Workflow.md) - Review the tail of the controller log for errors
Weekly
- Inspect the Pi camera lens for dust or condensation
- Verify all services are running:
systemctl status automator-controller.service klipper moonraker automator-buttons.service - Test the door interlock: open the door during a test scan and confirm the UI shows the door-open state. If the door opens while the servo is at 0° (mid-capture), the controller retracts the servo to 90° before releasing vacuum to prevent the lid dropping onto the sample.
Monthly
- Verify the latest backup is less than 3 days old
- Test the physical AC-side emergency stop and confirm all system supplies lose power
- Check CPU temperature at load: should stay below 75°C
Quarterly
- Review firmware and dependency updates on GitHub. Test in a non-production run before deploying.
- Inspect mechanical components: belts, bearings, stepper motor mounts for wear or loose fasteners
Every 6 months
- Rotate
AUTOMATOR_ADMIN_PASSWORDandAUTOMATOR_SESSION_SECRET. Update both service files, reload systemd, restart services. - Review this document against the current codebase for accuracy.
Backup procedure
Images accumulate in /home/pi/Automator/data/. Export to a USB drive as described in the user guide, or copy via scp from another machine on the same network.
Software update procedure
The Raspberry Pi has two remotes configured:
| Remote | URL |
|---|---|
origin |
https://github.com/rotsl/Automator.git |
teammaclean |
https://github.com/TeamMacLean/Automator.git |
The local main branch tracks teammaclean/main. git pull in step 4 below pulls from teammaclean/main by default. To pull from the original rotsl repository instead, use git pull origin main. Always run git status before pulling — do not pull if there are uncommitted changes unless they have been committed, stashed, or intentionally discarded. Verify the setup with git remote -v and git branch -vv.
- Announce a maintenance window.
- Stop active imaging.
- Back up data and raw directory.
- Pull reviewed code:
cd /home/pi/Automator && git pull - Update Python dependencies:
source venv_clean/bin/activate && pip install -r requirements.txt - Restart services:
sudo systemctl restart automator-controller.service - Verify with
curl -u admin:<password> http://localhost:8080/system/version - Run a test imaging cycle.
9. Security
Credentials
AUTOMATOR_ADMIN_PASSWORDandAUTOMATOR_SESSION_SECRETmust never be committed to the git repository.- Set them only in the systemd service environment, not in shell profiles or code.
- Rotate after any incident and on the 6-monthly schedule.
Network access
- The controller binds to
0.0.0.0(all interfaces) by default for direct MacBook Ethernet, kiosk display, and Pi-local/admin workflows, but should never be exposed to an untrusted network. - Keep the controller behind the institutional network boundary. Do not open it to the internet.
- Do not use the kiosk display and a MacBook Ethernet connection simultaneously — running both at once can cause latency.
Access control
- The
admincredential is the only account. There is no separate read-only user. - Restrict knowledge of the admin password to technical staff.
- Revoke or rotate the password promptly when personnel with access leave.
Audit logs
Retain:
/home/pi/Automator/raw/controller.logjournalctl -u automator-controller.service- Any incident notes
journalctl -t eth0-auto-switch
10. Practical takeover checklist
Run through this list when taking over an existing deployment:
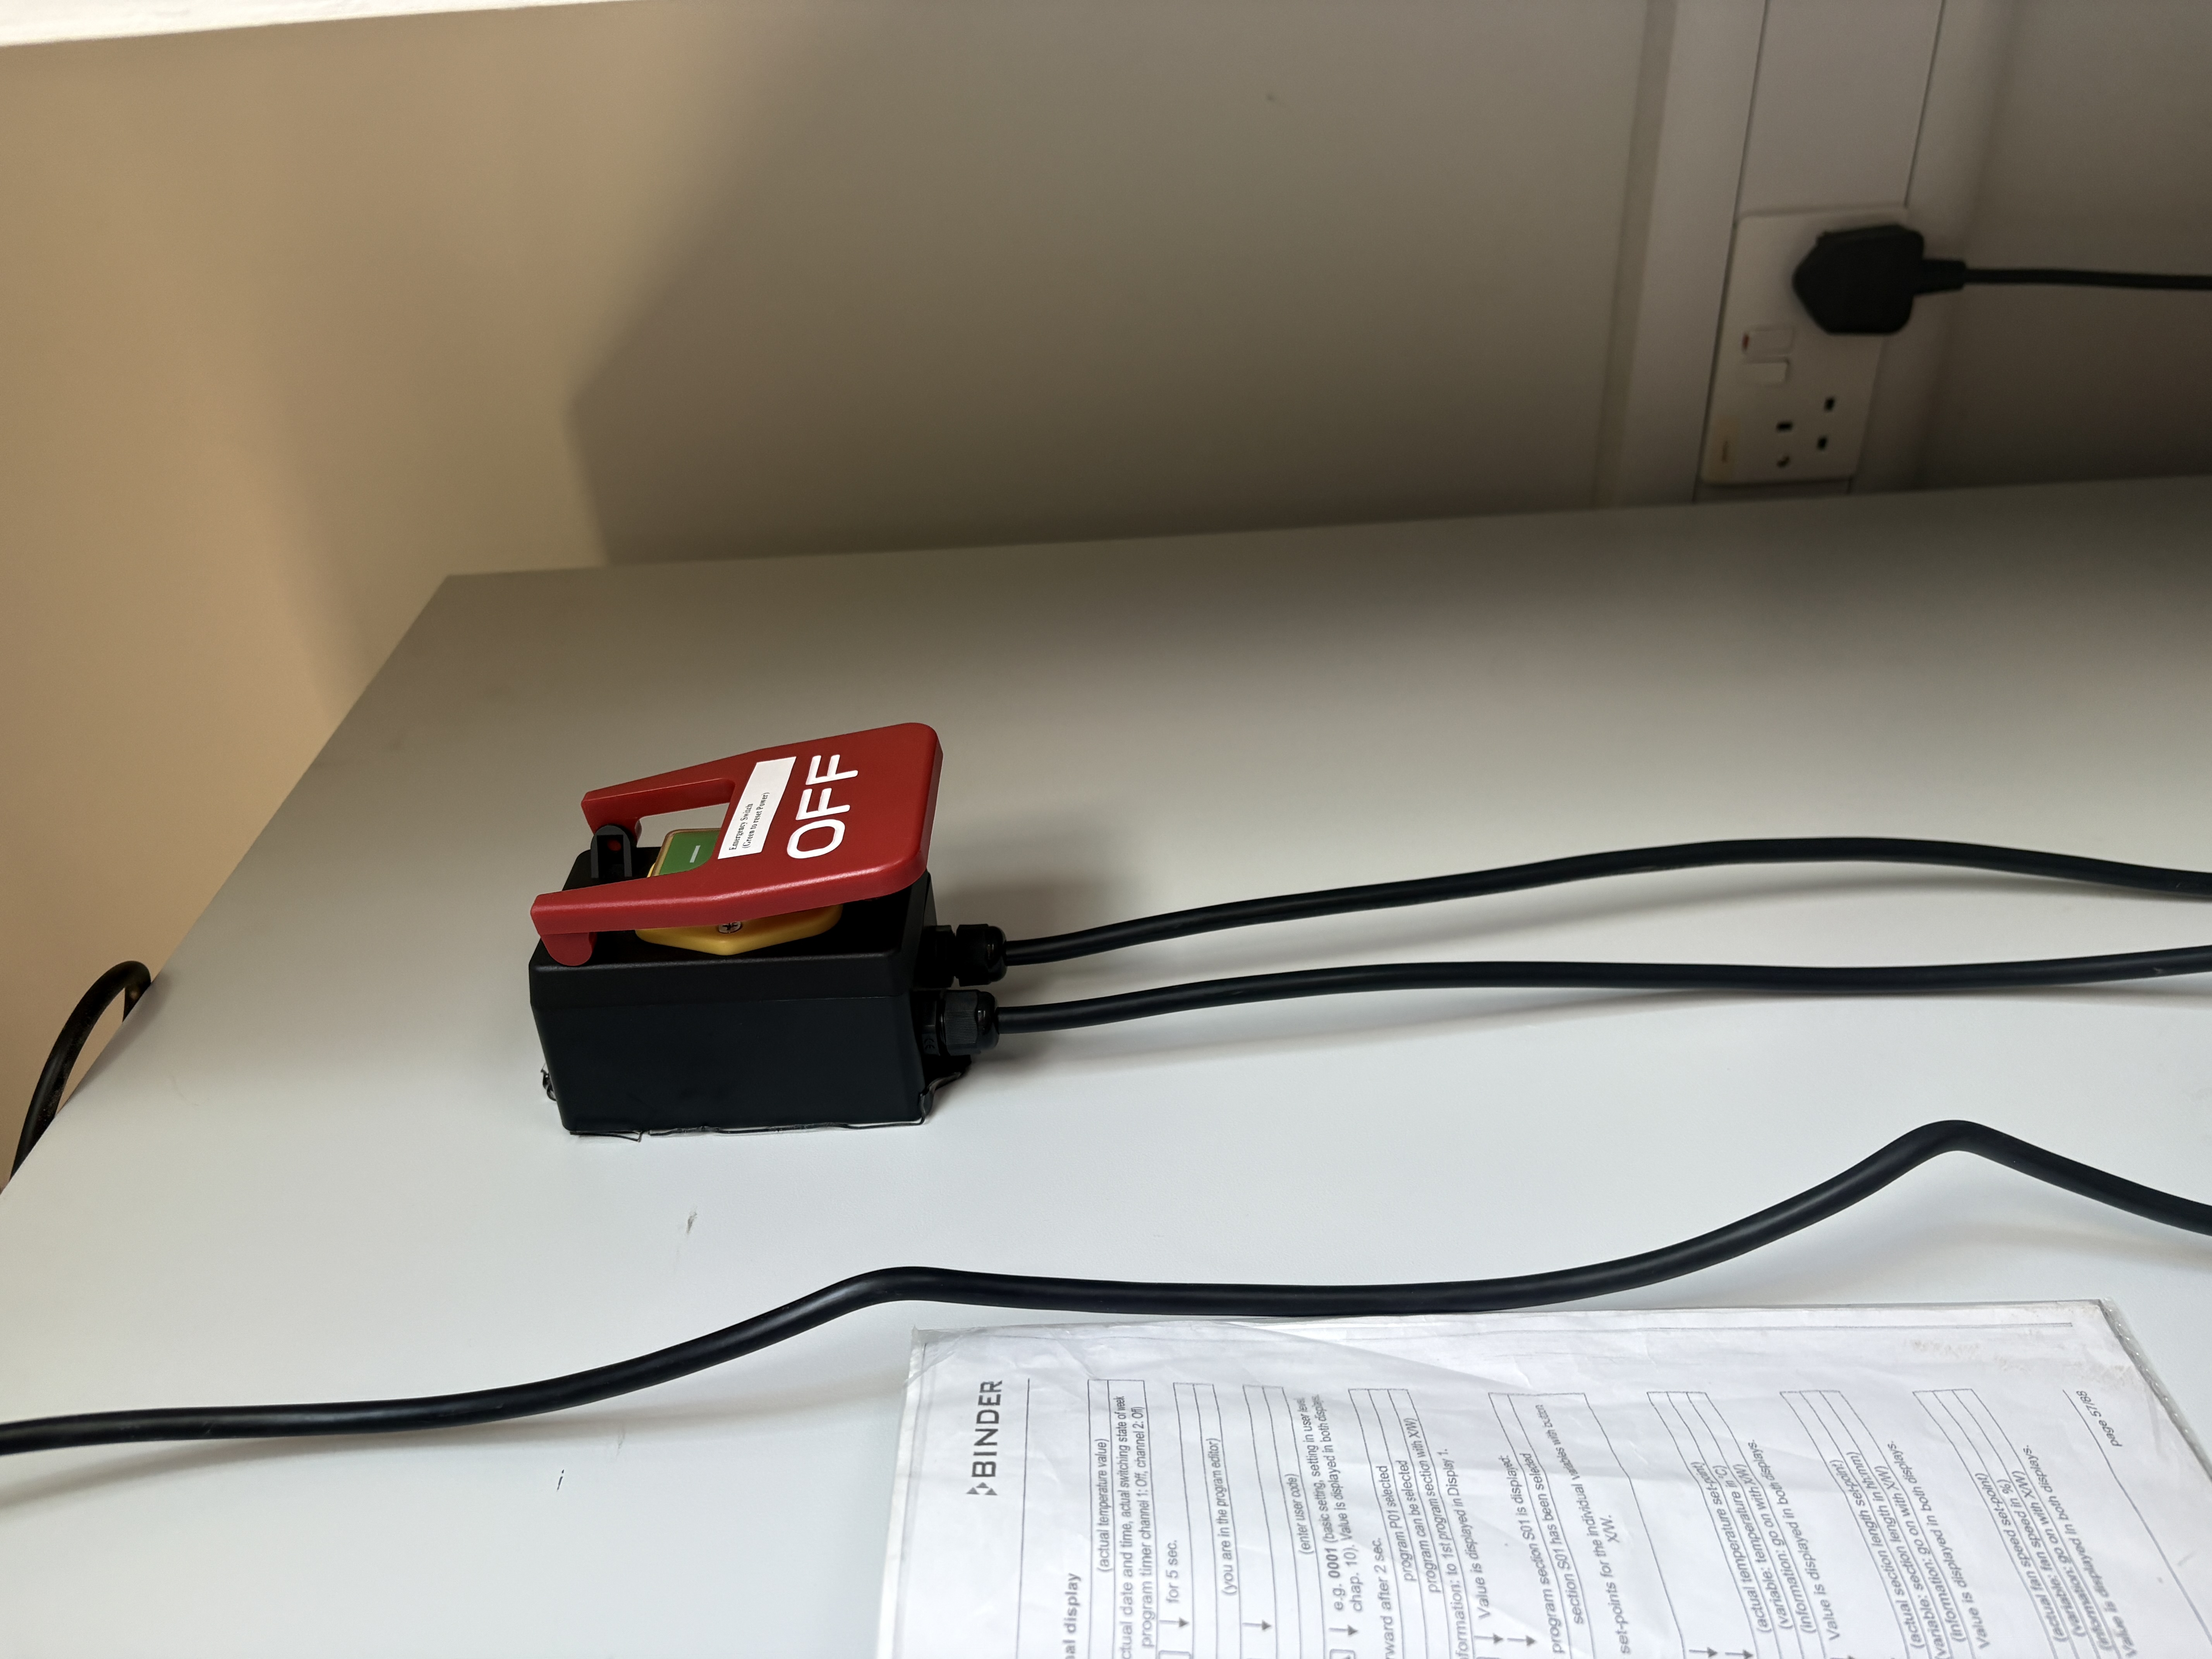
- Confirm the hardware emergency stop (AC-side latching switch) works — press it, verify all motion ceases and all power indicators go off. Reference photo: hardware/images/estop.jpg.
- Confirm Klipper and Moonraker are running:
systemctl status klipper moonraker. - Confirm
AUTOMATOR_ADMIN_PASSWORDandAUTOMATOR_SESSION_SECRETare set in the systemd unit file. - Confirm
automator-buttons.serviceis running and uses the same admin password asautomator-controller.service. - If email notifications are used, confirm the Pi can reach
smtp.nbi.ac.ukon port 25:nc -vz smtp.nbi.ac.uk 25. - Confirm routing is correct:
ip route get 8.8.8.8should go viawlan0. - Confirm QR PDF download works from
/by adding one QR code and clicking Download PDF Sheet. - Confirm normal-user direct MacBook access works from
http://192.168.50.2:8080/. For admin desktop checks, confirmhttp://127.0.0.1:8080/works from the Pi desktop browser. - Run one complete imaging cycle with a single test plate. Confirm the image appears in
/home/pi/Automator/data/.
11. Rebuild from scratch
Option A: Same hardware, same configuration
Follow sections 4.1 through 4.16 in order. Keep the repository at /home/pi/Automator/. Run the takeover checklist in section 10.
Option B: New or different hardware components
Start from a clean clone of the repository and work through the installation in order, but update each layer where the hardware differs:
- Update
config/printer.cfgfor any new pin assignments, motor parameters, or axis limits. Validate Klipper motion independently before running the Automator controller. - Update
dev2/doorsense.pyif the door sensor pin changed. - Update
dev2/led.pyif the LED relay pin changed. - Update
dev2/button_listener.pyif button GPIO pins changed. - Re-run workspace calibration with
dev2/calibration.py. Confirm a validdata/calibration.jsonexists before attempting a full imaging run. - Validate the USB camera detection pipeline: run
dev2/qrtest.pyand confirm QR codes are readable. - Validate the Pi camera capture path: run a test capture and inspect the output.
- Test all safety paths before production use: pause, resume, physical AC-side emergency stop, door-open interrupt.
A new build should be accepted only after all items in the acceptance checklist above pass.
12. Technical support
For code, system, or hardware problems:
- Dan MacLean: dan.maclean@tsl.ac.uk
- Rohan R: phonics-tiffs1i@icloud.com
For network, IT, or access permission issues: christopher.rickett@tsl.ac.uk
Repository: https://github.com/rotsl/Automator
For detailed runbook procedures, commissioning checklists, and acceptance tests, see RunBook.md.